
What does the “Advanced Options” functionality do?
The “Advanced Options” functionality allows you to review or change some view, outline and general options.
Where can I change the “Advanced Options” for my project?
To make changes in the Advanced tab from the Options dialog, go to File – Options – Advanced.
What can I change in Advanced tab from Options dialog?
In Advanced tab from Options dialog you can set View options for time units (minutes, hours, days, weeks, months, years), Outline options (Intent name, Show outline number/symbol, Show summary tasks, Show project summary task) and General Options (Open last file on startup, Show Highlight, Recently used file list, Collaboration Timeout, Check Spelling).
How can I highlight the cells?
To highlight cells, go to File - Options - Advanced tab - Check Show Highlight.
How to clean recent files list in Project Plan 365?
To clear the recent file list, go to File - Options - Advanced tab and uncheck the Recently used file list. Then restart the application.
How do I change the number of files that appear in the recently used files?
To change the number of files that appear in the list of recently used file, go to File - Options – Advanced – select the number of files you want to display.
How do I change the collaboration timeout?
You can customize the inactivity period before the file in real-time collaboration mode closes. In order to do that, go to the File menu - Options. Select the Advanced tab and from General Options, customize the Collaboration Timeout as you desire. For changes to take effect, click OK. The minimum value for the collaboration timeout option is 5 minutes and the maximum is 120 minutes.
How to enable the spell check feature on Windows?
The spell check feature on Windows is enabled by default. If the spell check feature is disabled, please go to the File menu - Options and in Advanced tab make sure that the Check Spelling box is checked.
How do I remove the WBS?
If the WBS number is present on Task Name, to remove it, please go to menu File - Options and in Advanced tab uncheck the Show outline number option. If you want to remove the WBS column, right-click on the header of the column and click on Hide Column.
How do I roll up to a total project % complete?
To change the % complete for the entire project, please insert the project summary task in your plan by going to menu File – Options - Advanced tab and check Show project summary task. Then, in the Gantt Chart view, change the percent complete for the project summary task.
Where is the Outline Number?
In order to see the outline number, you can either insert the WBS column or you can go to menu File -Options and in Advanced tab check the Show outline number option. The outline number will appear in the Task Name column.
How to total up the duration?
In order to see the total project duration, please insert the project summary task by going to menu File -Options and in Advanced tab check the Show project summary task option.
What does the “Help” button inside the “Advanced tab – Options dialog” do?
The “Help” button inside the “Advanced tab – Options dialog” redirects us to the “Advanced Options” article in our Online Help page.
It is possible to hide summary tasks?
In order to hide the summary tasks from your project, go to the File menu - Options - Advanced tab. Uncheck the "Show summary tasks" checkbox and click "OK".
Why the start of the tasks appears as 9:00 AM even though project schedule is set to start at 8:00?
You need to set the working hours in both Options dialog under Advanced tab and in Change Working Time dialog (menu Project-Change Working Time) for each day.
How do I change the start date for Task 0?
We are sorry but the Start and Finish fields for the task with ID 0 aren't editable in grid. If you want to edit the Start date of your project, you can use the Move Project option. For more information about the Move Project functionality, please read the Move Project article.
How can I add outline numbers to the tasks?
In order to see the outline number, go to the File menu – Options and click on “Advanced” tab. After that, check the “Show Outline Number” option and click on “OK” button.
Where can I set the initial schedule details of the project?
In order to set the initial Schedule details for your project, go to the File menu - Options, select the "Schedule" tab, make the desired changes and press "OK" for the changes to take effect.
Step by step on how to set advanced options:
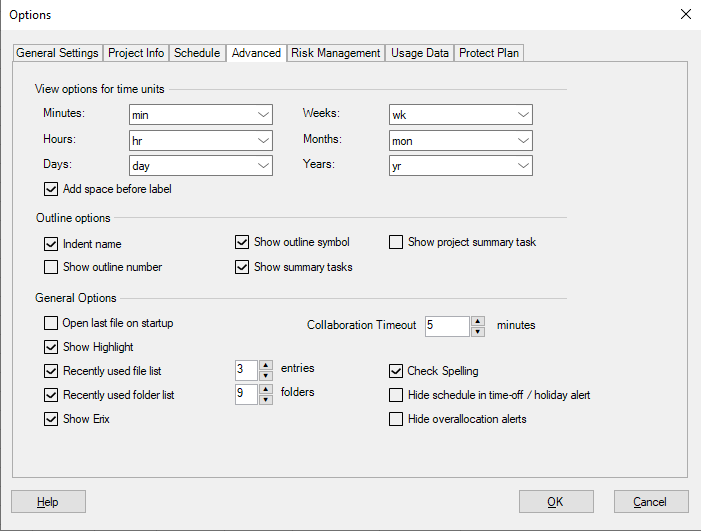
- View Options for time units
- Use this section to modify how time units appear in the project.
- Outline Options
- Use this section to view outlining options. Outline options are local settings and apply only to the active project.
- Indent name - Indents the names of subtasks in the Task Name column. By default, this box is checked.
- Show outline number - Displays the outline number next to each task name. By default, this box is unchecked.
- Show outline symbol - Displays outline symbols next to each task name. Shows a plus sign next to rolled-up summary tasks and a minus sign next to summary tasks showing their subtasks. By default, this box is checked.
- Show summary tasks - Displays summary tasks. If you clear this check box, tasks that have subtasks are hidden from view. Note that you cannot use outlining commands when summary tasks are hidden. By default, this check box is selected.
- Show project summary task - Specifies whether you want to display a project-level summary task. This task has an ID of 0. By default, this check box is cleared.
- General Options
- Use the General Options section to review or change your preferences for the general. You can view general options globally for the application as a whole or locally for the current project.
- Open last file on startup - Automatically opens, upon starting application, the last project file that you used. When this check box is cleared, the application starts empty. By default, this check box is cleared.
- Recently used file list entries - Sets the number of recently opened project files that are listed at the bottom of the File menu. By default, the File menu lists the names of the last 9 project files opened.
- Show Highlight – When checked, creates a hoover effect over items.
- Collaboration Timeout – It is the inactivity period before the file in real-time collaboration mode closes. The minimum value for the collaboration timeout option is 5 minutes and the maximum is 120 minutes.
- Check Spelling – Checks for misspellings in the project’s text.
- Show Erix - When unchecked, disables Erix.
- Hide Schedule In Time-off/Holiday alert – hides the time-off/holiday alerts that appear when a team member is schedule to work during time off/holiday;
- Hide overallocation alerts – hides the overallocation alerts that appear when a team member is overallocated;