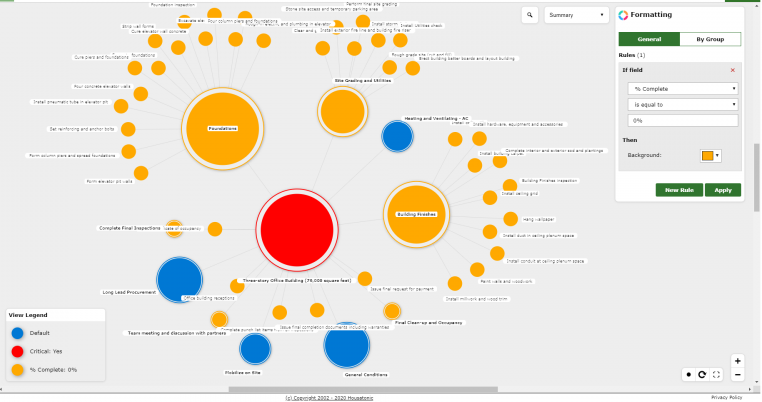
What is Bubble View?
Bubble View offers a dynamic and colorful visualization of your project. It allows you to easily visualize tasks based on certain task field values (i.e. Duration, Status, Critical, Milestones, Cost). You can either use the built-in groups to group your tasks based on specific criteria (i.e. task status), which will conveniently colorize the tasks based on their group, or provide your own formatting rules based on task fields value.
How do I use the Bubble View?
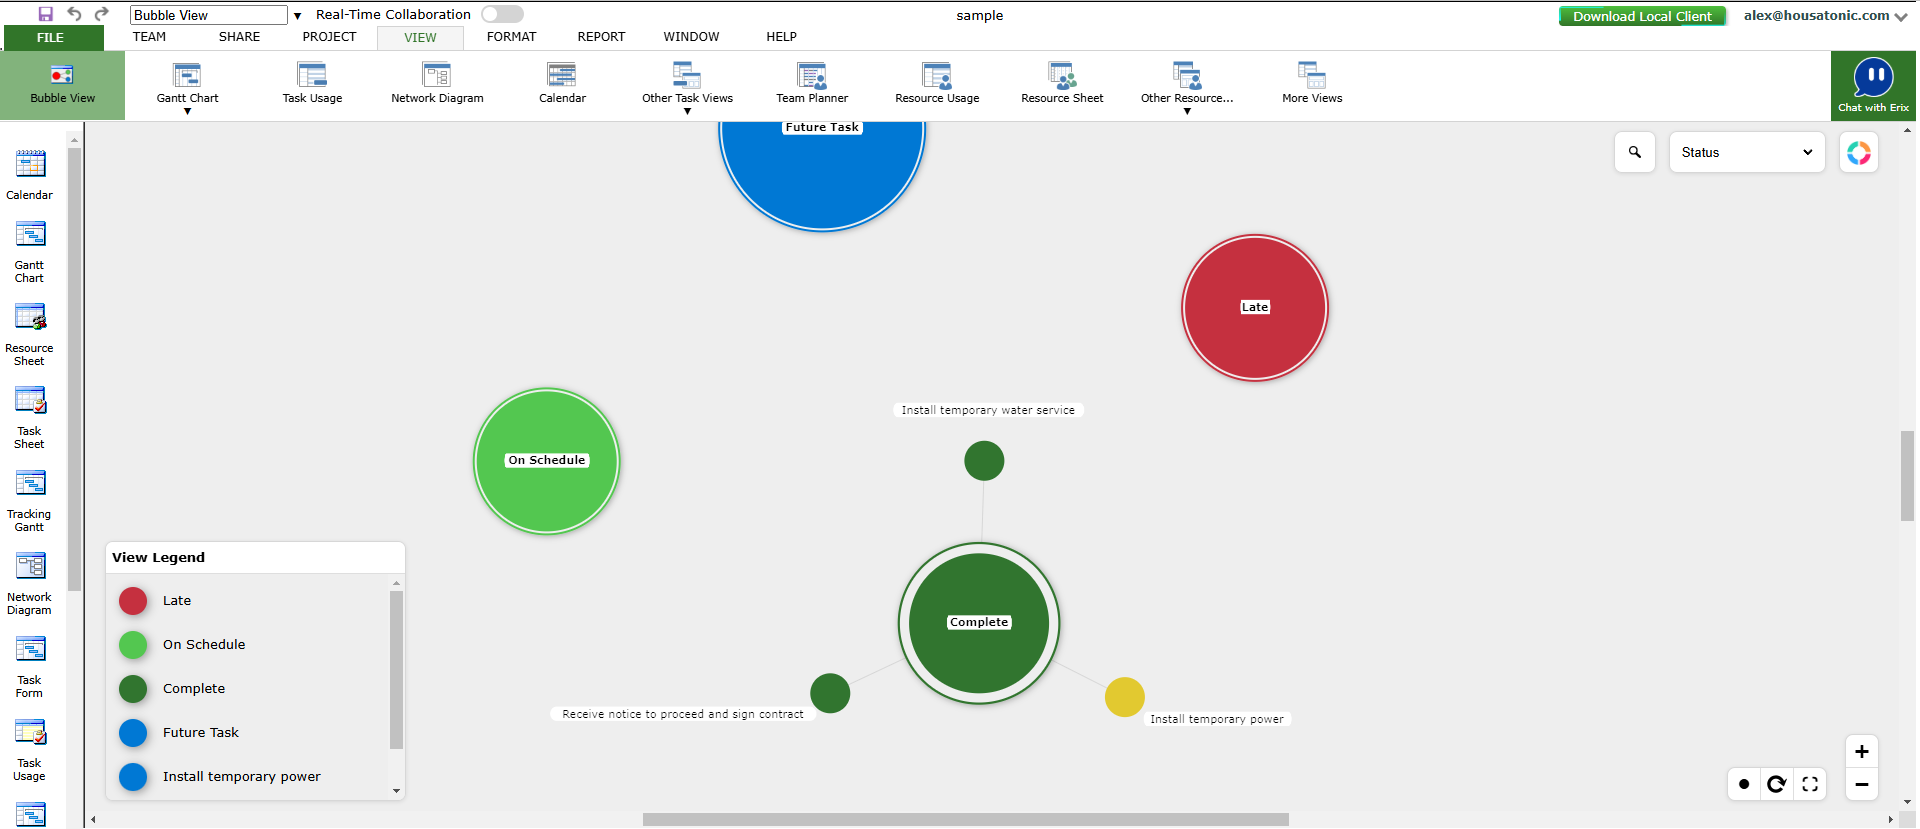
Bubble View is available for all your projects, you just have to access it from the left side View Bar. Once you clicked on Bubble View button, you will see the default Bubble View, which will open on Status group.
Can I apply filters on Bubble View?
You can apply filters on the Bubble View, so you can focus easily on the tasks that you are interested in. In order to apply a filter, select the Filter option under Project menu, and select a filter from the list. To apply a filter that isn’t in that list, click More Filters, select a filter from the dialog and then click Apply.
What do the bubbles represent in this view?
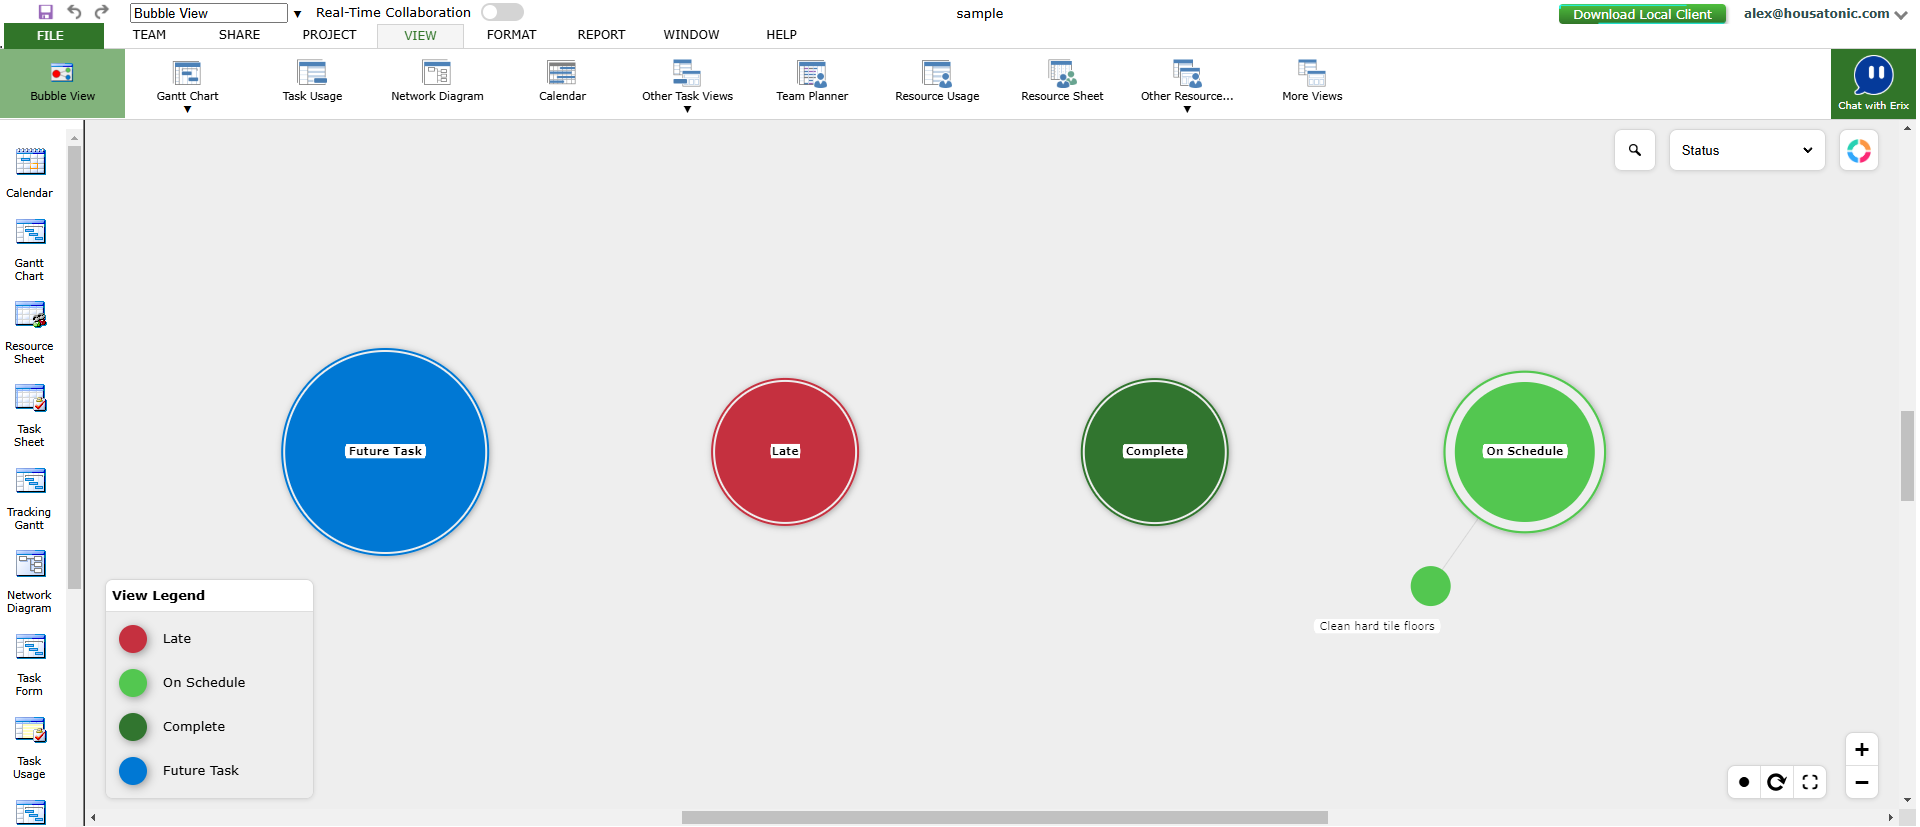
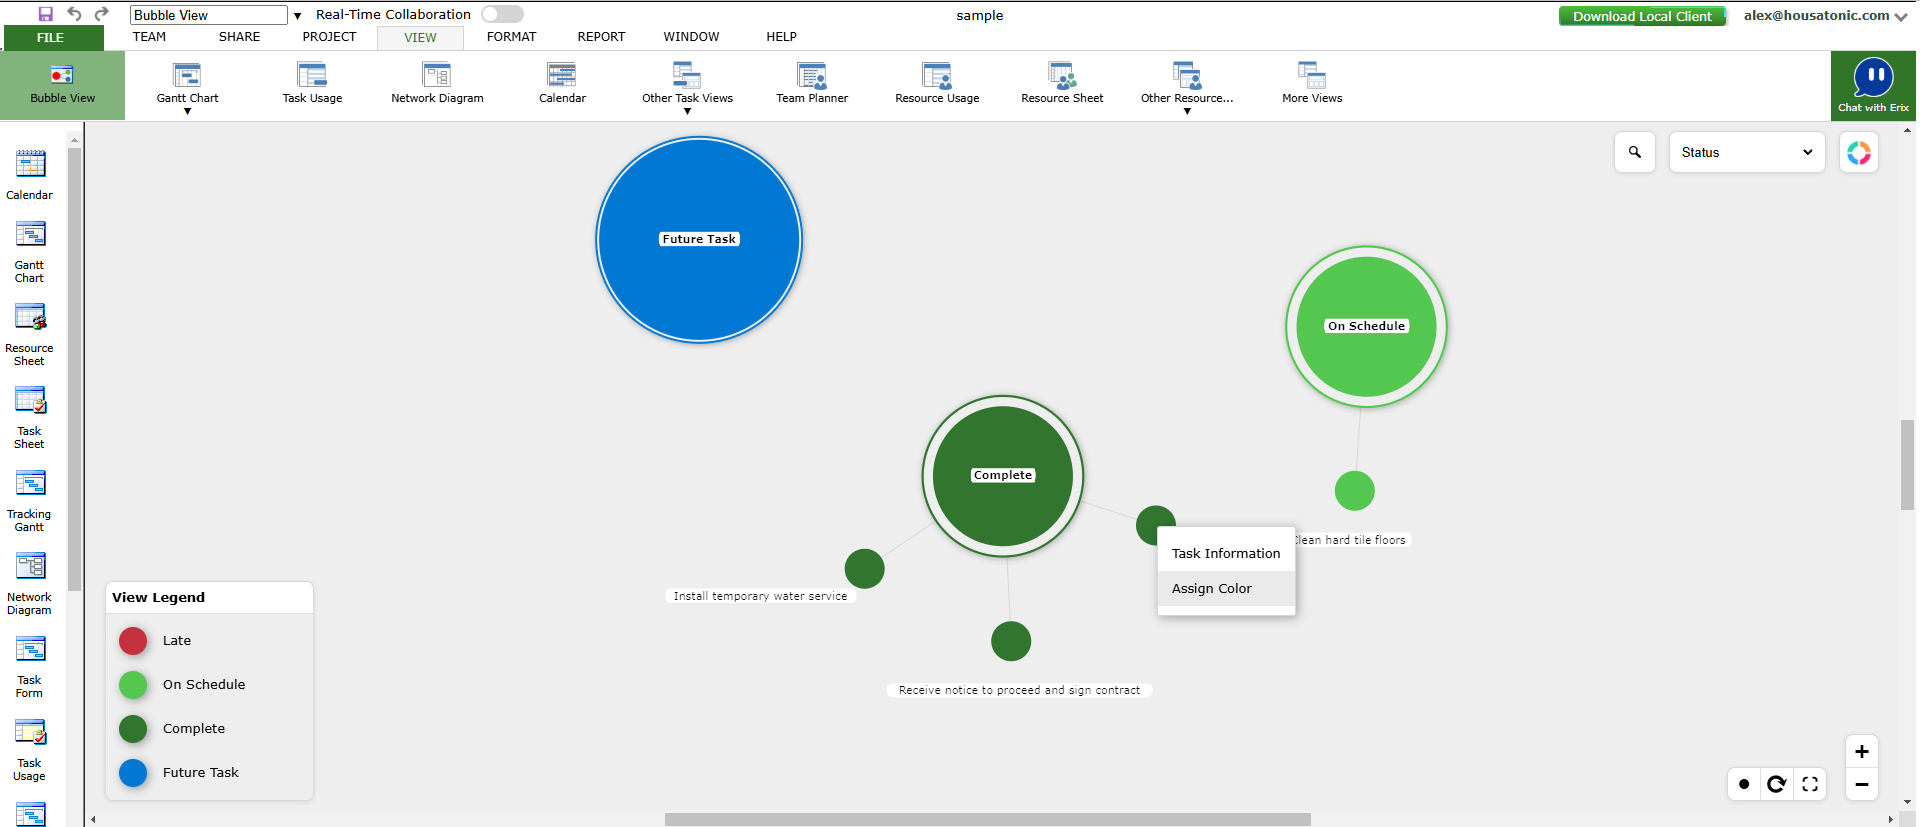
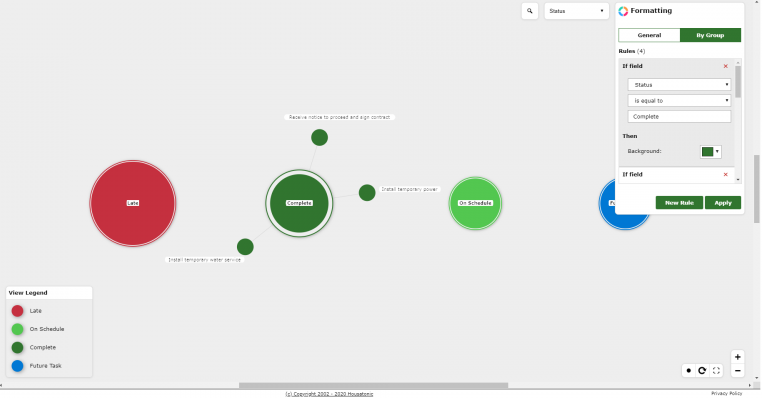
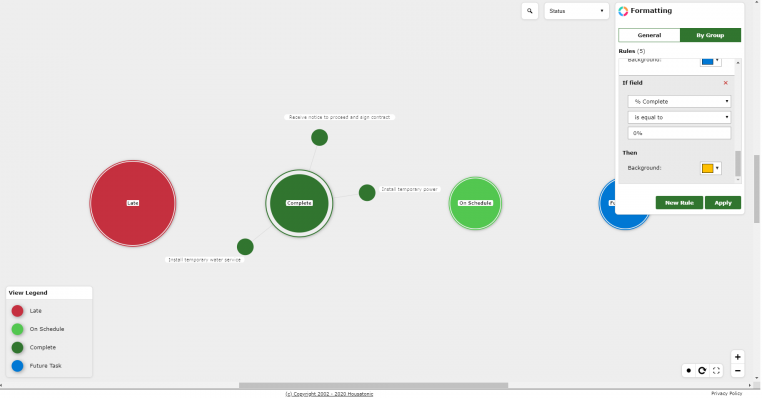
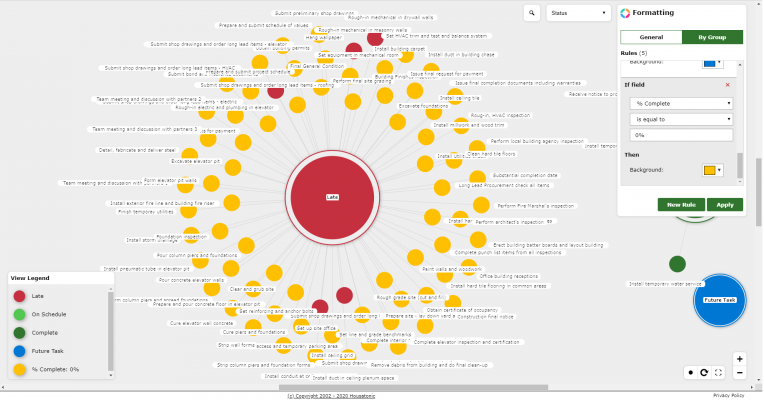
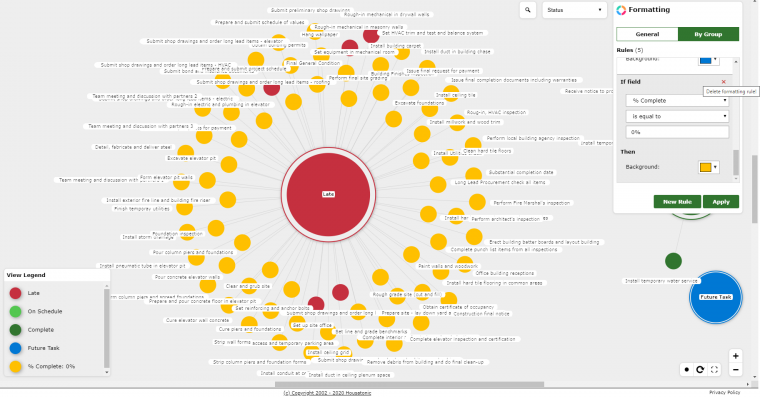
All tasks are represented as bubbles of different sizes and colors. The size of a group / summary bubble is given by the number of subtasks contained - big bubbles represents lots of subtasks. The color of a bubble is given by the group or by formatting rules that matches the task.
How can I expand or collapse the bubbles?
You can click on summary bubbles / groups to expand or collapse them.
What is “View Legend”?
“View Legend” shows the styling for bubbles in the current visualization. It can be collapsed / expanded by click on View Legend. View Legend is automatically updated to reflect the formatting rules for the current visualization.
How can I search for a specific task in Bubble View?
You can search for a specific task in Bubble View by clicking on the search icon from the upper right side of the view. The search icon expands a search box that will help you search for a specific task name. The view is centered on the result you clicked. Pressing the “Enter” key will automatically go to the first result.
How can I change the group in Bubble View?
In order to change the group in Bubble View, click on the Group box from the right-upper side of the view. A dropdown will appear which provides a list of built-in groupings that will help you better organize your visualization.
How can I center the Bubble View?
You can center the Bubble View by pressing on the “Center” button which can be found in the right-bottom side of the view. Also, the view can be centered by pressing the “spacebar” key.
How can I enable the full screen mode in Bubble View?
In order to enable the full screen mode in Bubble View, you can click on the Full Screen button from the right-bottom side of the view. Also, the Full Screen option can be found in Window menu.
How do I zoom in or zoom out in Bubble View?
You can zoom in/zoom out in Bubble View using the zoom control buttons from the right-bottom side of the view. Also, you can use the mouse scroll to zoom in/zoom out in the view.
How can I reset the Bubble View?
The “Reset” option allows you to revert to the initial view. In order to reset the Bubble View, you can use the Reset button from the right-bottom side of the view.
How do I move a task bubble in the view?
The position of a task bubble cannot be changed permanently. It can only be moved in the view but it cannot be saved in the new position. In order to move a task bubble in Bubble View, click on the bubble, then hold and drag it in the new desired position.
How can I see more information about a task or group?
In order to see more information about a task or a group, move the pointer on the desired task bubble and an information card will appear.
What are the information about a task/group that I can find in Information Card?
In the information card you can find the following elements about a task/group:
1. Task / Group Name
2. Task / Group Duration
3. Task / Group Start Date
4. Task / Group Finish Date
5. Task / Group Cost
6. Task / Group Progress (% Complete)
7. Task Status (Late / On Schedule / Complete / Future Task)
8. Summary tag (only for summary tasks)
How can I open the Task Information dialog for a task/group?
In order to open the Task Information dialog for a task, please double click on the desired bubble task. Also, you can open the Task Information dialog by right clicking on a task bubble and selecting Task Information option. The Task Information dialog isn’t available for Group bubbles.
How do I rename a task in Bubble View?
In order to rename a task in Bubble View, double click on the desired task bubble or right click on it to open/select the Task Information dialog. Type the new name of the task and press on “OK” button inside the Task Information dialog for the changes to take effect.
How do I assign resources to a task in Bubble View?
In order to assign resources to a task in Bubble View, double click on the desired task bubble or right click on it to open/select Task Information dialog. After that, go to the Resources tab, type the name of the resource and then click on “OK” button inside the Task Information dialog for the changes to take effect.
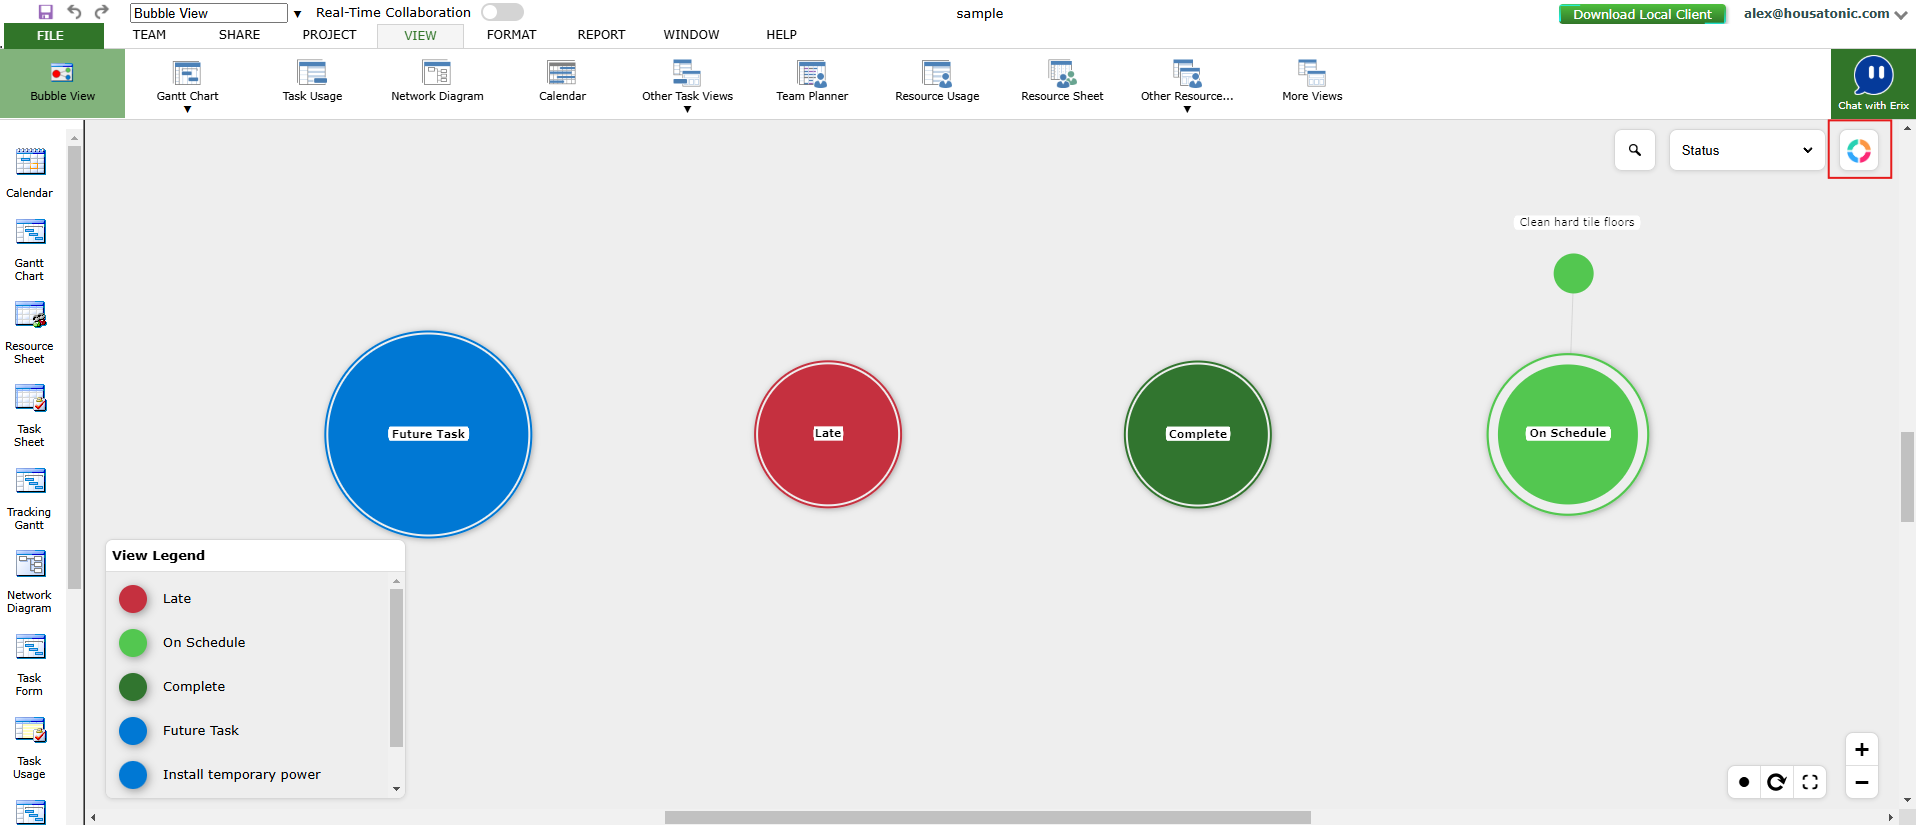
What does the “Status” group mean?
The “Status” group is the default grouping for the Bubble View. It shows the tasks in your project grouped by their Task Status field:
- Late
- On Schedule
- Complete
- Future Tasks
What does the “Summary” group mean?
The “Summary” group shows the WBS of your project. You can use this grouping to visualize the WBS of your project and provide color-code for different tasks / field values (using the Formatting Options). This grouping supports Project → Outline options.
What does the “Critical” group mean?
This grouping shows the tasks grouped as following:
- Critical
- Non-Critical
Critical tasks goes into the Critical group and other tasks goes into the Non-Critical group.
What does the “Progress” group mean?
The “Progress” group shows the tasks grouped based on % complete as following:
- Not Started – 0%
- In Progress – 1% to 99%
- Done – 100%
What does the “Milestones” group mean?
This grouping shows all milestones in a single group.
What does the “Risk” group mean?
The “Risk” group shows tasks grouped by their Risk Field value. Each group represents a distinct risk level. By default, there are three risk levels:
- low
- medium
- high
You can customize this through our Risk Management System.
What does the “Agile (Board Status)” group mean?
The “Agile (Board Status)” group shows tasks grouped by Board Status. The default groups are:
- Backlog
- Next up
- In progress
- Done
What does the “Resources” group mean?
The “Resources” group shows the tasks grouped by the resource assigned to the task. Each group represents a resource and the subtasks are tasks to which the resource is assigned. If no resource is assigned to a task, it goes into the Unassigned group.
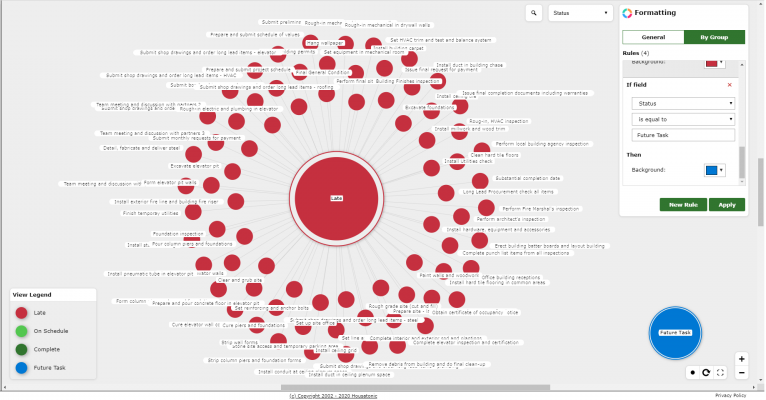
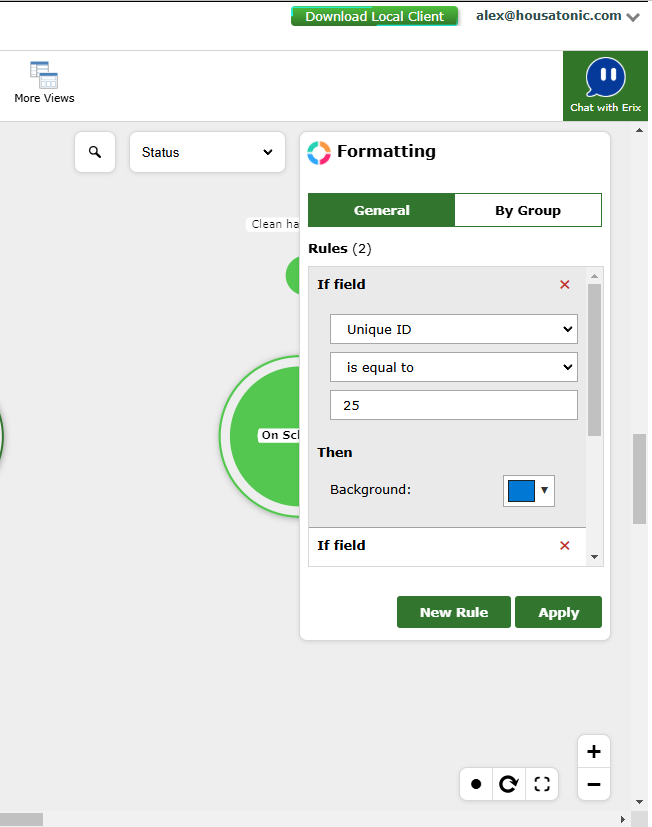
Where can I find the “Formatting” option in Bubble View?
You can find the “Formatting” option in the right-upper side of the view. Bubble View supports various formatting options. To access them, expand the Formatting Options window by clicking the Formatting Options icon.
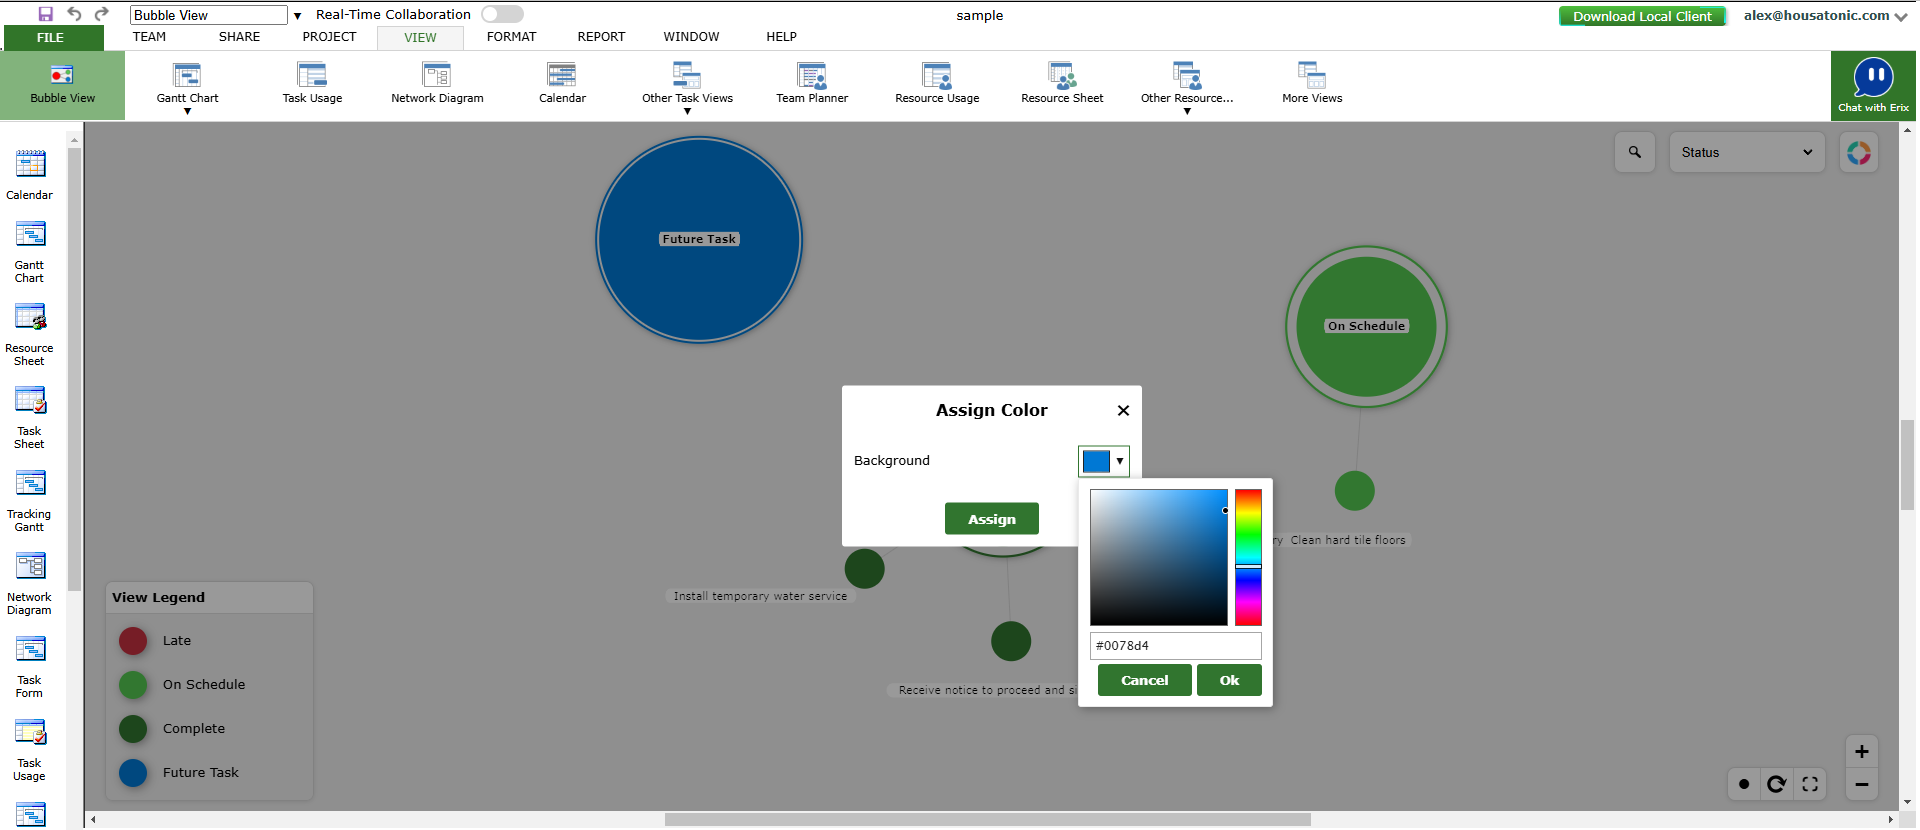
How can I track a specific task?
In order to track a specific task, right click on the task bubble and select the “Assign color” option. In the “Assign Color” dialog, select the desired color and click on “Assign” button. This will create a new General formatting rule for the Unique Id of the selected task. You can always modify or remove this formatting rule later.
How do I change the color of a predefined group?
In order to change the color of a predefined group, select the group from the right-upper side of the view, click on “Formatting” option and then select “By Group” tab. From “Background”, change the color for an existing rule and then press “Apply”.
Are the general formatting rules applied for all groups?
The general formatting rules are applied for all task bubbles, regardless the group.
Are the grouping formatting rules applied for a specific group?
The “By Group” formatting rules are only applied for task bubbles from the specific group.
What is the difference between “General rules” and “By Group” rules?
The difference between “General rules” and “By Group” rules is that the “General” formatting rules are applied for all task bubbles, regardless the group and the “By Group” formatting rules are applied only for the task bubbles from the selected group.
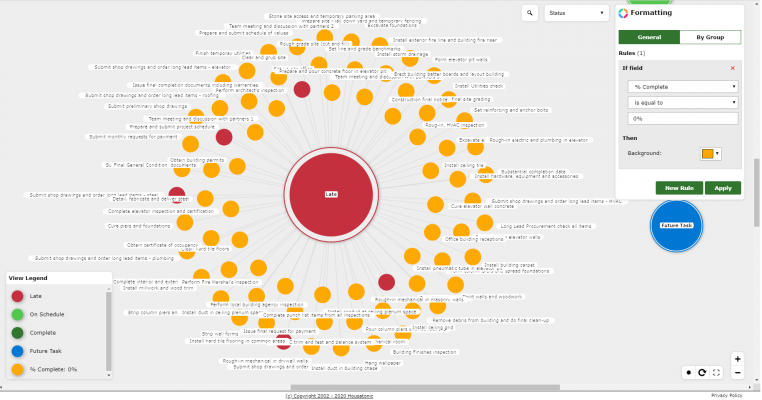
How can I add a new general rule?
To add a new general rule, open the Formatting Options dialog and make sure the General tab is selected. After that, click on the “New Rule” button. You can select the Task Field, test and provide the values for test. The new rule will apply for all tasks that pass the configured test.
What are the supported tests for the Formatting rules?
The supported tests for the Formatting rules are the following:
1. is equal to
2. is not equal to
3. is greater than
4. is less than
5. is greater than or equal to
6. is less than or equal to
7. is between (2 values)
8. begins with
9. ends with
10. contains
How to remove a formatting rule?
In order to delete a rule, simply click the X button corresponding to the rule. After you confirmed the action, click Apply to save the changes.
How to modify a formatting rule?
In order to modify a formatting rule, change the Task Field, test and value for an existing formatting rule and then click on “Apply” button for the changes to take effect.
How can I save the Bubble View as the default view?
We are sorry, but at this point the Bubble view can’t be saved as the default view.
How do I “Export to Image” the Bubble View?
In order to “Export to Image” the Bubble view, go to the File menu – Import/Export – Export and select “Export to Image” option. Type the name of the file and press “Save”. You can also use the “Export to Image” option from the “Share” menu. Go to the “Share” menu and click on “Export” option. Select “Export to Image” from the options available, type the name of the file and press “Save”.
How do I print the Bubble View?
We are sorry, but at this point the “Print” option isn’t available for Bubble View.
How do I “Export as PDF” the Bubble View?
We are sorry but the “Export as PDF” option isn’t available for Bubble View.
The “Bubble” view is missing from the application.
At this point, the “Bubble” view is available only for our Web application.
Step by step on how to apply the Bubble View:
- Go to the View menu – Bubble View.


2. The Bubble View is applied.
Step by step on how to assign a color to a task:
- Open Bubble View.
- Click on a bubble to expand it.
- Right click on a task and select “Assign Color” option.
4. Click on dropdown to select a color.
5. Click on “OK” and “Assign” buttons.
6. You will notice that the color of the task bubble has changed.
Step by step on how to create a new General rule:
- Open Bubble View.
- Click on the Formatting option from the right-upper side of the view.

- The Formatting dialog opens and the General tab is selected.
- Click on “New Rule” button and select Field, Test, Value and Color and press “Apply”.

- Expand a bubble and you will notice that the task bubbles that have % complete = 0% will have the color we selected. Also, the new rule we created, will appear in “View Legend” dialog.

Note: Remember that the General rules applies for all task bubbles, regardless the group. For example, if we change the group to “Summary”, we will notice that the new general rule that we created, has applied to the task bubbles from this group too.
Step by step on how to create a new “By Group” rule:
- Open Bubble View.
- Click on the Formatting option from the right-upper side of the view.
- The Formatting dialog opens and click on By Group tab.

- Click on “New Rule” button and select Field, Test, Value and Color and press “Apply”.
- Expand a bubble and you will notice that the task bubbles that have % complete = 0% will have the color we selected. Also, the new rule we created, will appear in “View Legend” dialog.
 Note: Remember that the “By Group” rules applies for the task bubbles, from that specific group. For example, if we change the group to “Summary”, we will notice that the new “By Group” rule that we created, wasn’t applied to the task bubbles from this group.
 Note: Remember that the “By Group” rules applies for the task bubbles, from that specific group. For example, if we change the group to “Summary”, we will notice that the new “By Group” rule that we created, wasn’t applied to the task bubbles from this group.
 Step by step on how to delete a rule:
1. Open Bubble View.
2. Click on the Formatting option from the right-upper side of the view.
3. Click on the “X” button corresponding to the rule.
4. Confirm the action by clicking “OK”.
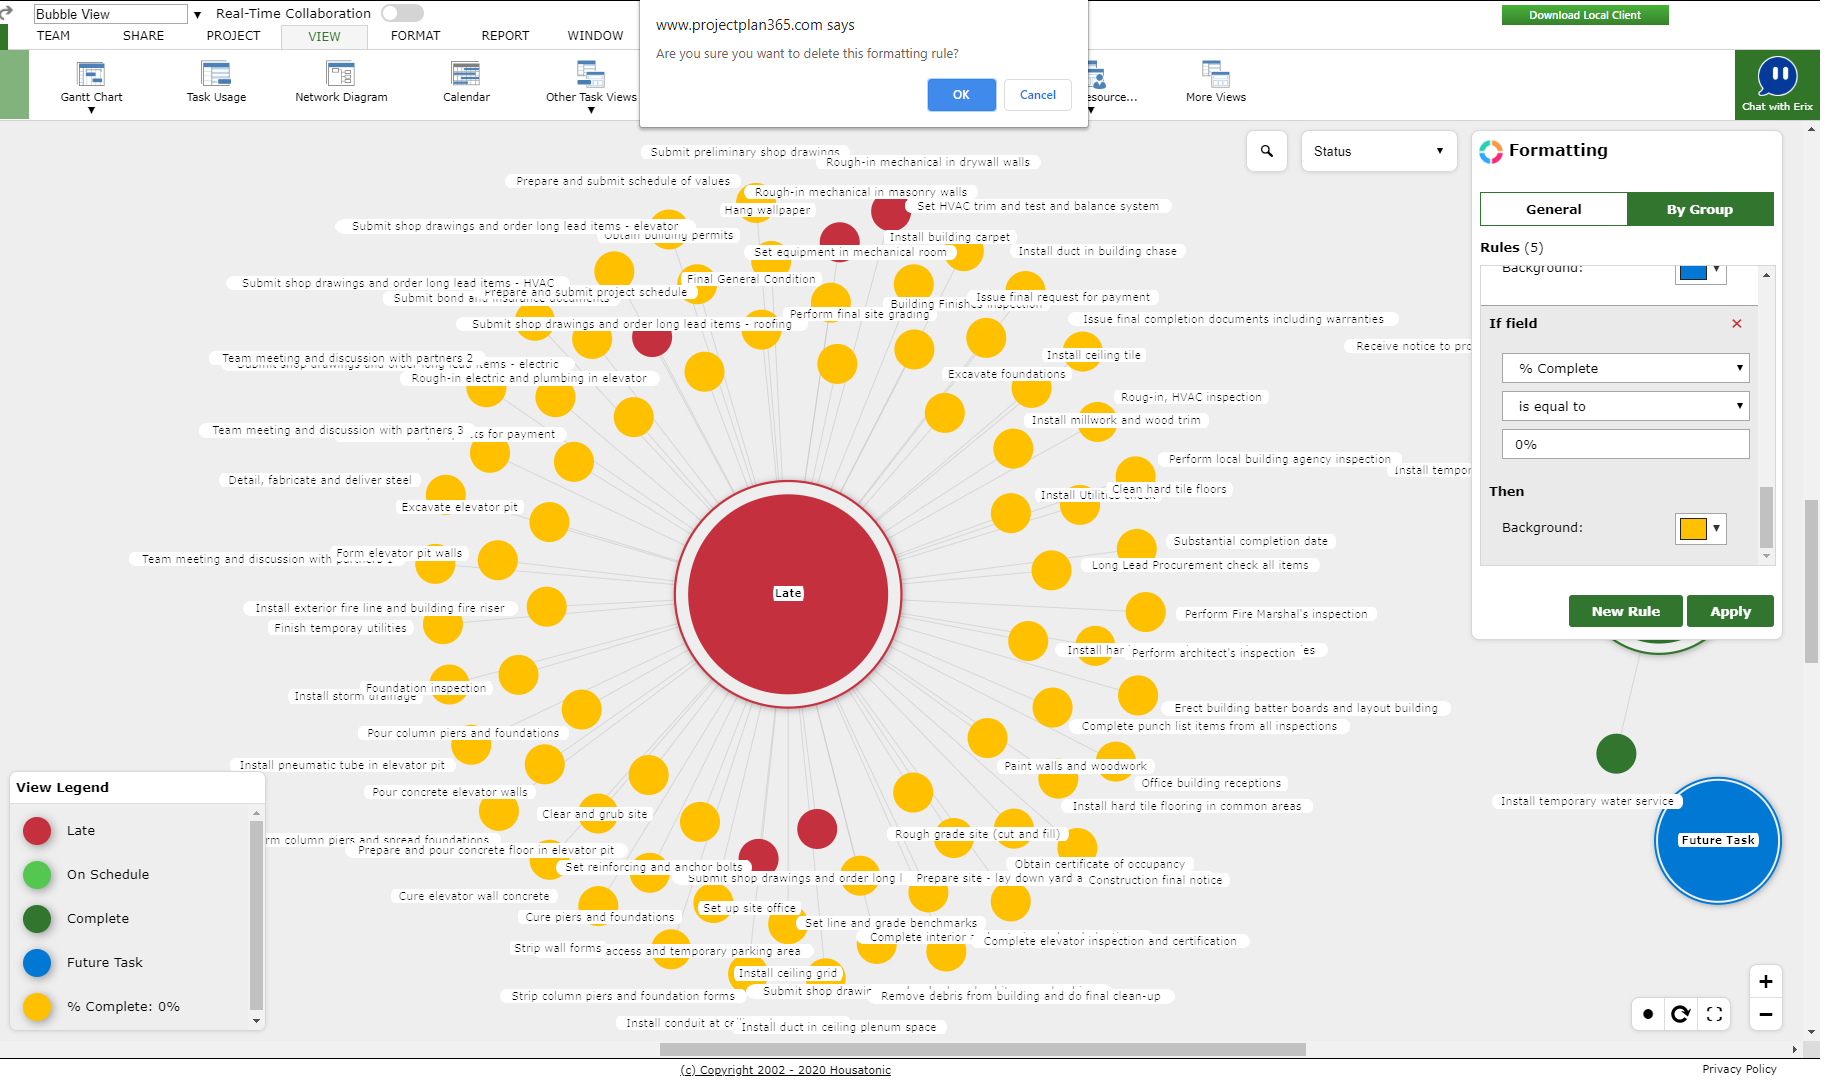
5. Click on the “Apply” button for changes to take effect.