
What does the “Export to Excel” functionality do?
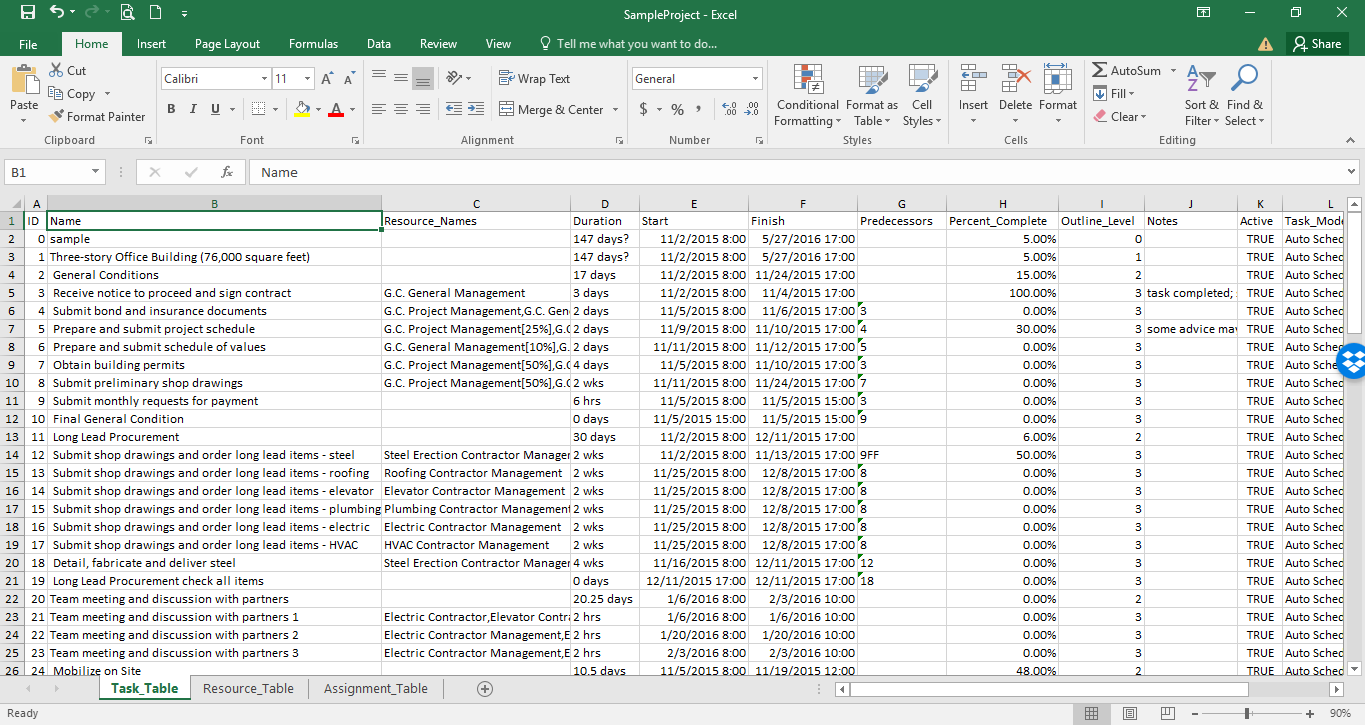
The “Export to Excel” functionality exports the information in a textual, comma-delimited format. The exported file can be opened in Microsoft® Excel or any text editor. This format exports the task or resource information in raw table format, with no formatting or outline information.
How do I export a project to Excel?
To export a project to an excel file follow these steps:
1. Open desired project file.
2. Open desired views (Gantt Chart, Tracking Gantt, Resource Sheet, Task Sheet, Team Planner).
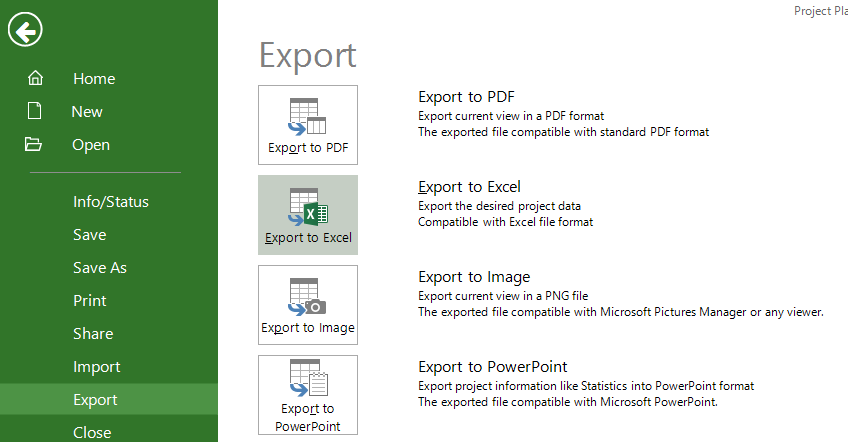
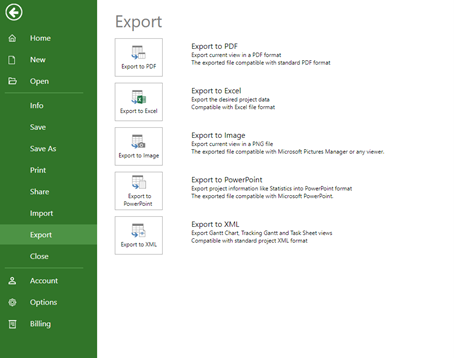
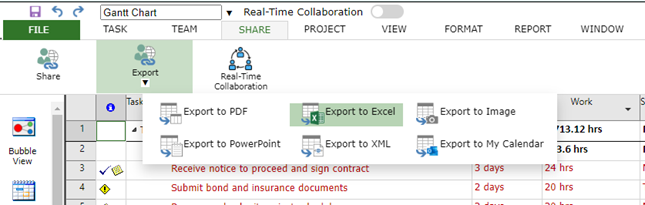
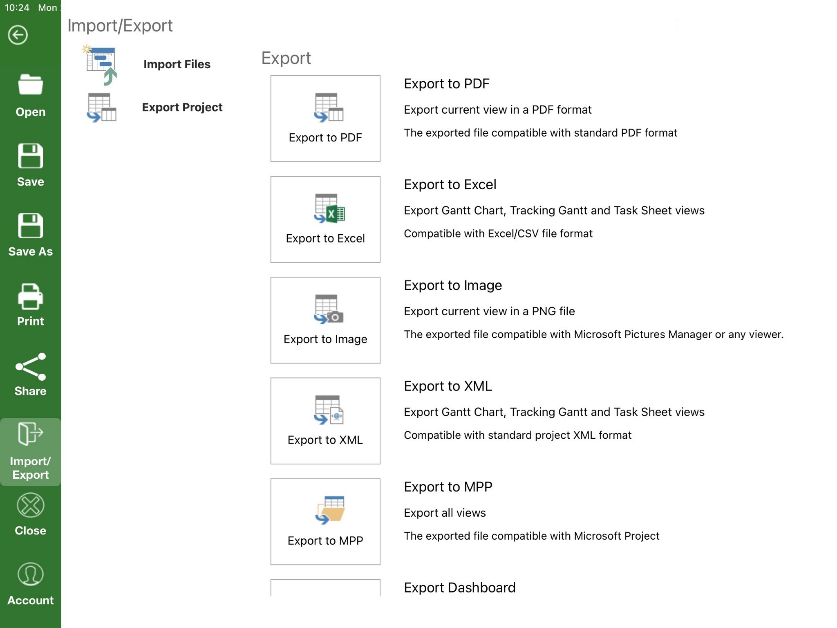
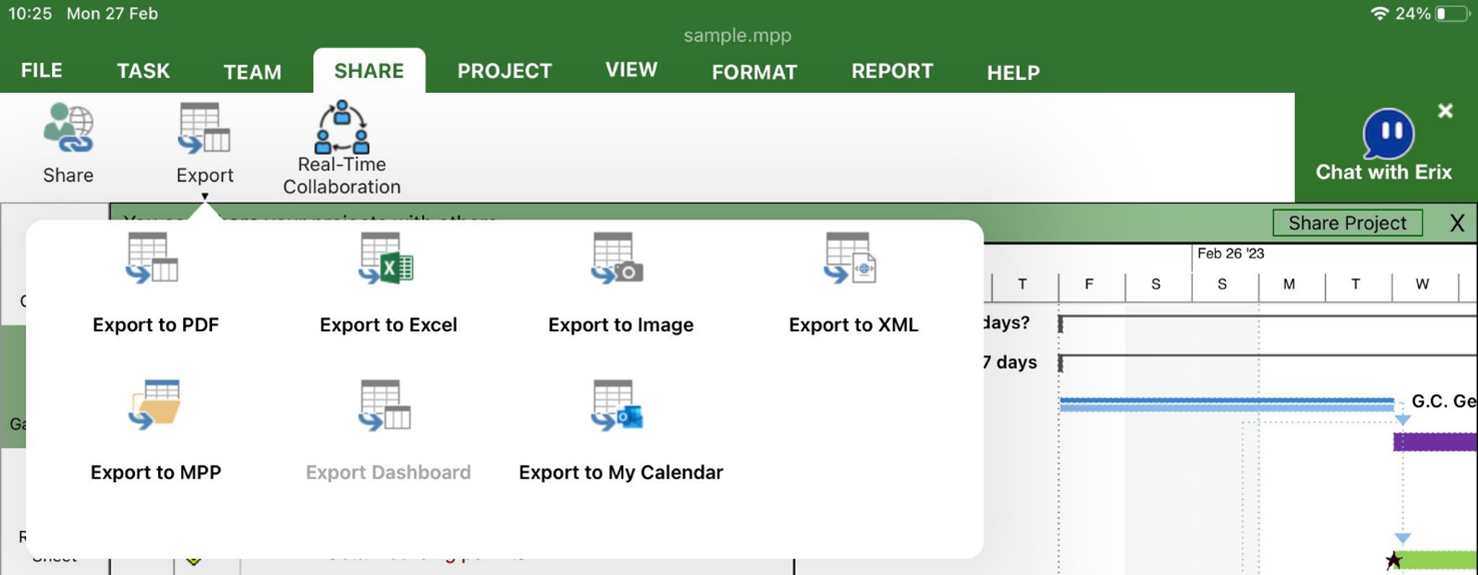
3. Go to menu File– Export – Export to Excel.
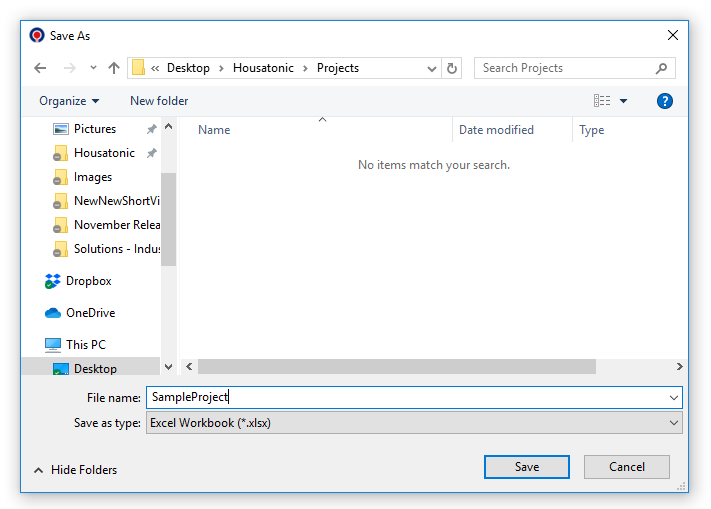
4. Select the desire file location and click Save.
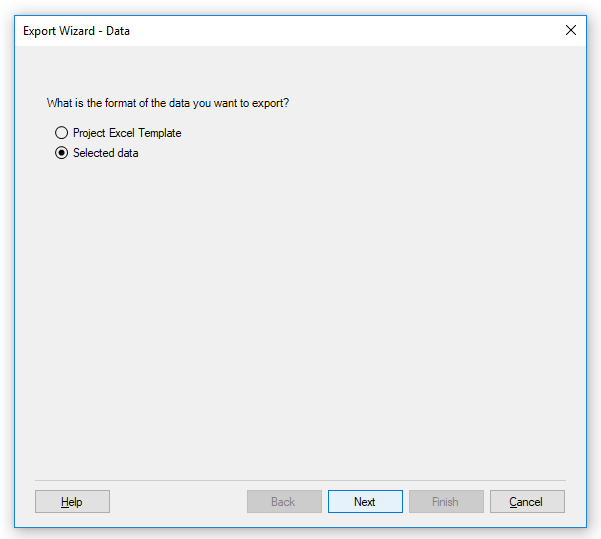
5. In the Export Wizard dialog that appears, select the desired option: Project Excel Templateor Selected Data.
6. Follow the steps from the Export Wizard and click Finish for the file to be exported in a .XLSX format.
Note: On iOS and Web platforms, when going to menu File – Export – Export to Excel, just select the desired file location and click Save. The project will be saved in .CSV format.
How can I export a project to Excel (CSV) using automatic command?
Exporting a project to Excel via an automatic command is only available on Project Plan 365 for Windows.
General command line syntax:
ApplicationName [/switch] projectpath
/csv – export to Excel file (CSV format) for default view (currently supported views are: Gantt Chart, Task Sheet, Resource Sheet and Team Planner).
Note: Using an automatic command can export projects to excel only in .CSV format.
How to export information to Excel/CSV using command?
Example for how to export to Excel a sample project from c:\my files folder with Project Plan 365:
ProjectPlan.exe /csv “c:\my files\sample.mpp”- this command will create sample.csv file in c:\my files folder.
For automation purposes, the following script sample can be used (exportCSV.bat):
@echo off
set PP="C:\Program Files (x86)\Housatonic\ProjectPlan365\ProjectPlan.exe"
cmd /c "%PP% /csv %1"
if %ERRORLEVEL% neq 0 (
echo Export error for %1
) else (
echo Successfully exported %1
)
Usage: exportCSV.bat projectpath
PP variable should be set to actual application path – export result will be displayed on the screen. The exported file will be added to projectpath location.
It is available for Gantt Chart, Tracking Gantt and Task Sheet views. By using this option, the content of the list of tasks will be exported in a CSV format.
Note: Using an automatic command can export projects to excel only in .CSV format.
What is Export schedule?
The export schedule is a functionality that converts a schedule from a format to another format than the one it is currently in.
What is Excel?
Microsoft Excel is a software program used to create spreadsheets.
How can I export to excel only the summary tasks?
In order to export to Excel only the summary tasks, you need to apply the "Summary Tasks" filter. In order to do that, go to the Project menu - Filter - Summary Tasks. After that, go to the File menu - Export - Export to Excel, type the name of the file and press "Save". Follow the steps from Export Wizard and click Finish.
Note: On iOS and Web platforms, when going to menu File – Export – Export to Excel, just select the desired file location and click Save. The project will be saved in .CSV format.
How can I export to Excel the Gantt Chart?
It is not possible to export to excel the Gantt Chart, but only the information about the tasks from the grid.
How can I keep the project structure when using the “Export to excel” functionality?
We are sorry but keeping the project structure when exporting to Excel, is not possible at this moment in our application.
I want to maintain the format of the Gantt Chart when exporting to Excel a .MPP file.
We are sorry but, at this point, it is not possible to export to Excel the Gantt Chart, but only the information about the tasks from the grid.
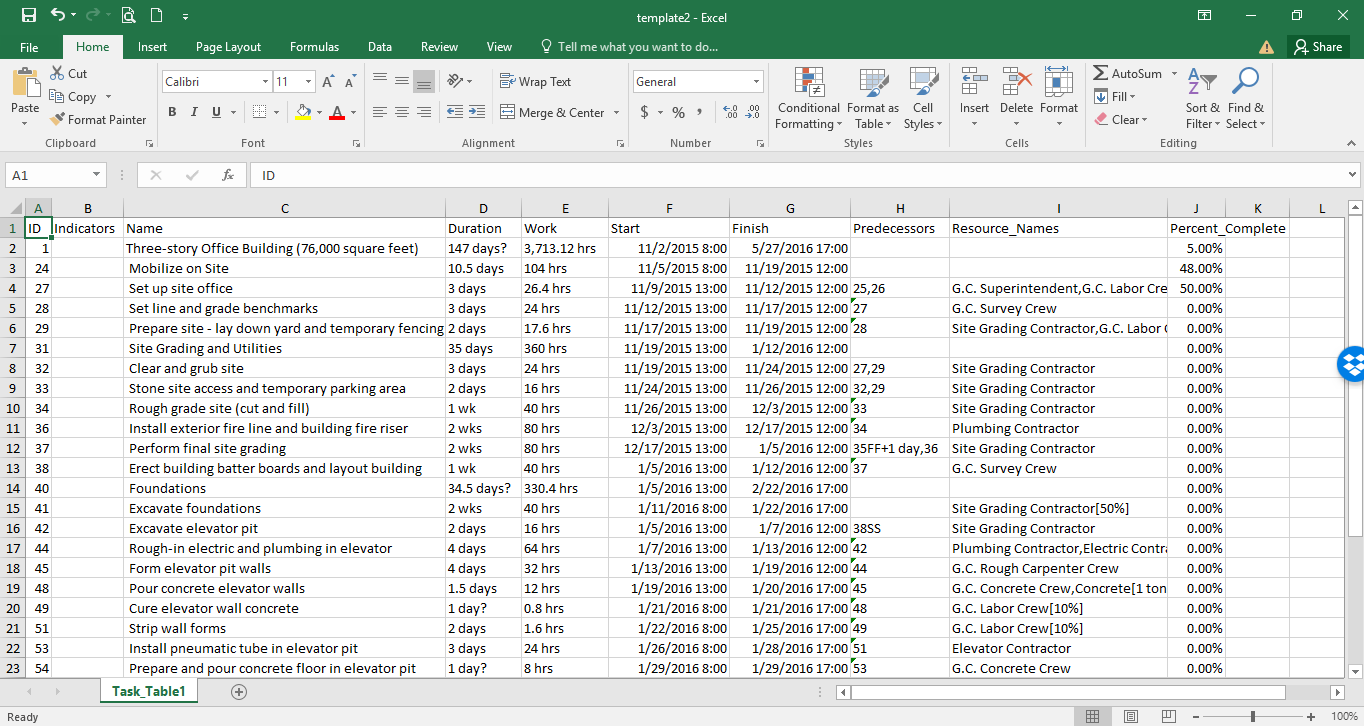
How can I export a project to Excel using a Project Excel Template?
To export to excel using a Project Excel Template on Windows and Mac platforms, for the desired project, go to menu File – Export – Export to Excel. Select a location, type in a name and click Save. In the Export Wizard dialog that appears, select the Project Excel Template option then click Finish. The project will be exported to Excel in .xlsx format based on a template.
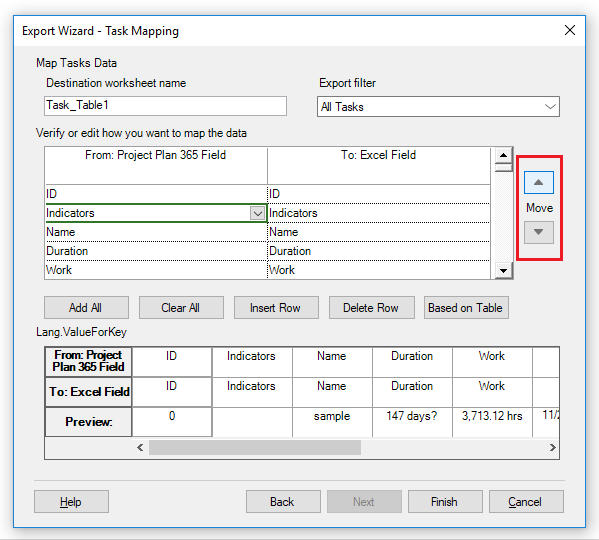
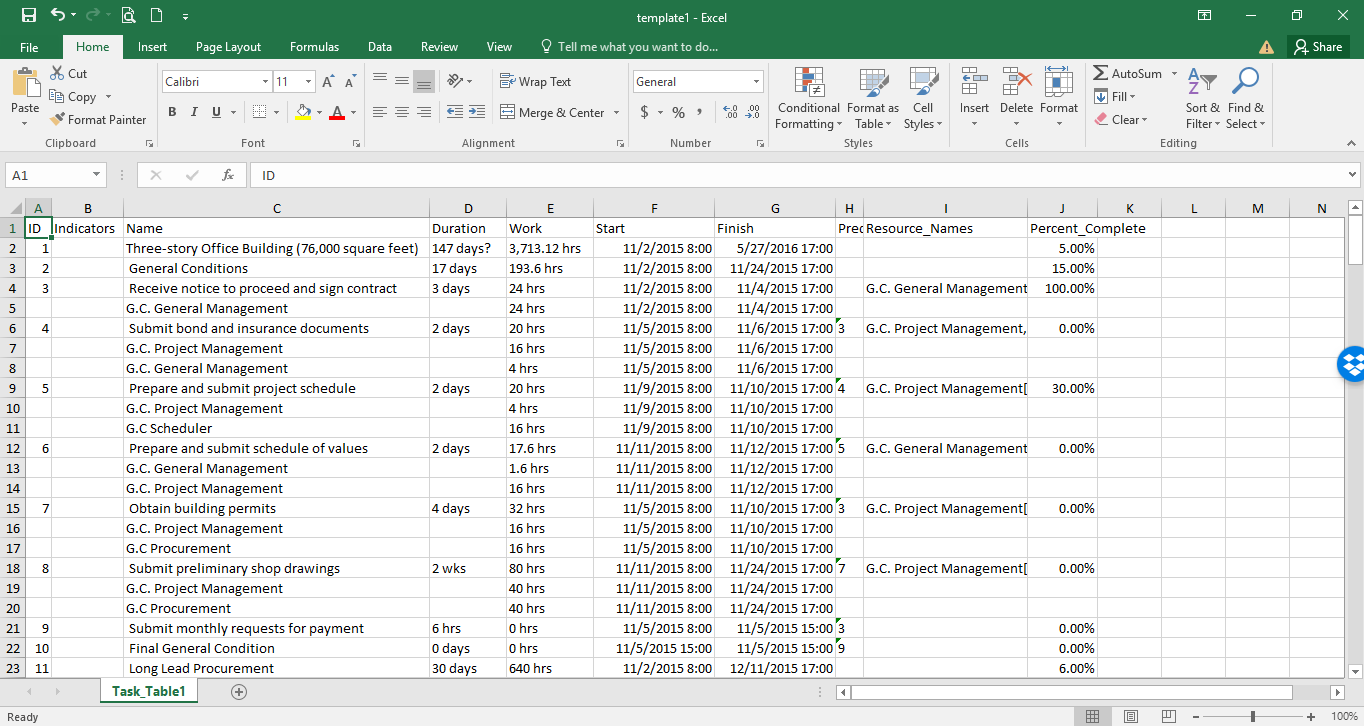
How can I export to Excel tasks from table?
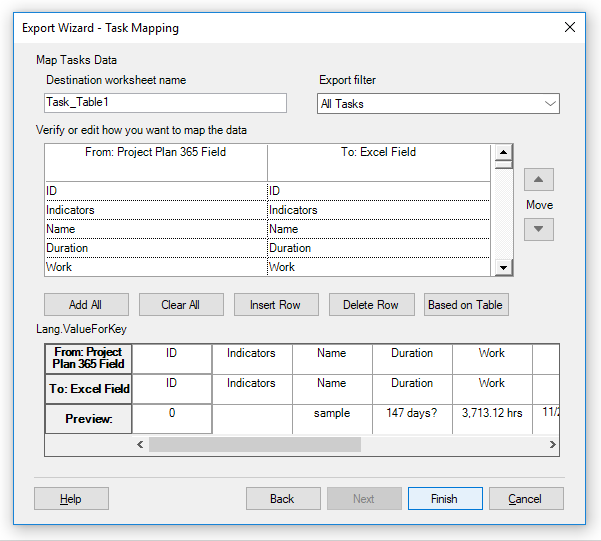
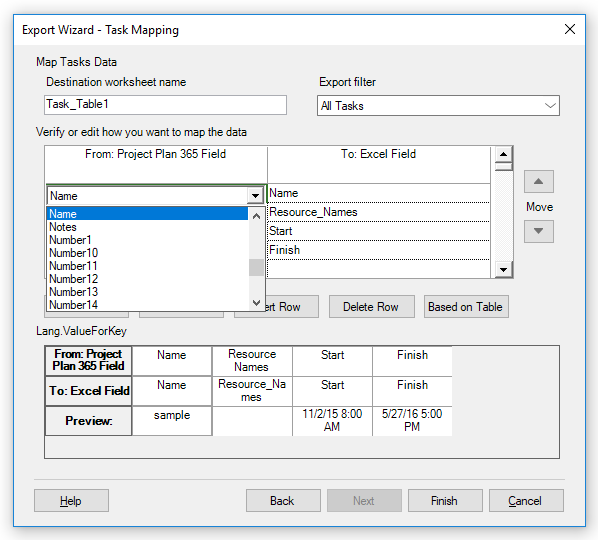
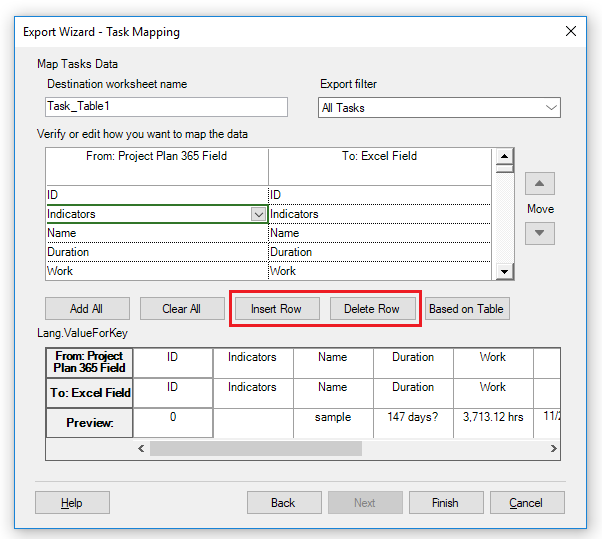
To export to Excel tasks from table on Windows and Mac platforms, for the desired project, go to menu File – Export – Export to Excel. Select a location, type in a name and click Save. In the Export Wizard dialog that appears, select the Selected Data option and click Next. In the Map Options section select Tasks then click Next. In the Task Mapping section, type in a name for the Worksheet, click on Based on Table… button, select the desired base table and click OK. The mapping in the grid will be completed with the columns from the selected table. Click Finish for the project to be exported to excel with the selected settings.
Tips: You can move the rows order by selecting a row and clicking on up/down arrows near Move. You can add/remove rows by clicking Insert Row or Delete Row buttons. You can add/remove all the available task fields by clicking Add All or Clear All buttons.
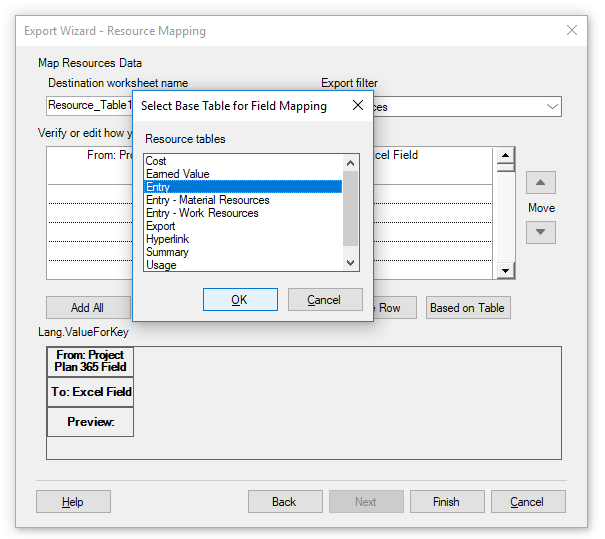
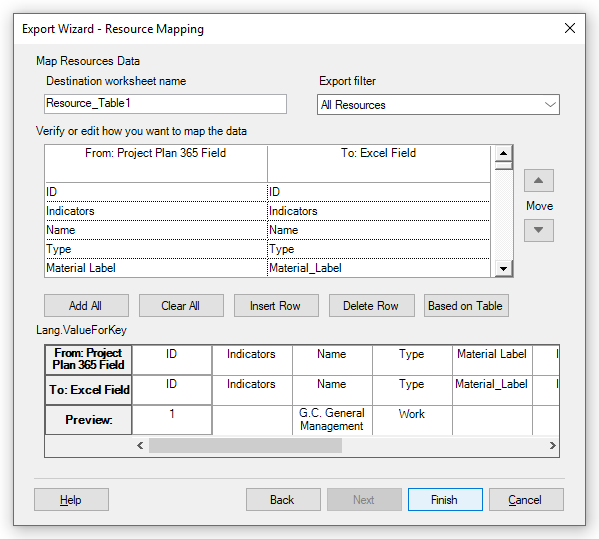
How can I export to Excel resources from table?
To export to Excel resources from table on Windows and Mac platforms, for the desired project, go to menu File – Export – Export to Excel. Select a location, type in a name and click Save. In the Export Wizard dialog that appears, select the Selected Data option and click Next. In the Map Options section select Resources then click Next. In the Resource Mapping section, type in a name for the Worksheet, click on Based on Table… button, select the desired base table and click OK. The mapping in the grid will be completed with the columns from the selected table. Click Finish for the project to be exported to excel with the selected settings.
Tips: You can move the rows order by selecting a row and clicking on up/down arrows near Move. You can add/remove rows by clicking Insert Row or Delete Row buttons. You can add/remove all the available resource fields by clicking Add All or Clear All buttons.
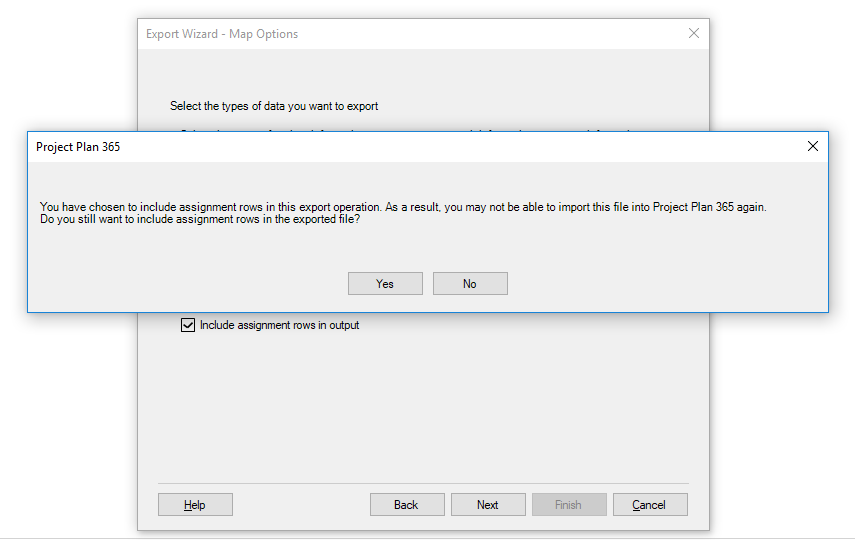
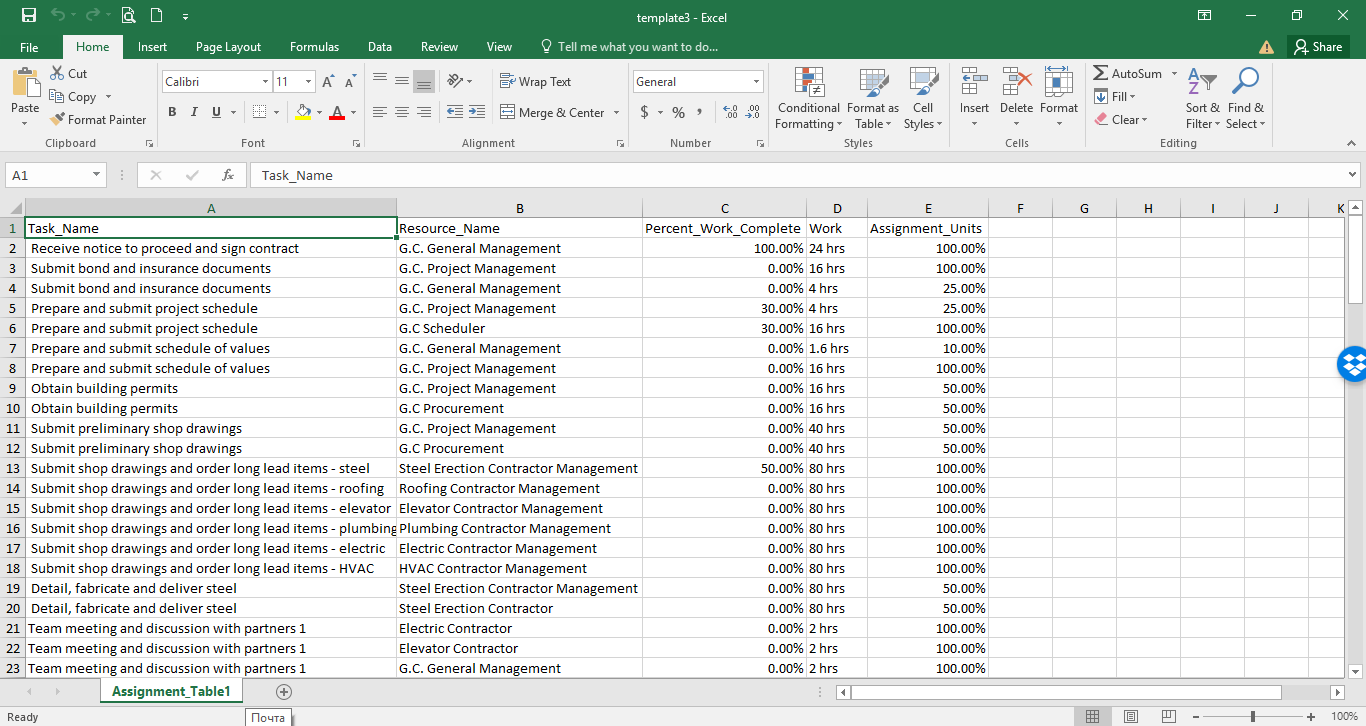
How can I export to Excel tasks from table including assignments in output?
To export to Excel tasks from table including assignments in output on Windows and Mac platforms, for the desired project, go to menu File – Export – Export to Excel. Select a location, type in a name and click Save. In the Export Wizard dialog that appears, select the Selected Data option and click Next. In the Map Options section select Tasks, from the Microsoft Excel Options select Include assignments rows in output option then click Next. In the alert that appears click Yes. In the Task Mapping section, type in a name for the Worksheet, write or select the desired task fields by clicking on a row and opening field picker and click Finish. In the exported task sheet will be added resource assignments information after each task.
Tips: You can move the rows order by selecting a row and clicking on up/down arrows near Move. You can add/remove rows by clicking Insert Row or Delete Row buttons. You can add/remove all the available resource fields by clicking Add All or Clear All buttons.
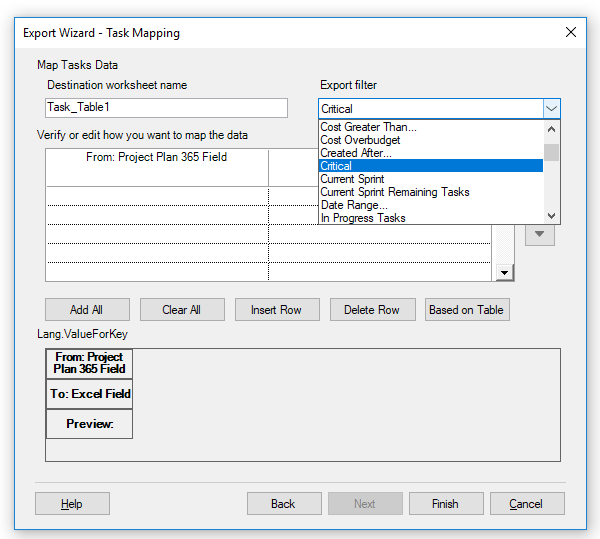
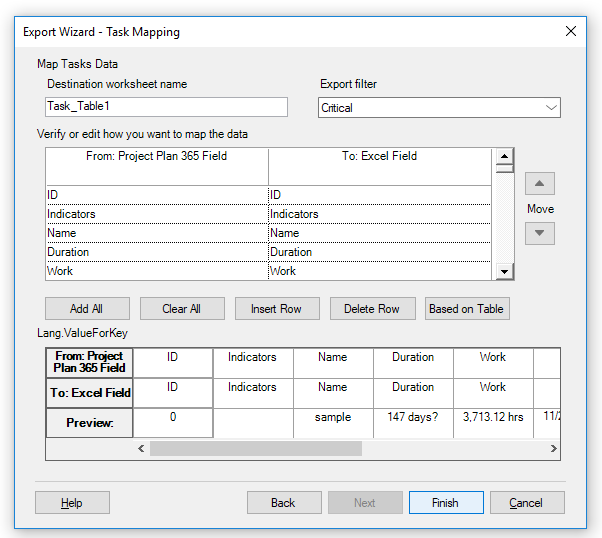
How can I export to Excel tasks with Filter?
To export to Excel tasks with Filter on Windows and Mac platforms, for the desired project, go to menu File – Export – Export to Excel. Select a location, type in a name and click Save. In the Export Wizard dialog that appears, select the Selected Data option and click Next. In the Map Options section select Tasks then click Next. In the Task Mapping section, open the Export Filter drop-down menu and select the desired filter. Type in a name for the Worksheet, write or select the desired task fields or base table and click Finish. The file will be exported with the selected filter.
Tips: You can move the rows order by selecting a row and clicking on up/down arrows near Move. You can add/remove rows by clicking Insert Row or Delete Row buttons. You can add/remove all the available resource fields by clicking Add All or Clear All buttons.
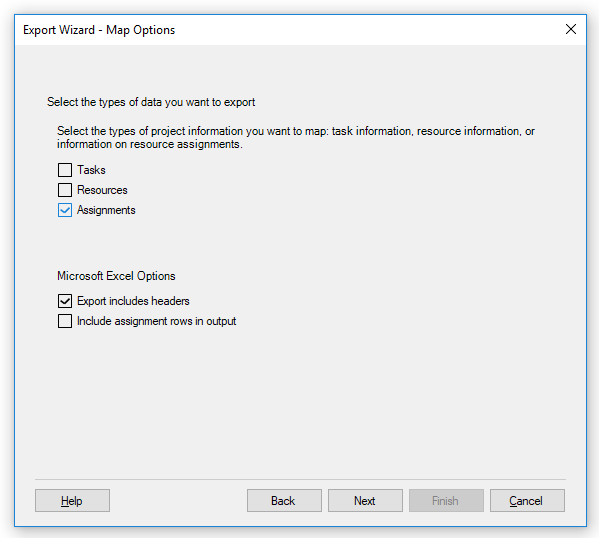
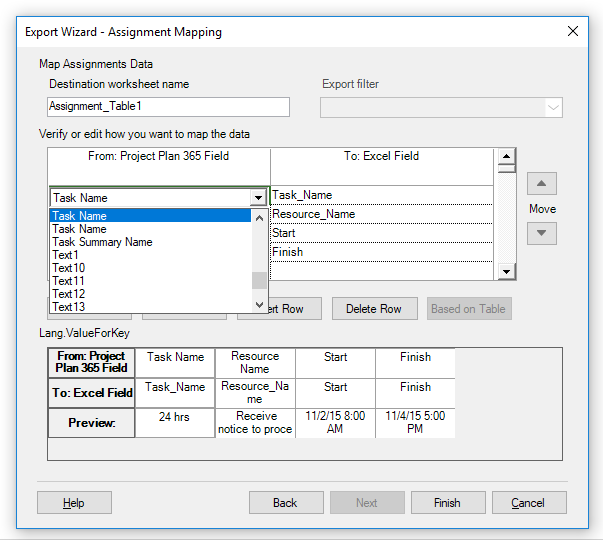
How can I export Assignments to Excel?
To export Assignments to Excel on Windows and Mac platforms, for the desired project, go to menu File – Export – Export to Excel. Select a location, type in a name and click Save. In the Export Wizard dialog that appears, select the Selected Data option and click Next. In the Map Options section select Assignments then click Next. In the Assignments Mapping section, type in a name for the Worksheet then either click on Add All button to add all the available project fields or manually add some fields by clicking on a row and opening field picker. Click Finish for the file will be exported with the selected settings.
Tips: You can move the rows order by selecting a row and clicking on up/down arrows near Move. You can add/remove rows by clicking Insert Row or Delete Row buttons. You can add/remove all the available resource fields by clicking Add All or Clear All buttons.
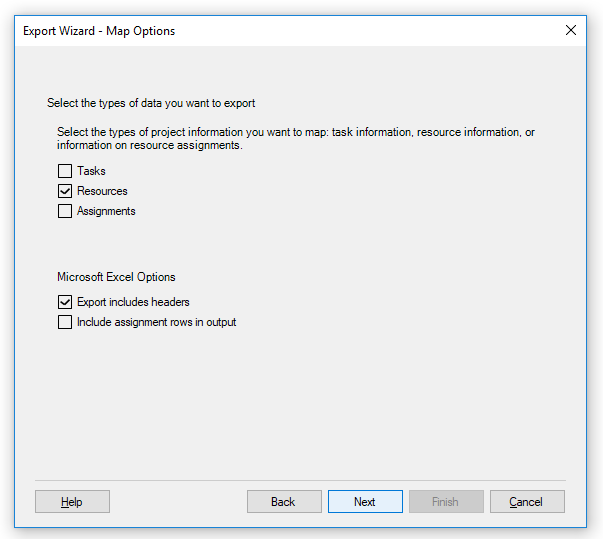
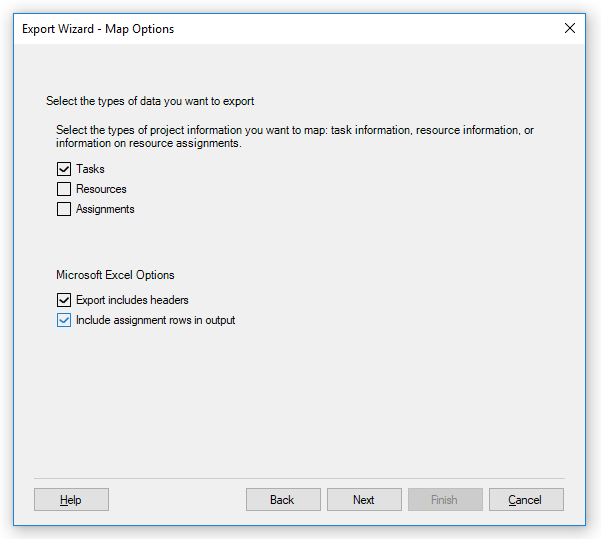
Can I export to Excel more than one type of data?
You can export to excel all the available types of data: Tasks, Resources and Assignments, in one file by selecting all of them from the Map Options section in the Export Wizard dialog. You will then be asked to set mapping settings for each type of data. The exported file will have 3 separate worksheets for each type of project information with the selected settings.
Note: The option to export to Excel more than one type of data is available only on Windows and Mac platforms.
Can I change field order in the Export Wizard dialog when exporting to Excel?
You can change field order in the Export Wizard dialog when exporting to Excel by clicking on up/down arrows near Move from the Mapping section.
Note: The option to change field order in the Export Wizard dialog when exporting to Excel is available only on Windows and Mac platforms.
Why do I get an error alert when trying to export to Excel with Selected Data?
If you get an error alert when trying to export to Excel with Selected Data it means you have more than 225 project fields specified when Mapping the data. To be able to export the file you need to reduce the number of exported fields by clicking on Clear All button from the Map Data section then manually adding the desired fields by clicking on a row and selecting a field from the field picker. Click Finish for the file will be exported with the selected settings.
Step by step on how to export a project to Excel using a Project Excel Template on Windows and Mac:
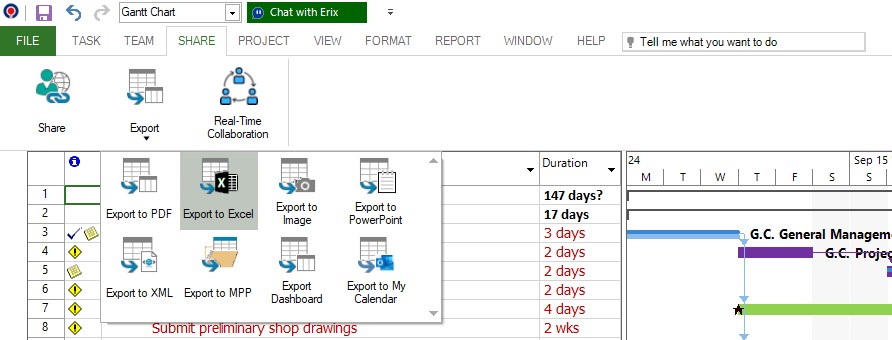
1. Go to menu File – Export – Export to Excel or menu Share – Export – Export to Excel:
2. Select a location, type in a name and click Save.
3. In the Export Wizard dialog that appears, select the Project Excel Template option then click Finish.

4. The project will be exported to Excel in .xlsx format based on a template.
Step by step on how to export to Excel tasks from table on Windows and Mac:
1. Go to menu File – Export – Export to Excel or menu Share – Export – Export to Excel:
2. Select a location, type in a name and click Save.
3. In the Export Wizard dialog that appears, select the Selected Data option and click Next.
4. In the Map Options section select Tasks then click Next.

5. In the Task Mapping section, click on Based on Table… button and select the desired base table then click OK.
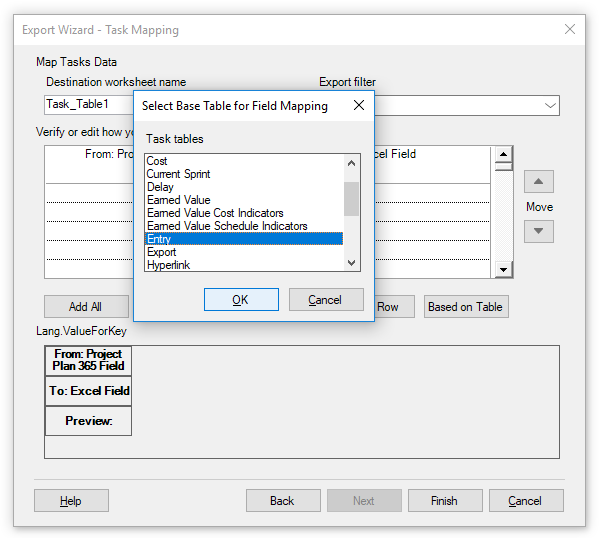
6. The mapping in the grid will be completed with the columns from the selected table.
Note: You can also manually add the desired fields by clicking on a row to open the field name drop-down menu and selecting a field.
7. Click Finish for the project to be exported to excel with the selected settings.

Tips: You can move the rows order by selecting a row and clicking on up/down arrows near Move.
You can add/remove rows by clicking Insert Row or Delete Row buttons.
You can add/remove all the available task fields by clicking Add All or Clear All buttons.

Step by step on how to export to Excel resources from table on Windows and Mac:
1. Go to menu File – Export – Export to Excel or menu Share – Export – Export to Excel:
2. Select a location, type in a name and click Save.
3. In the Export Wizard dialog that appears, select the Selected Data option and click Next.
4. In the Map Options section select Tasks then click Next.
5. In the Resource Mapping section, click on Based on Table… button and select the desired base table then click OK.
6. The mapping in the grid will be completed with the columns from the selected table.
Note: You can also manually add the desired fields by clicking on a row to open the field name drop-down menu and selecting a field.
7. Click Finish for the project to be exported to excel with the selected settings.
Tips: You can move the rows order by selecting a row and clicking on up/down arrows near Move.
You can add/remove rows by clicking Insert Row or Delete Row buttons.
You can add/remove all the available task fields by clicking Add All or Clear All buttons.
Step by step on how to export to Excel tasks from table including assignments in output on Windows and Mac:
1. Go to menu File – Export – Export to Excel or menu Share – Export – Export to Excel:
2. Select a location, type in a name and click Save.
3. In the Export Wizard dialog that appears, select the Selected Data option and click Next.
4. In the Map Options section select Tasks and/or Resources and from the Microsoft Excel Options select Include assignments rows in output option then click Next.
5. In the alert that appears click Yes.
6. In the Task/Resource Mapping section, write or select the desired task/resources fields by clicking on a row and opening field picker.
7. Click Finish for the file to be exported with the selected settings. In the exported task sheet will be added resource assignments information after each task.
Tips: You can move the rows order by selecting a row and clicking on up/down arrows near Move.
You can add/remove rows by clicking Insert Row or Delete Row buttons.
You can add/remove all the available task fields by clicking Add All or Clear All buttons.
Step by step on how to export to Excel tasks with Filter on Windows and Mac:
1. Go to menu File – Export – Export to Excel or menu Share – Export – Export to Excel:
2. Select a location, type in a name and click Save.
3. In the Export Wizard dialog that appears, select the Selected Data option and click Next.
4. In the Map Options section select Tasks and/or Resources then click Next.
5. In the Task/Resource Mapping section, open the Export Filter drop-down menu and select the desired filter.
6. Type in a name for the Worksheet and write or select the desired task/resources fields or base table.
7. Click Finish for the project to be exported to excel with the selected settings.
Tips: You can move the rows order by selecting a row and clicking on up/down arrows near Move.
You can add/remove rows by clicking Insert Row or Delete Row buttons.
You can add/remove all the available task fields by clicking Add All or Clear All buttons.
Step by step on how to export Assignments to Excel on Windows and Mac:
1. Go to menu File – Export – Export to Excel or menu Share – Export – Export to Excel:
2. Select a location, type in a name and click Save.
3. In the Export Wizard dialog that appears, select the Selected Data option and click Next.
4. In the Map Options section select Assignments then click Next.
5. In the Assignments Mapping section, click on Add All button to add all the available project fields or manually add some fields by clicking on a row and selecting a filed from drop-down menu.
6. Click Finish for the file will be exported with the selected settings.
Tips: You can move the rows order by selecting a row and clicking on up/down arrows near Move.
You can add/remove rows by clicking Insert Row or Delete Row buttons.
You can add/remove all the available task fields by clicking Add All or Clear All buttons.
Step by step on how to export to Excel on iOS and Web:
1. Open the desired project file.
2. Open desired views (Gantt Chart, Tracking Gantt, Resource Sheet, Task Sheet, Team Planner).
3. Go to File- Export– Export to Excel or Share – Export – Export to Excel.
Export to Excel is available for Gantt Chart, Tracking Gantt and Task Sheet views. By using this option, the content of the list of tasks will be exported in a CSV format.
4. In folder explorer type the name you want in the File name box or let the auto-generated name, and click Save.