
What does the “Print for Web” functionality do?
The “Print for Web” functionality allows you to print the active view of the current project on paper, by using a printer connected to your laptop or desktop computer.
How do I print my project in Project Plan for Web?
Before printing your project we advise you to:
- Pick the view you want.
- Format the view.
- Change the view so it shows only the data you want to share. For example: Hide subtasks to show only top-level tasks. Sort tasks/hide columns temporarily so they don’t appear in the printout.
- Use the Print option to print the active view of the current project.
- Your selected printer is shown at the top of the Print dialog box.
- Using the Page Setup option you can choose how much of the project to print( print the whole project or pick date and page ranges).
- Set other printing options, like the number of copies, page orientation and paper size, then press OK.
How can I print in A4 format?
To print in A4 format go to menu File – Print – Page Setup and select on Paper Size field the A4 format.
How do I print in landscape?
To print in landscape, go to menu File - Print - Page Setup and on Orientation section select Landscape.
How do I print only the relevant data on the Gantt Chart view?
To print or export only the relevant data, first please change the view so it shows only the information that you want to print. You can filter data, hide columns or subtasks, you can sort the tasks or resources to highlight specific info. Then, go to menu File - Print - Print in order to print the active view of the current project. Select a printer and the desired settings and click Print.
How can I take a full screenshot of the Gantt Chart?
To take a full screenshot of the Gantt Chart view, you can export the entire view on one page. To achieve this, go to menu File - Print. Click on the Page Setup button and a dialog will open and you will see that there is the Scaling option. Check the option Fit to 1 page wide by 1 tall. Then, go to menu File – Export – Export to PDF.
How can I fit to one page?
To fit the entire project to one page, go to menu File - Print. Click on the Page Setup button and a dialog will open and you will see that there is the Scaling option. Check the option Fit to 1 page wide by 1 tall.
Where can I find the “Scaling” option?
To find the “Scaling” option you have to go to the “File” menu and choose the Print option. Click the “Page setup” option and a dialog will open and you will see that there is the Scaling option which includes the “Adjust to” and “Fit to” commands.
Where can I find the “Print between two dates for Timeline View” option?
To find the “Print between two dates” option, open the app then go to the “File” menu, select the “Print” option and then choose the “Page setup” option. A dialog will appear. Go to the “View” tab to reach the “Print between two dates” function.
I want to do page set up but they are telling me the from date must be before to date.
Please make sure that the FROM date is before the TO date.
How can I print in A1 format in the online version?
We are sorry, but you cannot print in A1 format on our web application at this point.
How can I print the Gantt Chart?
To print the Gantt Chart view, open the application, make sure the selected view is Gantt Chart and then go to the File menu - Print and select the Print option.
How can I print the current view?
In order to print the current view, make sure the desired view is selected, then go to the File menu - Print and select the Print option.
How can I combine two views and print them at the same time?
We are sorry but printing two views at the same time is not possible in our application at this point.
How can I improve the print resolution?
In order to improve the Print resolution, please set another paper size. In order to do that, go to the File menu - Print and select Page Setup option. Select the desired Paper Size and then press "OK" in the dialog for changes to take effect.
How can I insert a logo?
To insert a logo, go to the File menu - Print - Page Setup dialog. Select Header/Footer tabs, click on "Insert Image" icon and then click on "OK" button.
How can I print only the tasks?
To print only the tasks, please use the Task Sheet view. Then, go to the menu File - Print.
I cannot find a way to print or export to PDF in web application. Is this available?
To print/export to PDF your plan, go to menu File-Print-Page Setup and make the desired changes. You can see the changes in Print Preview dialog.
After this go to menu File-Print-Print and click OK and download the PDF file on your device.
Step by step on how to prepare a view for printing and print it on Web:
1. Pick the view you want.
2. Format the view.
3. Change the view so it shows only the data you want to share. For example:
Hide subtasks to show only top-level tasks.
Sort tasks or dates to highlight specific info.
Hide columns temporarily so they don't appear in the printout.
4. Use the Print option to print the active view of the current project. Your selected printer is shown at the top of the Print dialog box.
5. Using Page Setup option, you can choose how much of the project to print. You can print the whole thing or pick date and page ranges.
6. Set other printing options, like the number of copies, page orientation, and paper size.
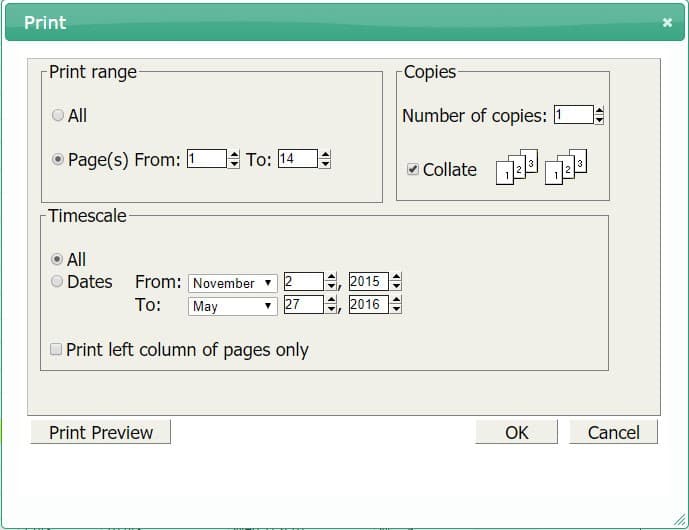
Range
Select All to print the entire project. To print a section of the project, select Pages and type the first and last pages in the From and To boxes. To see the number of pages in your project, choose the Print Preview button.
Timescale
The Timescale box is available if you are printing the Gantt Chart, Resource Graph, Resource Usage view, or Calendar. Select All to print the project from start date to finish date. To print the project only between specified dates, select Dates and enter the start and finish dates in the From and To boxes.
Print Left Column of Pages Only
Select to print the left column of each page only.
Copies
Type the number of copies to print.