
What does the “Print for Windows” functionality do?
The “Print for Windows” functionality allows you to print the active view of the current project on paper, by using a printer connected to your Windows laptop or desktop computer.
For more information about the Print for Windows functionality and its benefits, please see the Print on Windows page, which also includes a video.
How can I take a full screenshot of the Gantt Chart?
To take a full screenshot of the Gantt Chart view, you can export the entire view on one page. To achieve this, go to menu File - Print. Click on the Page Setup button and a dialog will open and you will see that there is the Scaling option. Check the option Fit to 1 page wide by 1 tall. Then, go to menu File-Export-Export to PDF.
How can I print in A4 format?
To print in A4 format go to menu File - Print- Page Setup and select on Paper Size field the A4 format.
How do I print in landscape?
To print in landscape, go to menu File - Print - Page Setup and on Orientation section select Landscape.
How do I print only the relevant data on the Gantt Chart view?
To print or export only the relevant data, first please change the view so it shows only the information that you want to print. You can filter data, hide columns or subtasks, you can sort the tasks or resources to highlight specific info. Then, go to menu File - Print - Print in order to print the active view of the current project. Select a printer and the desired settings and click Print.
How can I fit to one page?
To fit the entire project to one page, go to menu File - Print. Click on the Page Setup button and a dialog will open and you will see that there is the Scaling option. Check the option Fit to 1 page wide by 1 tall.
How to print the Timeline view?
To print the Timeline view, open the application and select the Timeline view, go to menu File->Print dialog.
Where can I find the “Print between two dates for Timeline View” option?
To find the “Print between two dates” option, open the app then go to the “File” menu, select the “Print” option and then choose the “Page setup” option. A dialog will appear. Go to the “View” tab to reach the “Print between two dates” function.
I want to do page set up but they are telling me the from date must be before to date.
Please make sure that the FROM date is before the TO date.
How can I see the legend on the bottom of the page?
To see the legend on the bottom of the page, please follow the steps below:
1. Go to File-Print-Page Setup.
2. Go to Legend tab.
3. Select Every page.
Where can I find the “Scaling” option?
To find the “Scaling” option you have to go to the “File” menu and choose the Print option. Click the “Page setup” option and a dialog will open and you will see that there is the Scaling option which includes the “Adjust to” and “Fit to” commands.
How can I print in A0 format on Windows?
In order to print in A0 format on Windows, please follow these steps:
- Download and install the free CutePDF Writer software from this link: CuteWriter
- Open Project Plan 365 app.
- Go to File - Print - Page Setup
- Select Options and on Printer field select CutePDF Writer, then press OK.
- On paper size select ISO A0.
I cannot print the Gantt Chart on Windows.
Our print implementation uses WMI service in order to allow timescale customization from within print dialog. In this case WMI is not accessible (service not enabled or access not permitted) or one of the printers is not properly supported via WMI.
I want to just export the task sheet, but I don't want to lose the formatting, which does happen when you're in Task Sheet view.
Please download and install the latest application from our website.
How can I print the Gantt Chart?
To print the Gantt Chart view, open the application, make sure the selected view is Gantt Chart and then go to the File menu - Print and select the Print option.
How can I print the current view?
In order to print the current view, make sure the desired view is selected, then go to the File menu - Print and select the Print option.
How can I combine two views and print them at the same time?
We are sorry but printing two views at the same time is not possible in our application at this point.
How can I improve the print resolution?
In order to improve the Print resolution, please set another paper size. In order to do that, go to the File menu - Print and select Page Setup option. Select the desired Paper Size and then press "OK" in the dialog for changes to take effect.
How can I insert a logo?
To insert a logo, go to the File menu - Print - Page Setup dialog. Select Header/Footer tabs, click on "Insert Image" icon and then click on "OK" button.
How can I print only the tasks?
To print only the tasks, please use the Task Sheet view. Then, go to the menu File - Print.
What does the “Help” button inside the “Print” dialog do?
The “Help” button inside the “Print” dialog redirects you to the “Print for Windows” functionality in our Online Help page.
I am preparing a Gantt chart for a 3-year studentship proposal and would like to be able to export a pdf of only the first 36 months of the Gantt. Is this possible?
You can achieve this by going to menu Project-Filter-Date Range and insert the dates. Then, go to menu File-Print-Page Setup and make the desired changes and after this export the file to PDF. The print functionality will generate a PDF file for you only with the tasks that are presented in the current Gantt Chart view.
How do I print the critical path in a A3 format page?
In order to see the critical tasks in your project, go to Gantt Chart view and in the Project tab click on the Critical Path button. All the critical tasks become red in the Gantt Chart.
To filter all the critical tasks in your project, go to Project ribbon – Filter and select Critical.
After this, you can Print in A3 format these tasks by going to menu File-Print-Page Setup and export the project in a A3 format.
How can I print only some specific columns?
If you want to print only some specific columns, you can hide those you don’t want to appear in your printed file. You can achieve this by selecting a column – right click on it and from the contextual menu select the “Hide Column” option. After that, go to the File menu - Print - Print in order to print the active view of the current project.
How do I save the Gantt Chart view as PDF in size A3?
In order to set the Paper Size to A3, go to the File menu - Print - Page Setup and from "Page" tab, "Paper Size" field, select A3 and press "OK" in order for changes to take effect. After that, go to the File menu - Export and select the "Export to PDF" option.
How can I take a full screenshot of the Network Diagram view?
To take a full screenshot of the Network Diagram view, you can export the entire view on one page. To achieve this, go to menu File - Print. Click on the Page Setup button and a dialog will open and you will see that there is the Scaling option. Check the option Fit to 1 page wide by 1 tall. Then, go to menu File-Export-Export to PDF.
How can I increase number of the printed pages for clarity?
If you want your printed file to be more clearly, you can change the Paper Size from the “Page Setup” dialog and then use the “Print Preview” option in order to see the changes made in the Page Setup dialog.
Also, please make sure you don’t have checked the “Fit to” option and that “Adjust to” is set to “100%”.
I just want to print the Gantt and not the columns. How do I do this?
In order to print only the Gantt Chart, drag to the left the bar that separates the grid from the Gantt Chart and then go to the File menu - Print - Print.
How do I print the Resource Usage view?
To print the Resource Usage view, open the application, make sure the selected view is Resource Usage and then go to the File menu – Print and select the Print option.
Can I print to A2 format on Windows?
In order to print in A2 format on Windows, please follow these steps:
1. Download and install the free CutePDF Writer software.
2. Open Project Plan 365 app.
3. Go to File – Print – Page Setup
4. Select Options and on Printer field select CutePDF Writer, then press OK.
5. On paper size select ISO A2.
For Windows devices, the paper size depends on the installed printer or PDF drivers. If you don’t see the desired paper size in the paper size list, it means that there is no printer or PDF driver that supports that paper size.
As a solution, you could install a third party app that supports a larger number of paper sizes, for example Win2PDF. After installing a third party app follow the steps below:
- Open the Project Plan 365 app and go to menu "File" – "Print" – "Print";
- From the "Printer Name" list select Win2PDF (or the preferred app) then press "Properties";
- The Print dialog should appear and select "Properties" again;
- In the next dialog, click on "Advanced" button then, from the "Paper Size" list, select the desired paper size;
- After selecting the paper size, press "OK" in all dialogs, give a name for the PDF file and press “Save”;
- The project should then be exported/printed to PDF with the desired page size.
Step by step on how to prepare a view for printing and print it on Windows:
- Pick the view you want.
- Format the view.
- Change the view so it shows only the data you want to share. For example:
- Hide subtasks to show only top-level tasks.
- Sort tasks or dates to highlight specific info.
- Hide columns temporarily so they don't appear in the printout.
- Use the Print option to print the active view of the current project. Your selected printer is shown at the top of the Print dialog box.
- Using Page Setup option, you can choose how much of the project to print. You can print the whole thing or pick date and page ranges.
- Set other printing options, like the number of copies, page orientation, and paper size.

Alternatively, you can use contextual printing for printing your project plan. When installing one of the Windows applications, the setup program also adds to your Explorer contextual menu a Print option, through which you may Print directly an MPP File without opening the application. The default view printed is Gantt Chart. This context menu appears only when you right click on an MPP file.
Add a header, footer, or legend
You can include headers and footers on each printed page. You can add, remove, or change the headers, footers, and legends by using Page Setup option under Print menu and then clicking on the Header, Footer, or Legend tab. Type your text in the Left, Center, or Right text box.
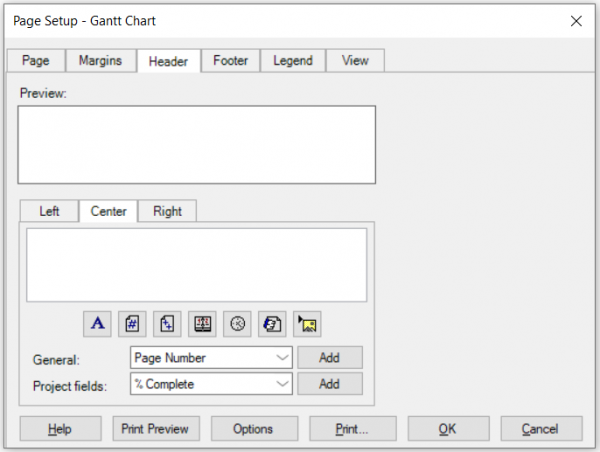
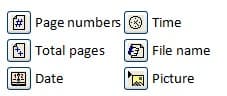
Use the buttons below the text box to format the text or add elements:
Want to get rid of the legend completely? On the Legend tab, under Located on, click None.
To print a report, choose the Report menu option and then use the Print option.
To see what your printed view will look like with the options you specify, choose the Print Preview button.
Printer
Lists all installed printers. To use a printer, select it from the list and choose OK. Also provides information about each printer such as status, type, and so on.
Properties
Displays another dialog box, in which you select the options available for your printer, such as paper size, orientation, and font cartridges. For more information about printer settings, see the owner's manual for your printer.
Range
Select All to print the entire project. To print a section of the project, select Pages and type the first and last pages in the From and To boxes. To see the number of pages in your project, choose the Print Preview button.
Timescale
The Timescale box is available if you are printing the Gantt Chart, Resource Graph, Resource Usage view, or Calendar. Select All to print the project from start date to finish date. To print the project only between specified dates, select Dates and enter the start and finish dates in the From and To boxes.
Print Left Column of Pages Only
Select to print the left column of each page only.
Copies
Type the number of copies to print.
Manual Page Breaks
Select to use the page breaks set with the Page Break command on the Insert menu. Clear to use automatic page breaks
Print a view using automatic command – Standard Print
To print a file directly you need to perform the following steps:
- Copy the project file in folder where you have installed Project Plan 365 (C:\Program Files(x86)\Housatonic\ProjectPlan365);
- Open Command Prompt window;
- cd "C:\Program Files (x86)\Housatonic\ProjectPlan365"
- Use the command ProjectPlan.exe /dp filename (standard print)
- Use the command ProjectPlan.exe /spp filename (standard print – portrait)
- Use the command ProjectPlan.exe /spl filename (standard print – landscape)
Important: Commands must be entered into Command Prompt exactly. Wrong syntax or a misspelling could cause the command to fail or, worse, could execute the wrong command or the right command in the wrong way.