
What does the "Print Preview" functionality do?
The “Print Preview” functionality displays the active view as it will look when printed. The pages to be printed display the information according to settings selected using Page Setup option, such as: hidden columns, added columns, resized columns, resized panels etc. Use this command to check the header, footer, legend, margins and timescale on a view with a timescale.
How can I figure out the length of the project I want to print?
The status bar at the bottom of the “Print Preview” window shows the current page number and the total number of pages.
What does the “Help” button inside the “Print Preview” dialog do?
The “Help” button inside the “Print Preview” dialog redirects you to the “Print Preview” article in our Online Help page.
Where can I find the Print Preview option?
In order to find the Print Preview option, go to the File menu - Print - Print Preview.
Step by step on how to prepare a view for Print Preview:
- Pick the view you want.
- Format the view.
- Change the view so it shows only the data you want to share. For example:
- Hide subtasks to show only top-level tasks.
- Sort tasks or dates to highlight specific info.
- Hide columns temporarily so they don't appear in the printout.
- Using File – Print – Page Setup option, you can choose how much of the project to print. You can print the whole thing or pick date and page ranges.
- Set other printing options, like the page orientation and paper size.
Step by step on how to see a Print Preview on Windows:
In Page Setup dialog, press the “Print Preview” button.
Alternatively, you can see the print preview by selecting File – Print – Print Preview directly, or File – Print – Print and then press the “Preview” button after configuring the printer and printing job settings.
In order to preview a report instead of a view, choose the report (for example Report – Overview – Project Summary) and press the “Select” button. This will launch the “Print Preview” dialog for the selected report, for one final look before printing it.
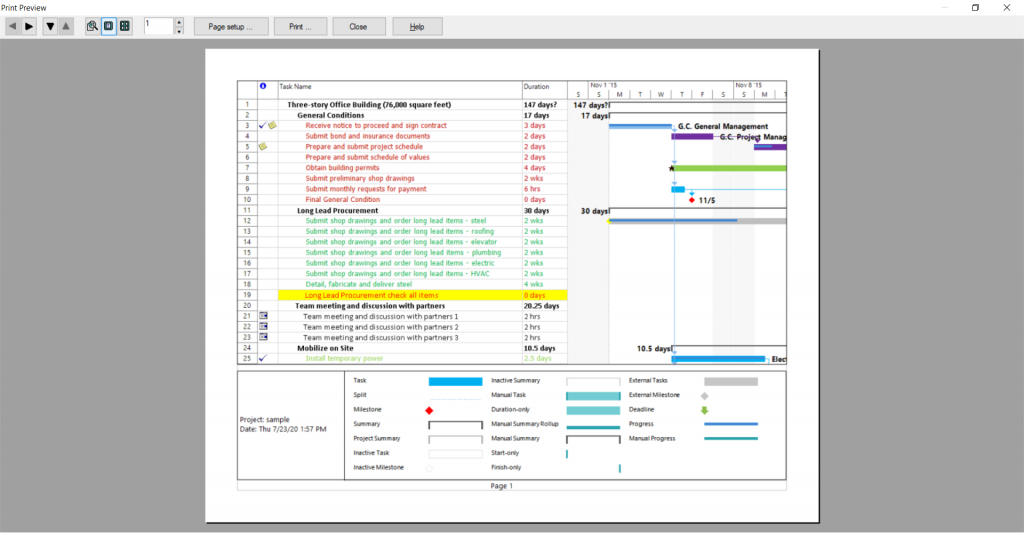
Arrow Buttons
Select to navigate between pages.
Zoom
Select to zoom the preview window for a more detailed view.
One Page
Select to display one full page.
Multiple Pages
Select to display several pages at once, scaled to fit the preview window.
Page Setup
Displays the Page Setup dialog box.
Displays the Print dialog box and sends the pages’ content to the printer.
Close
Closes the preview window and displays the active view.
Step by step on how to see a Print Preview on Mac:
In Page Setup dialog, press the “Print” button. Alternatively, you can see the print preview by selecting File – Print – Print Preview directly.
In order to preview a report instead of a view, choose the report (for example Report – Overview – Project Summary) and press the “Select” button. This will launch the “Print” dialog for the selected report, for one final look before printing it.
Print Preview section - Displays the active view as it will look when printed. The pages to be printed display the information according to the settings applied.
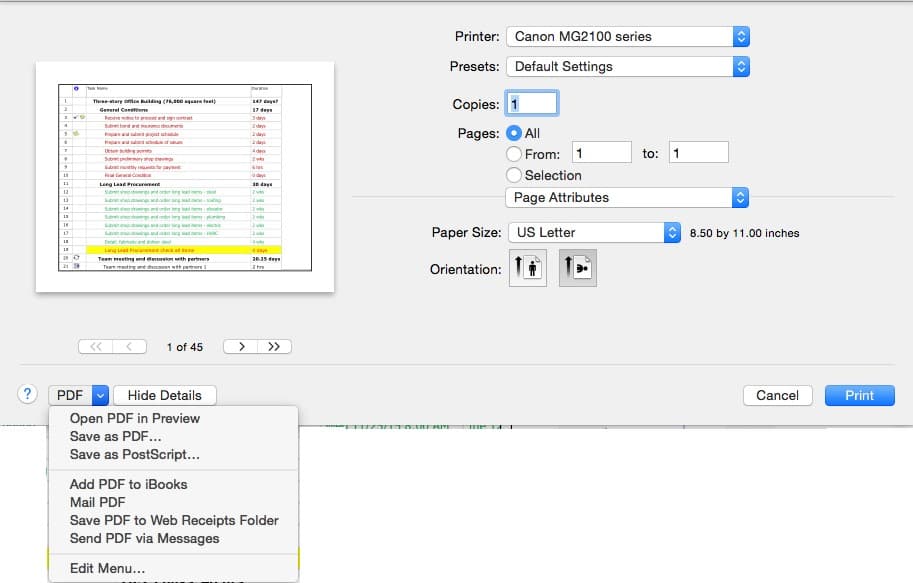
PDF - options will open list with extra options:
Open PDF in Preview - Displays the active view as it will look when printed in PDF format
Save as PDF - Save the information from current printed view in PDF file
Save as PostScripts - Save the information from current printed view in PostScript file
Add PDF to iBooks - Will add current printed view in iBooks
Mail PDF - Opens the Untitled Message window, with the current printed view attached in the Attachment field
Save PDF to Web Receipts Folder - Will save current printed view (PDF generated) in Web Receipts Folder
Send PDF via Messages - Opens the Untitled Message window, with the current printed view attached in the Attachment field
Edit menu - Opens the Edit menu