
What is resource leveling?
Resource leveling is a technique in which start and finish dates are adjusted based on resource limitation with the goal of balancing demand for resources with the available supply.
When to use resource leveling?
Use resource leveling technique to resolve resource overallocation in tasks. Project Plan 365 evaluates resource allocations and adjusts your plans so that your resources are not overallocated.
What is Overallocation?
The situation corresponding to a resource of type work who dedicates more than 8 hours a day to accomplish some tasks. Overallocation may have two distinct causes:
1) the resource is assigned to several tasks that are scheduled during the same period (i.e. the resource is supposed to work 4 hours at task1 and 8 hours at task2 in the same day);
2) the PM wants the resource to dedicate more time and assigns more than 100% units for that resource.
What are overallocated resources?
A resource is overallocated when it is assigned too much work to complete within the resource's available time. You can resolve resource overallocation by adjusting either tasks or resources in your project.
What is Overallocated field?
The Overallocated field indicates whether a resource is assigned to more work on a specific task or all tasks that can be completed within a normal working capacity.
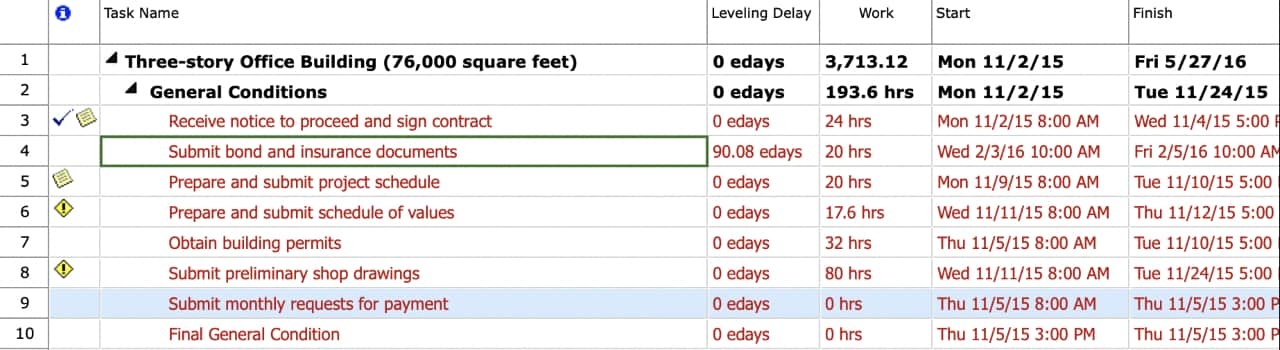
What is Leveling Delay field?
The Leveling Delay field contains the amount of time that a task or assignment is to be delayed from its early start date because of resource leveling.
When should I use the Leveling Delay field?
Add the Leveling Delay field to a task view if you want to examine the delays to tasks caused by resource leveling.
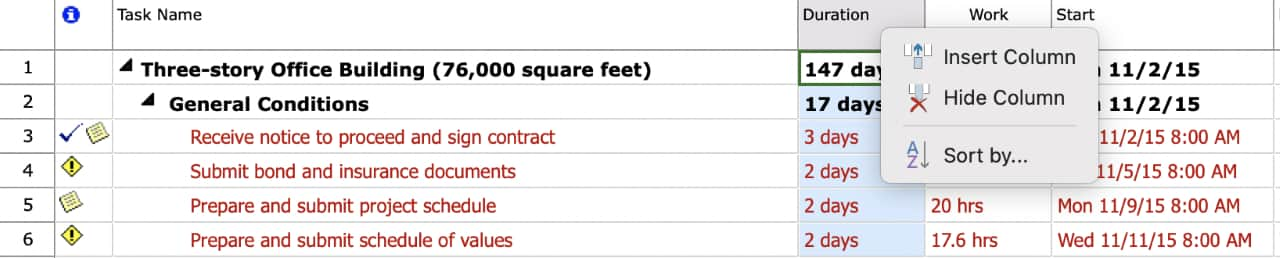
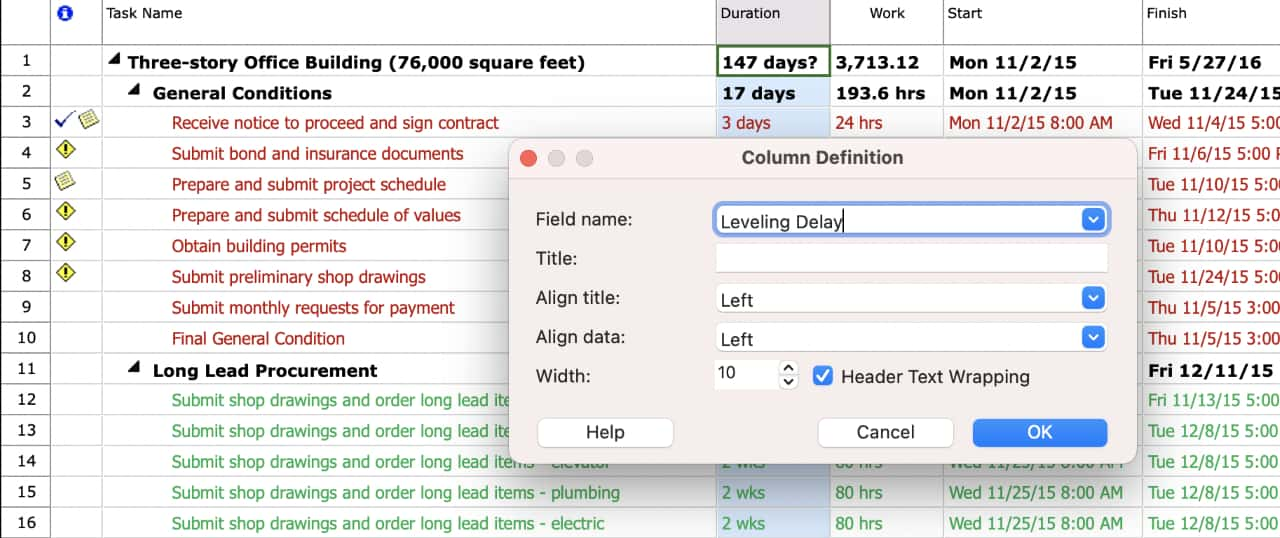
How to insert the Leveling Delay column?
To insert the Leveling Delay column, right click on the column before which you want to insert it, and from the contextual menu choose the “Insert column…” option. Select “Leveling Delay” for the “Filed name” and click the “OK” button.
What causes resource overallocation?
A resource overallocation can be caused by increased duration of tasks, decreased unit availability for resources, and resources assigned to work full-time on more than one task at the same time.
- A resource assigned to work full-time on more than one task at the same time - For example, if you assign a resource to two tasks of eight hours each on the same day, then the resource is overallocated because only one eight-hour task can be accomplished on that day. To view a resource's workload, on the Viewmenu, click Resource Usage. Look at the number of tasks assigned during times of overallocation.
- Increased duration of tasks - If you increase a task's duration, then the amount of work assigned to the resource also increases and may cause the resource to have too much work at one time. To view a resource's workload, on the View menu, click Resource Usage. Look at the number of hours of work assigned each day.
- Decreased unit availability for resources - For example, a resource's availability is reduced from 100% units to 50% units because it is working part-time. Or, more specific nonworking time is entered on the resource calendar, such as Monday through Friday, 1:00 P.M. to 5:00 P.M. To find out if the resource has decreased unit availability, on the View menu, click Resource Sheet.
How to level the tasks of certain resources?
To level tasks for certain resources, go to “Team” menu and click the “Level Resource” button. In the “Level Resources” dialog, select the resources for which you want to level tasks and click the “OK” button. A summary of how Project Plan 365 fixed the overallocation will be displayed. Click the “OK” button for the changes to be applied.
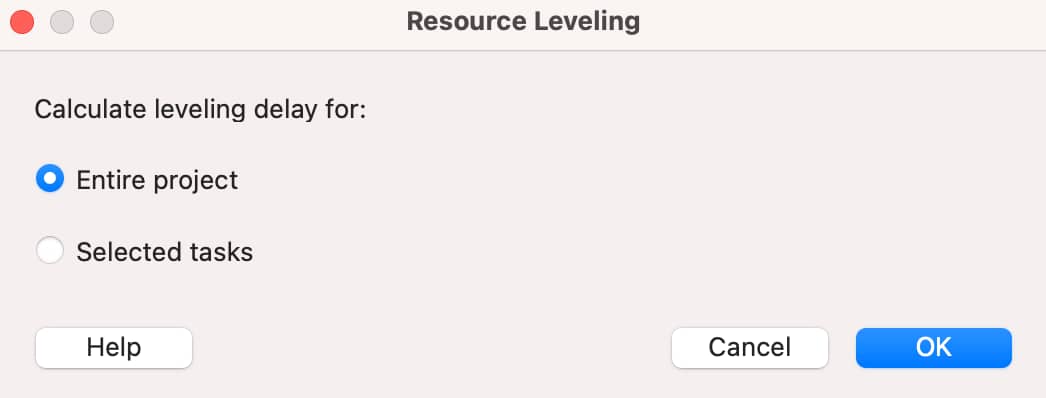
How to level the entire project?
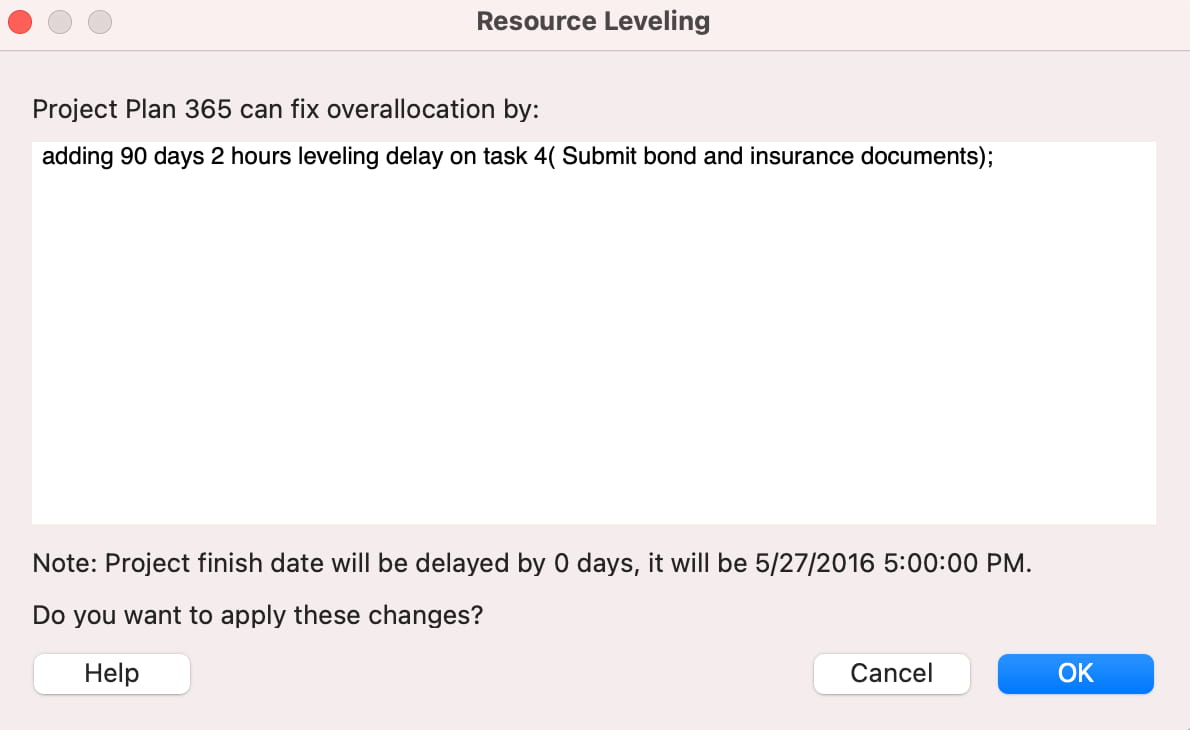
To level the entire project, go to “Team” menu and click the “Level All” button. In the “Resource Leveling” dialog, the “Entire Project” option and click the “OK” button. A summary of how Project Plan 365 fixed the overallocation will be displayed. Click the “OK” button for the changes to be applied.
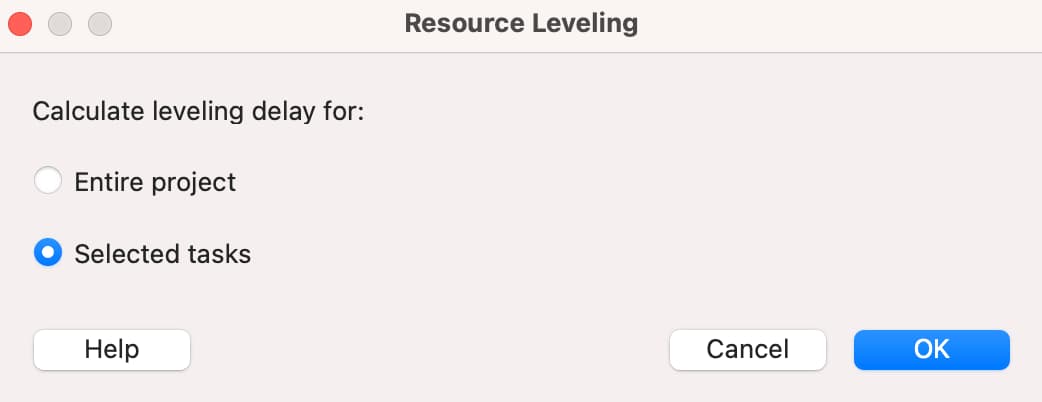
How to level only the selected tasks?
To level only the selected tasks, go to “Team” menu and click the “Level All” button. In the “Resource Leveling” dialog, the “Selected tasks” option and click the “OK” button. A summary of how Project Plan 365 fixed the overallocation will be displayed. Click the “OK” button for the changes to be applied.
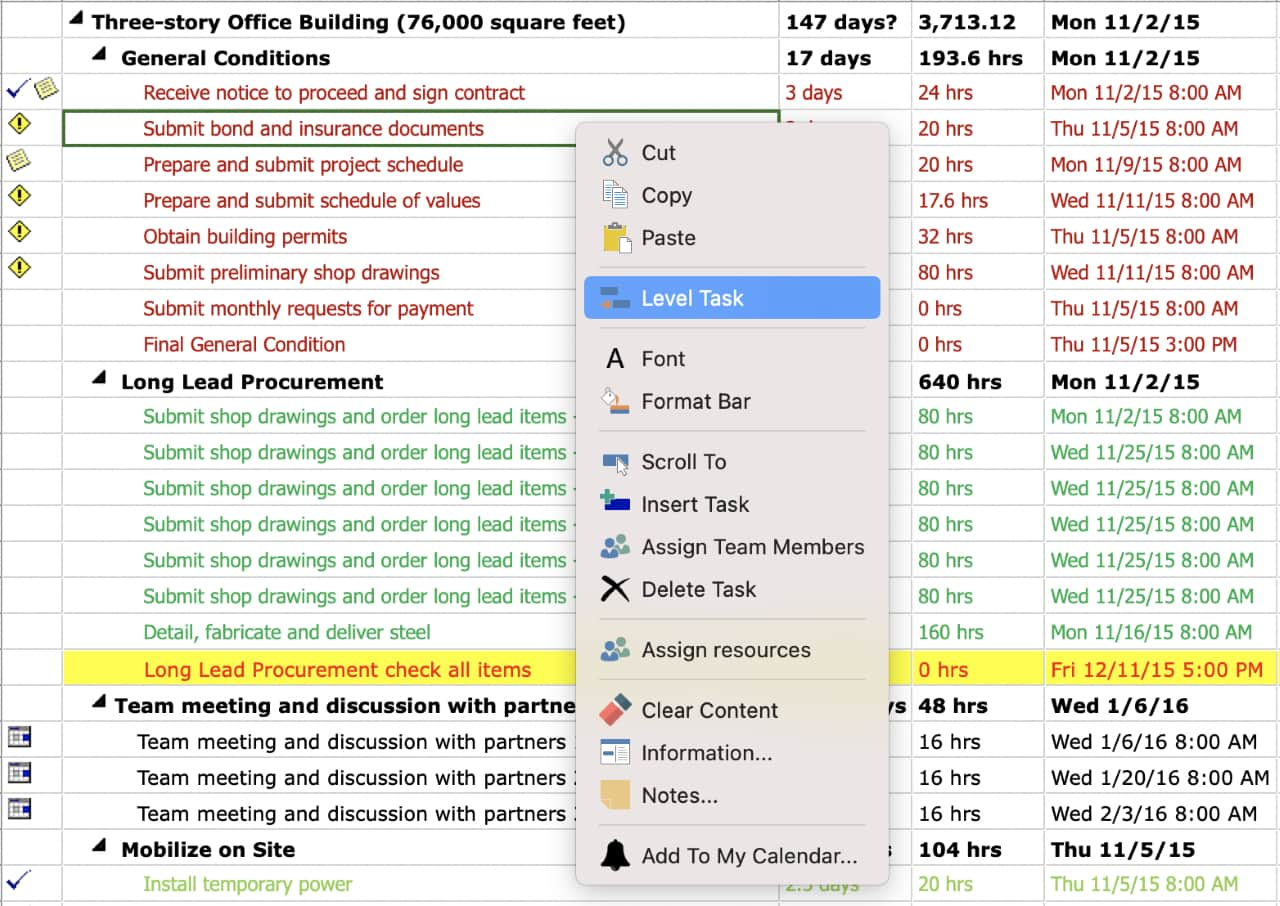
How to level a task from the contextual menu?
Select the task that you want to level, right click on it, and from the contextual menu chose the “Level Task” option. A summary of how Project Plan 365 fixed the overallocation will be displayed. Click the “OK” button for the changes to be applied.
How to clear resource leveling?
To clear the leveling go to “Team” tab and click the “Clear Leveling” button. You can either clear the leveling for the entire project or just for the selected tasks.
When to use the “Clear Leveling” option?
Use the “Clear Leveling” option to undo the effects of the previous leveling.
Can I level the tasks with %Complete grater than 0%?
Project Plan 365 can fix overallocation only on tasks with % Complete set to 0%.
Does Project Plan 365 consider the deadline when performing resource leveling?
Project Plan 365 does not take care of deadlines when performing resource leveling.
Does Project Plan 365 resolve the overallocation of a resource assigned 200% to a task?
No. Project Plan 365 does not change neither the duration nor work of the tasks as part of the resource leveling method.
Does Project Plan 365 resolve the overallocation for resources assigned to summary tasks?
Project Plan 365 cannot resolve the overallocation for resources assigned to summary tasks.
What subscription do I need to have to use the Resource Leveling feature?
You must have a Business Subscription to use the "Resource Leveling" feature.
What does the yellow diamond icon mean?
The yellow diamond icon from the Indicators field shows the tasks that are overallocated.
I have the Business feature but the Resource Leveling functionality is missing.
If the Resource Leveling functionality isn’t available in the Project Plan 365 application, please make sure you have the latest version of the application installed on your device: Download
Where is the Leveling Options dialog in the app?
We are sorry, but at this moment, the Leveling Options dialog isn’t available in our application.
Step by step on how to level tasks for the selected resources:
- Go to “Team” tab and click the “Level Resource” button.

- The “Level Resources” dialog will be displayed.
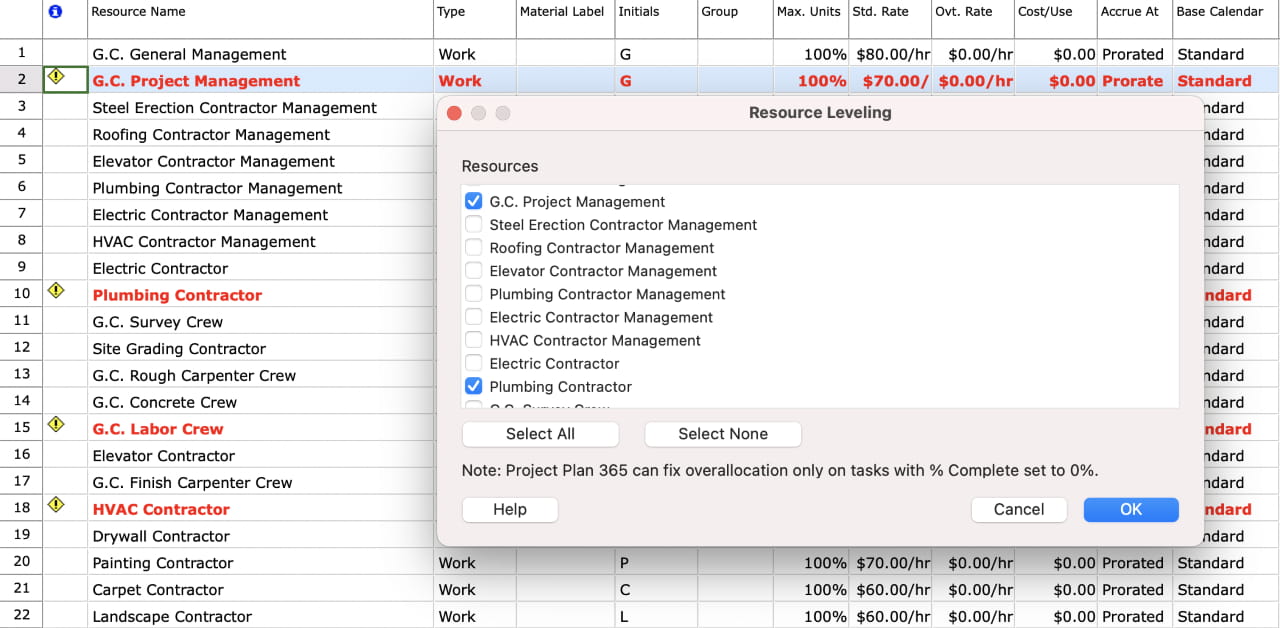
- Select the resources for which you want to level tasks and click the “OK” button.
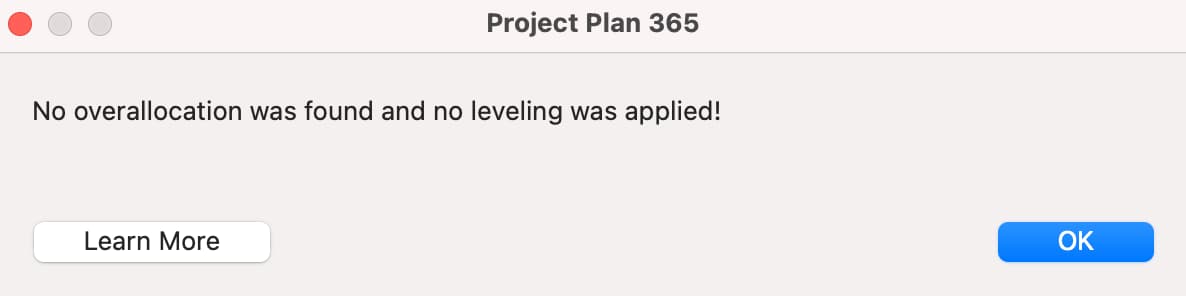
- If there is no overallocation found on the selected resources, the following alert will pop-up:
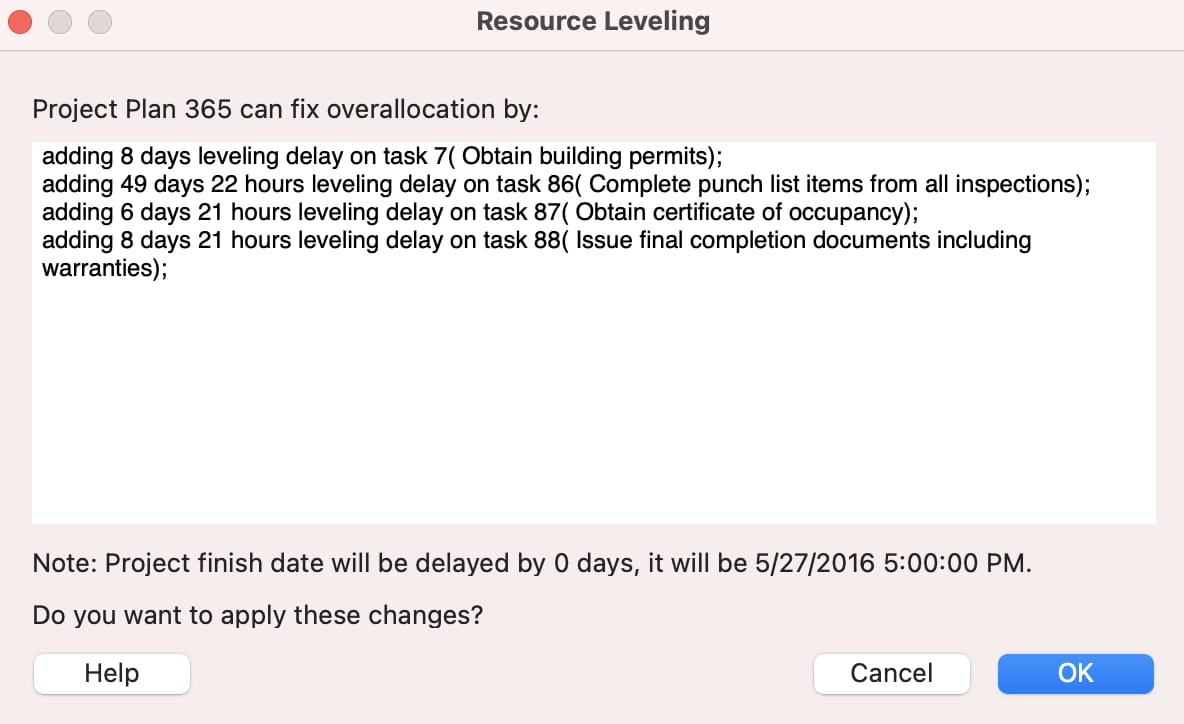
Else, a summary of how Project Plan 365 fixed the overallocation will be displayed.
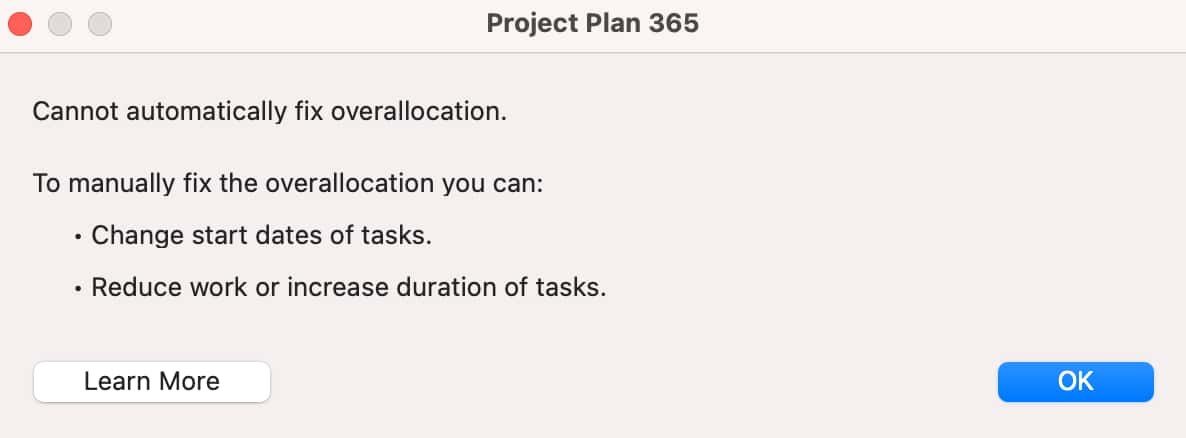
Note: If Project plan 365 cannot fix the overallocation for any resource, the following alert will be displayed:
- Click the “OK” for the changes to be applied.
Step by step on how to level the entire project:
- Go to “Team” tab and click the “Level All” button.

- The “Resource Leveling” dialog will be displayed.
- Select the “Entire Project” option and click the “OK” button.
- If there is no overallocation found, the following alert will pop-up:
Else, a summary of how Project Plan 365 fixed the overallocation will be displayed.
Note: If Project plan 365 cannot fix the overallocation, the following alert will be displayed:
- Click the “OK” for the changes to be applied.
Step by step on how to level the selected tasks:
- Select the tasks that you want to level.
- Go to “Team” tab and click the “Level All” button.
- The “Resource Leveling” dialog will be displayed.
- Select the “Selected tasks” option and click the “OK” button.
- If there is no overallocation found, the following alert will pop-up:
Else, a summary of how Project Plan 365 fixed the overallocation will be displayed.
Note: If Project plan 365 cannot fix the overallocation, the following alert will be displayed:
- Click the “OK” for the changes to be applied.
Step by step on how to level a task from the contextual menu:
- Select the task that you want to level.
- Right click on it and from the contextual menu chose the “Level Task” option.
- If there is no overallocation found, the following alert will pop-up:
Else, a summary of how Project Plan 365 fixed the overallocation will be displayed.
Note: If Project plan 365 cannot fix the overallocation, the following alert will be displayed:
- Click the “OK” for the changes to be applied.
Step by step on how to view the leveling delay:
- Go to any task view.
- Right click on the column before which you want to insert the “Leveling delay” field, and from the contextual menu choose the “Insert column…” option.
- In the “Column definition” dialog, select “Leveling Delay” for the “Field name” and click the “OK” button.
- The “Leveling Delay” field will be added to your view, allowing you to examine the delays to tasks caused by resource leveling.
Note: You can also view the Leveling Delay field by applying the “Delay” table or “Leveling Gantt” view.
To apply the “Delay” table, go to “Project” menu - “Table” - “More Tables” and from the “Tables” list, select the “Delay” table and click the “Apply” button.

To apply the “Leveling Gantt” view, go to “View” menu – “More Views” and from the “Views” list, select the “Leveling Gantt” view and click the “Apply” button.

Step by step on how to clear resource leveling:
- Go to “Team” tab and click the “Clear Leveling” button.
- The “Clear Leveling” dialog will be displayed asking you what leveling you want to clear. You can either clear the leveling for the entire project or just for the selected tasks.
![]()
- Click the “OK” for the changes to be applied.