
In most projects, tasks are connected to one another. These relationships are called dependencies, and they play an important role in determining the overall project schedule. After creating the task list and organizing it into a Work Breakdown Structure (WBS), the next step is to link tasks so you can define how they relate to each other.
Linking Tasks
Dependencies are created by linking tasks together. A task that must be completed first is called a predecessor, while the task that follows it is called a successor. Once tasks are linked, Project Plan 365 automatically updates and adjusts the schedule whenever changes occur, helping keep the project timeline accurate.
Why Dependencies Matter
Dependencies determine when tasks can begin or end and ensure that project activities happen in the correct sequence. For example, you can furnish a room only after the walls have been painted, which is considered a Finish-to-Start (FS) dependency. Another example is beginning to level concrete once pouring has started, which represents a Start-to-Start (SS) dependency.
Project Plan 365 uses these relationships, along with task durations, to automatically calculate and maintain the project schedule.
Types of Dependencies
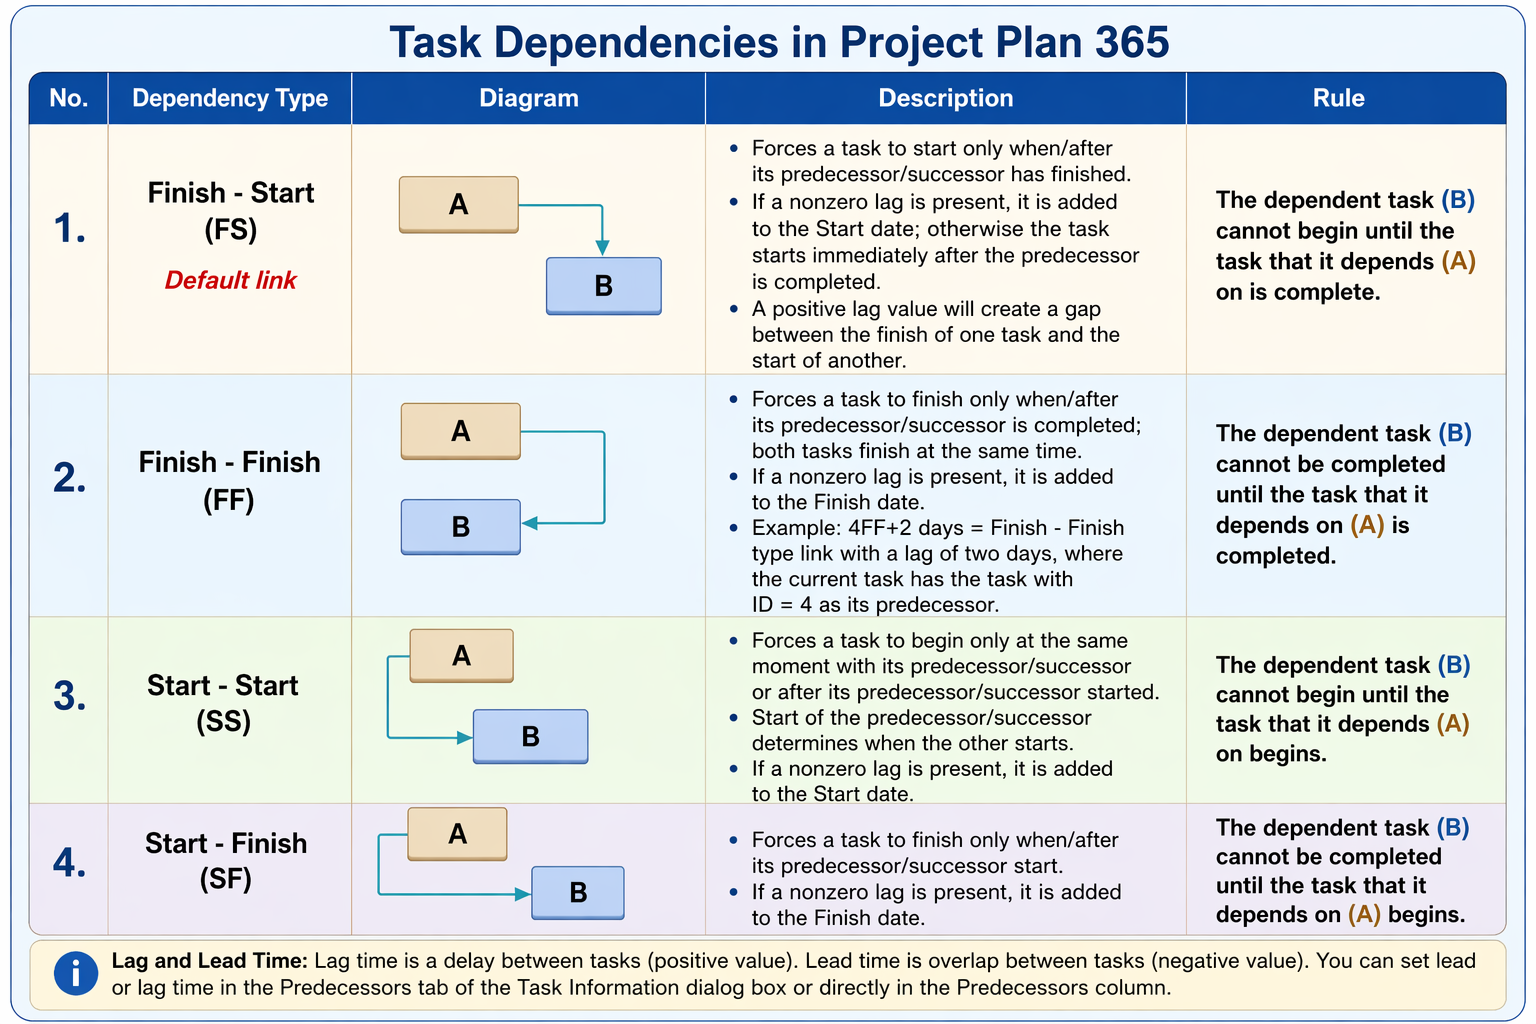
There are several common types of dependencies used in project scheduling. The most frequently used is Finish-to-Start (FS), where one task can begin only after another task has finished. Another common type is Start-to-Start (SS), where one task begins at the same time as, or after, another task starts.
Lead and Lag Time
In addition to task dependencies, you can also define lead or lag time between linked tasks. Lag time is a positive value that introduces a delay between tasks. For example, if a task should begin two days after the previous task finishes, you would enter +2 days. Lead time, on the other hand, is a negative value that allows tasks to overlap. For instance, if a task should start two days before the previous task is completed, you would enter –2 days.
Lead and lag time can be configured either in the Predecessors tab within the Task Information dialog box or directly in the Predecessors column.
The link types supported in Project Plan 365 are summarized below:
You can link two tasks by one of the following options:
In the Predecessors or Successors column enter:
- the ID of the predecessor/successor; this automatically creates a Finish-Start link from the predecessor/successor to the current task
- the ID of the predecessor/successor followed by the link type - a value in {SS, SF, FF}
Step by step on how to link or unlink tasks:
1. In the Gantt Chart view, select the desired task, then go to Task → Task Information.

2. In the Task Information dialog box, click on Predecessors tab.
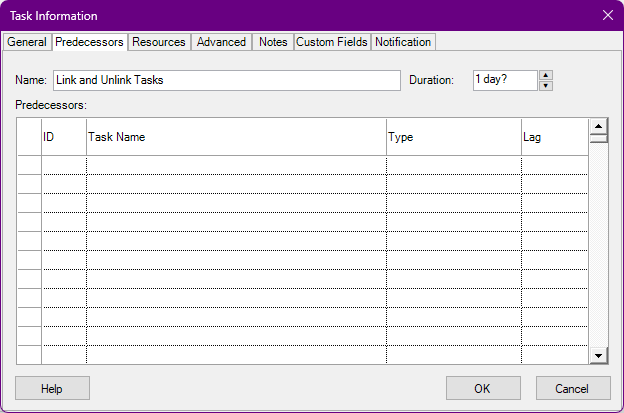
3. Select the task that will be linked as well as the constraint type and click OK.
You can link two tasks using the Predecessors or Successors column:
- Enter the ID of the predecessor/successor → this creates a Finish-to-Start (FS) link by default
- Enter the ID followed by the link type → use one of the following:
- SS (Start-to-Start)
- FF (Finish-to-Finish)
- SF (Start-to-Finish)
 Using a vertical drag-and-drop operation starting from the predecessor: implicitly a Finish-To-Start link is created; to change the link type or to delete it, perform a double click on the link.
 By using the Link option under Task menu, which creates a Finish-To-Start type of dependency between the two selected tasks.

Note: After linking tasks, you can modify or remove dependencies at any time. To remove a link, delete the value from the Predecessors/Successors column or use Task → Unlink.
 Avoid using too many complex links, as this can make the project harder to manage and the schedule more difficult to understand.
 Practice
1. We will specify the interdependencies among tasks by entering values in the Predecessors column. When introducing in the Predecessors column only the id of the predecessor, this automatically creates a Finish-Start link from the predecessor to the current task. Another possibility is to enter the ID of the predecessor followed by the link type. Allowed values are: SS (for Start – Start link type), SF (for Start – Finish link type), FF (for Finish – Finish link type) and FS (for Finish – Start link type).
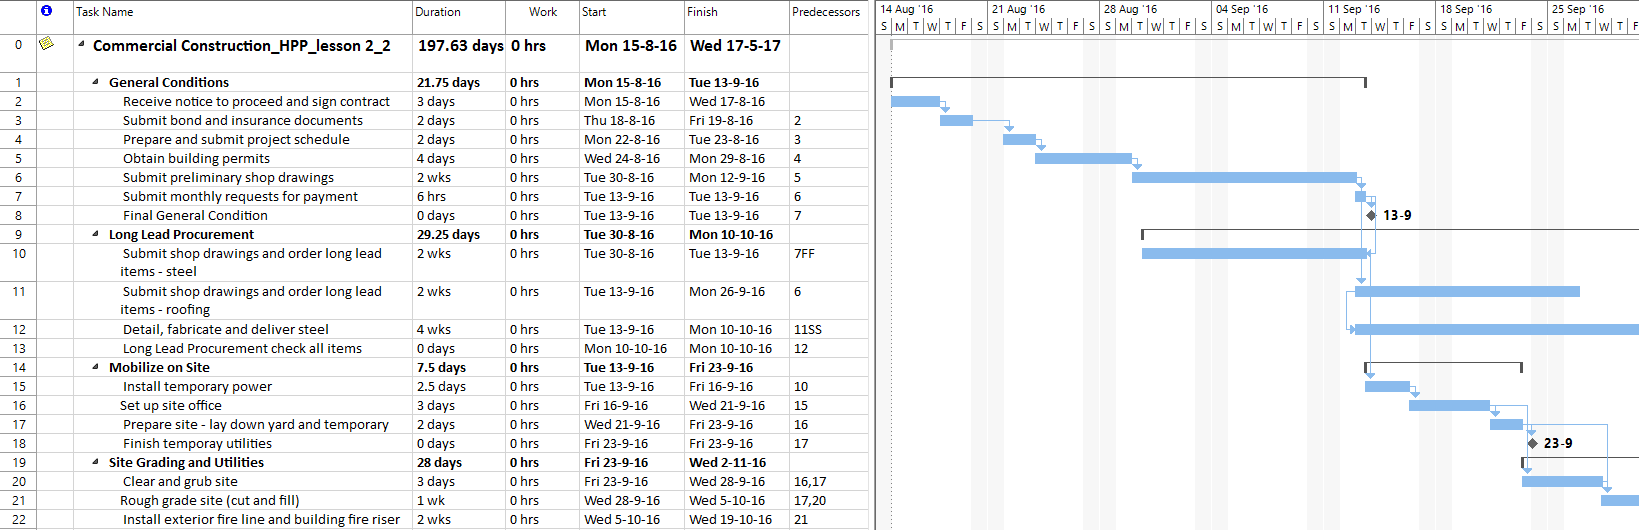
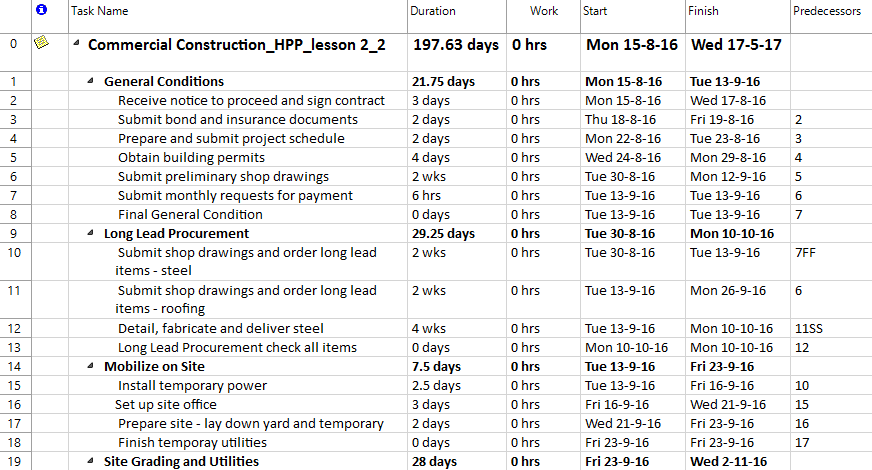
In your project, enter the following values in the Predecessors column:
- for task with ID = 3, we will enter the value 2 in the Predecessors column,
- for task with ID = 4, enter the value 3,
- for task with ID = 5, enter the value 4,
- for task with ID = 6, enter the value 5,
- for task with ID = 8, enter the value 7,
- for task with ID = 10 enter 7FF,
- for task with ID = 11 enter 6,
- for task with ID = 12 enter 11SS,
- for task with ID = 13 enter 12,
- for task with ID = 15 enter value 10,
- for task with ID = 16 enter value 15,
- for task with ID = 17 enter 16,
- for task with ID = 18 enter 17,
- for task with ID = 20 enter values 16,17,
- for task with ID = 21 enter values 17,20,
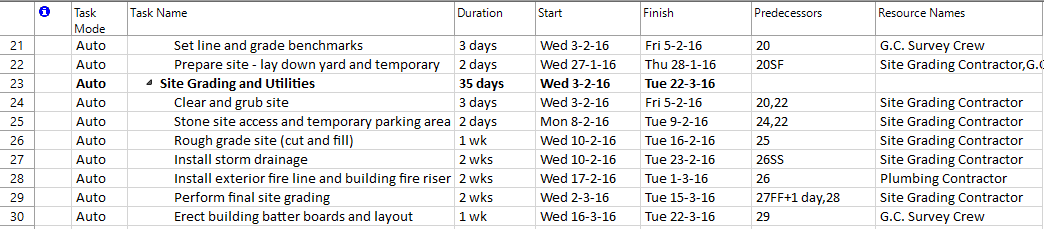
- for task with ID = 22 enter 21,
- for task with ID = 30 enter 24,
- for task with ID = 31 enter 30SS,
- for task with ID = 32 enter 31,
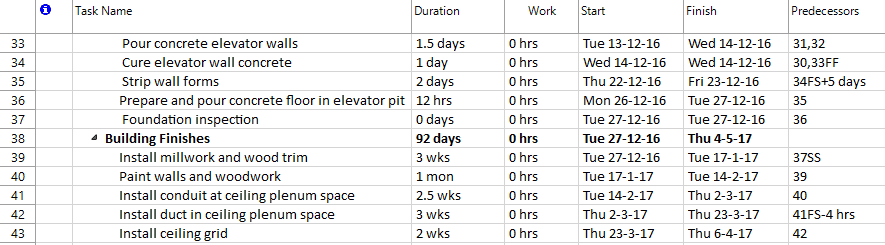
- for task with ID = 33 enter values 31,32,
- for task with ID = 39 enter 37SS,
- for task with ID = 40 enter 39,
- for task with ID = 41 enter 40,
- for task with ID = 43 enter 42,
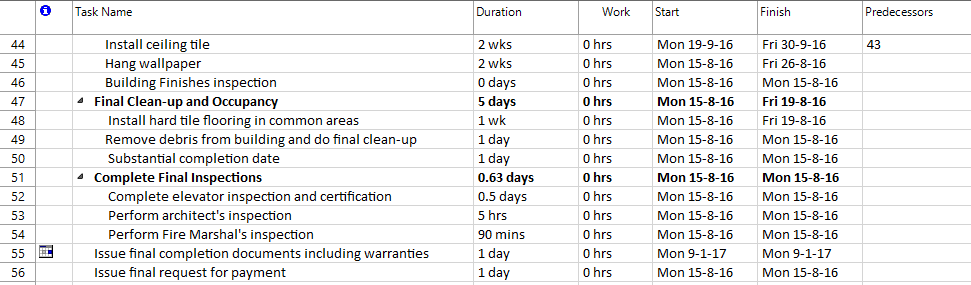
- and finally for task with ID = 44 enter 43.
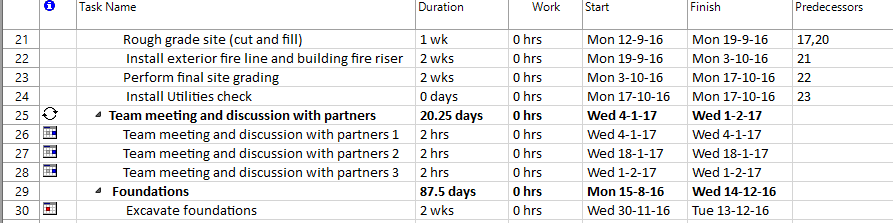
You should get something like this: 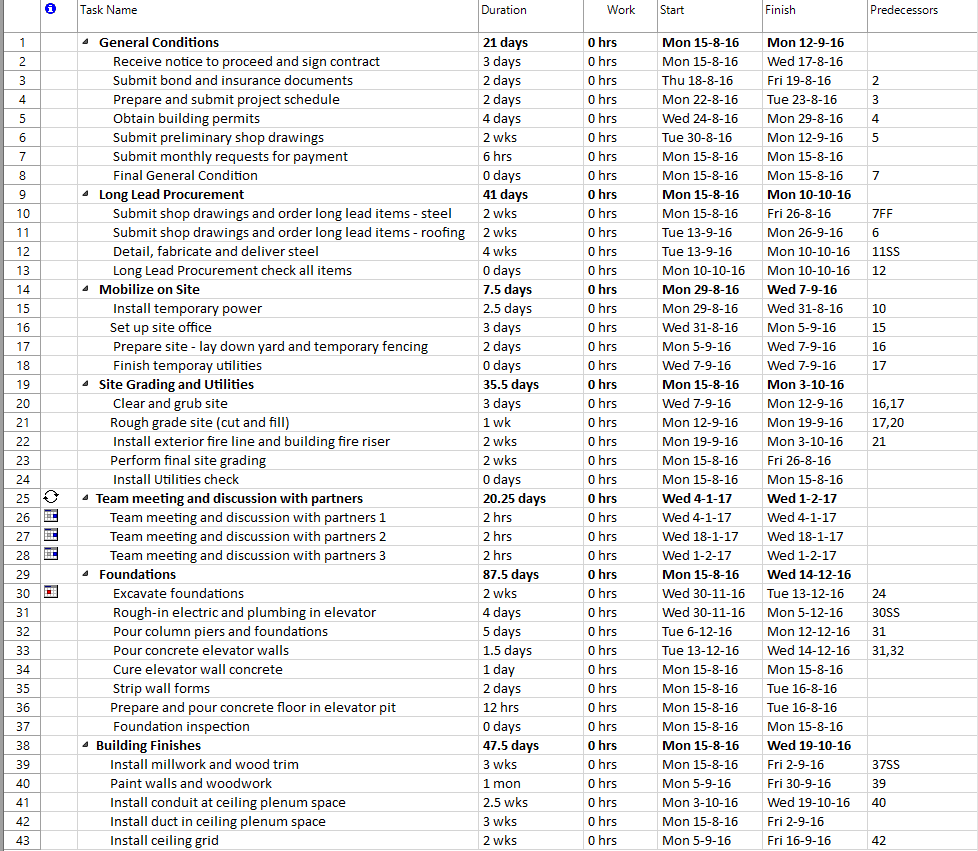
2. After entering these links in the Predecessors column, let's see which is the current finish date of our project. For this, we will open the Options dialog and in the Advanced tab, we will check the the "Show project summary task" option, so that the Project Summary Task will be displayed in our schedule. In this way, you do not need to create the task on the first level. The project task summarizes all the tasks in the project.
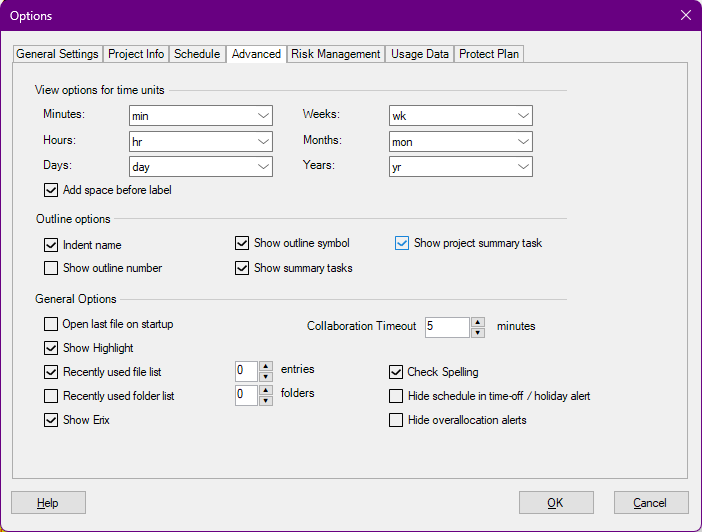
Once you've pressed OK in this dialog, you will notice that the project summary task will be displayed. It has ID 0 and is the root of the WBS. The Project task has assigned by default the name of the project.

3. Another way of linking two tasks is to use in the right panel of Gantt Chart a vertical drag-and-drop operation starting from the predecessor. In this way, implicitly a Finish-Start link is created.
Locate in the right chart, the bar corresponding to task with ID = 22 and drag-and-drop over the taskbar corresponding to task with ID = 23 to create a Finish-to-Start dependency between the two tasks. Use the vertical divider and drag it to the left to see more content from the right side, useful when performing the dragging operation.
During dragging, you will notice a specific icon to indicate the linking process. Proceed in a similar manner and drag the bar for task with ID = 23 over the bar for task with ID = 24.

Note: If the bars are still not visible in the Gantt Chart, you can use the “Zoom Out” option available in menu Project – Zoom tab.
4. Or alternatively, you can use the Link option from the Task menu which creates a Finish-Start link between the two selected tasks. Select tasks with id = 49 and 52 (use non-contiguous multiple selection) and then press on Link option. Proceed in the same way for tasks tasks 52 and 53 (use contiguous multiple selection).
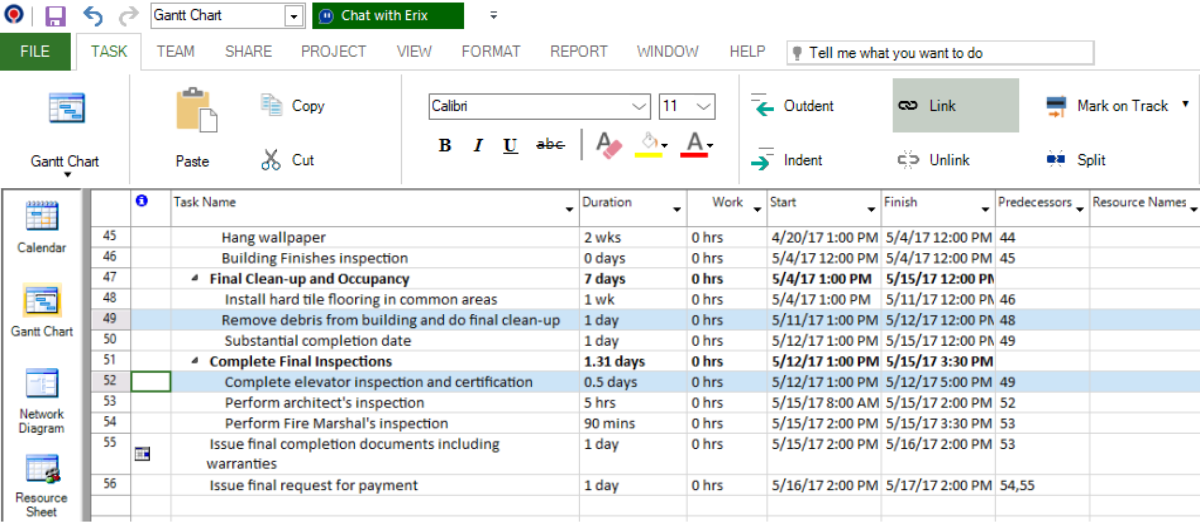 You should get something like:
5. If your task is no longer dependent on any other tasks, you can remove all of the task's dependencies at once.
Suppose that we no longer want to have a dependency between the tasks with ID = 24 and 30. To achieve this, select these 2 tasks using CTRL since they are not listed consecutively. Then press on Unlink option under Task menu.
6. You can also link two tasks by using the Task Information dialog. Select the Predecessors tab and enter the predecessor for the selected task. Open the Task Information dialog for task with ID = 7 and select Predecessors tab. In the ID cell enter the value 6 and press Enter. You will notice that the Task Name cell will be filled with the task name of the predecessor. Notice that the default link Finish-to-Start is displayed in the Type column.
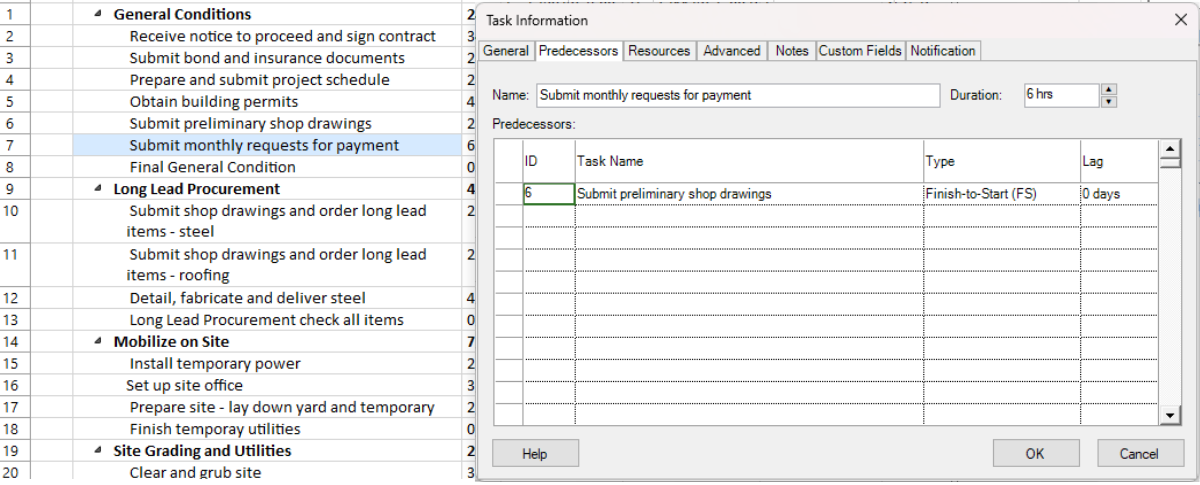
Press OK button and you will see that the value 6 will be displayed in the Predecessors column.
7. In a similar way open the Task Information dialog for task with ID = 34 and go to Predecessors tab. Insert in the ID cell the value 30, then 33. For the predecessor with ID = 33, in the Type cell select from the drop-down list the Finish-to-Finish (FF) link type.
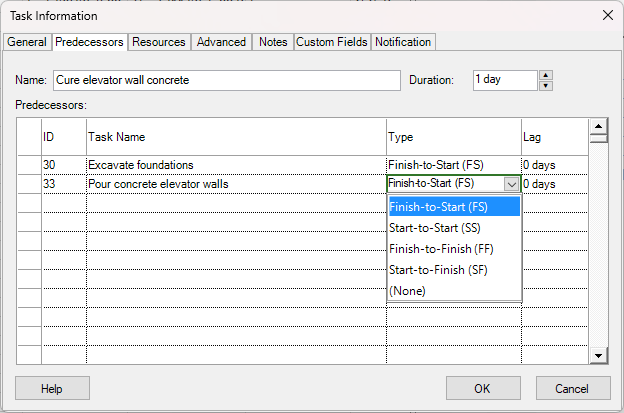
Press OK button and the values 30 and 33FF will be shown in the Predecessors column for the task with ID = 34.

8. Using the Task information dialog enter other links between tasks:
- for task with ID = 36 enter id 35 in the Predecessors tab,
- for task with ID = 37 enter id 36,
- for task with ID = 45 enter id 44,
- for task with ID = 46 enter id 45,
- for task with ID = 48 enter id 46,
- for task with ID = 49 enter id 48,
- for task with ID = 50 enter id 49,
- for task with ID = 54 enter id 53,
- for task with ID = 55 enter id 53,
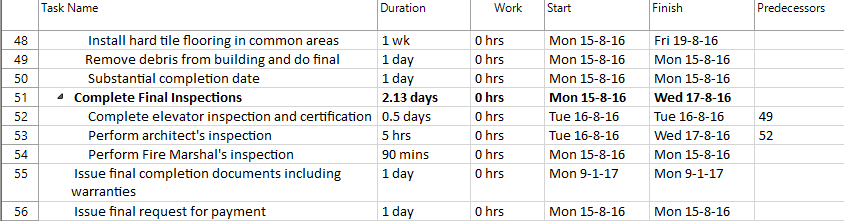
- for task with ID = 56 enter id 54,55.
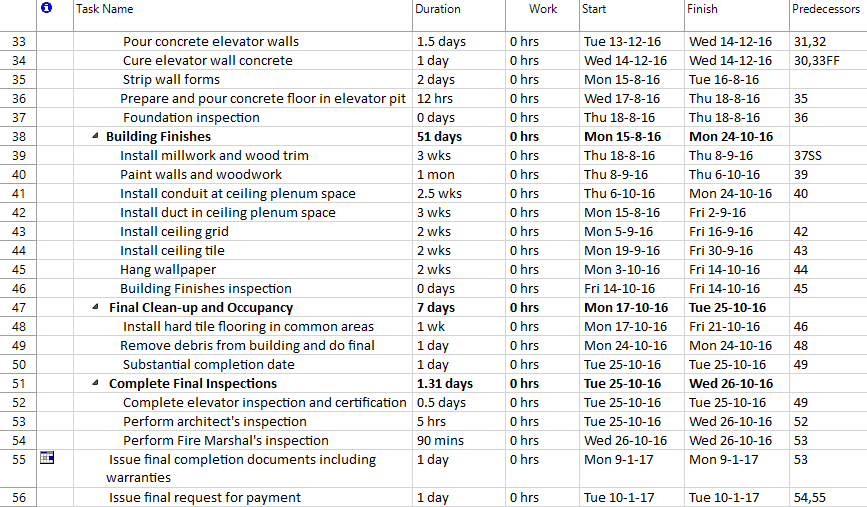
You should obtain something like this:
9. In addition to its type, a link can also have a lag value specified. Let’s assume that we need a five-days delay between the finish of task with ID = 34 and the start of the task with ID = 35. To establish this, we will enter a finish-to-start dependency between the 2 tasks and specify five days of lag time. Thus, we will enter the value 34FS+5 days in the Predecessors cell corresponding to task with ID = 35.

10. Besides lag time, we can also have lead time, which is an overlap between tasks that have a dependency and is entered as a negative value. We will specify a lead time of 4 hours between tasks with ID = 41 and 42. To achieve this, type in the Predecessors column for task with ID = 42, the value 41FS-4 hrs.
11. Notice how different types of links between tasks are depicted in the right Gantt Chart. When hovering the mouse over the separating line between the left side grid and the right side panel in Gantt Chart, the mouse pointer will indicate that a resize is possible. This is a convenient way to show more content from the right side Gantt panel.
12. Now after finishing specifying dependencies between tasks, let's see which is the new current finish date of our project. Notice the new duration of the first summary task and observe how the introduction of dependencies between tasks affects the duration of summary tasks.
![]() Video
Video
If you prefer to see things in action, rather than reading text, watch out this video, which covers some of the topics from this section.