
An important aspect in project planning is to add holidays as non-working days and time-off periods for the resources involved in your project. Having a task complete on Christmas day is never likely to be a realistic expectation! Holidays, vacations, medical leave. People take time off. And keeping track of non-working time is critical for making sure your project meets its deadline. To make sure you never get caught out, you can add holidays (non-working time) to the project calendar. Calendars determine the standard working time and non-working time, such as weekends and holidays, for the project.
The project calendar sets the default working times for all tasks in your project. For example, if most of the work on your project happens between 8 a.m. and 5 p.m. Monday through Friday, the default Standard calendar is the best choice for your project calendar. When you set the project calendar you are simply choosing what the default working times will be for tasks and resources in your project. You can modify working times for individual tasks and resources to reflect exceptions to the default hours. If resource calendars or task calendars are not used, tasks are scheduled during the working time based on the project calendar by default.
Project calendars are used to determine the resource availability, how resources that are assigned to tasks are scheduled, and how the tasks themselves are scheduled. Project calendars and task calendars are used in scheduling the tasks, and if resources are assigned to tasks, resource calendars are used as well. If resource calendars or task calendars are not used, tasks are scheduled during the working time on the project calendar by default.
When setting up your project's calendar, you need to decide which base calendar you want to use as a starting point. If most of your tasks need to be completed during normal working hours, choose the Standard base calendar. If most of your tasks need to be completed during off hours, the Night Shift base calendar may make more sense for your project. Or, if your project needs continuous coverage, choose the 24 Hours base calendar. By default, the Standard calendar is the project calendar. The project calendar is applied to all resources as you add them. You can either assign a different base calendar to the resource, or you can modify the individual resource calendar.
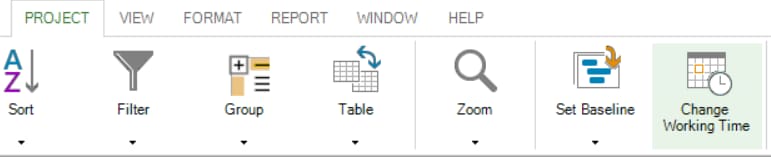
Step by step on how to set the general working days and times for a project:
- Go to Project menu – Change Working Time.
- See that the project includes a few different base calendars, by default:
- Standard: 8AM to 5PM, with a one-hour lunch break at 12PM.
- 24 Hours: 12AM to 12AM, every day.
- Night Shift: 11PM to 8AM, with a one-hour break at 3AM.
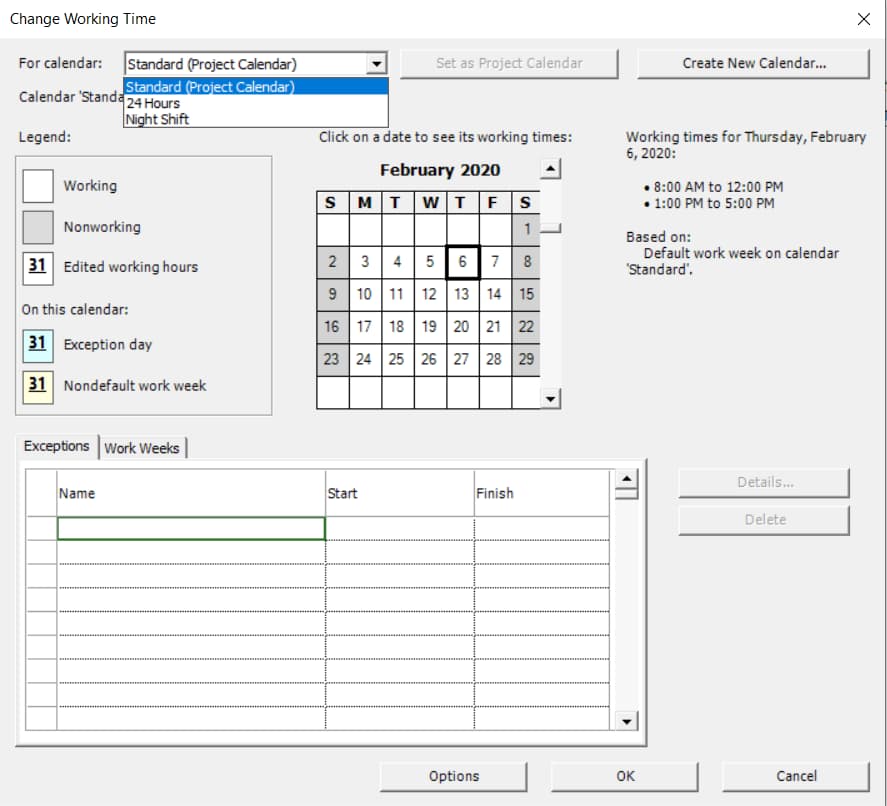
- If these calendars aren't quite working, you can adjust them for your project or create a new base calendar.
- Click the Work Weeks tab and then click Details.
- Select the day(s) that you want to change the working times for, and then choose whether you want them to be working or nonworking time.
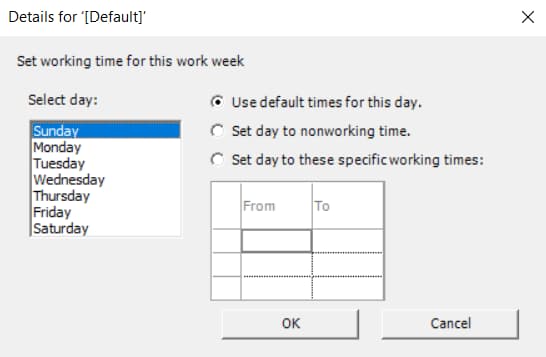
- If you chose Set day to these specific working times, use the From and To columns to set the working times for the selected days.
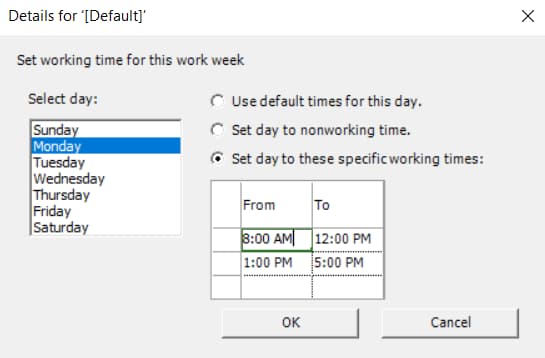
- Click OK to return to the Change Working Time dialog box, and then click OK.
Step by step on how to add a company holiday to the project calendar:
Project doesn’t include preset holidays, but you can add them to any calendar to make sure work is not scheduled on days when your organization isn't working.
- Go to Project menu – Change Working Time.

- Select a calendar from the For calendar list, and then click the holiday on the calendar.
- On the Exceptions tab, type a Name for the holiday, and then press Enter.
The Start and Finish dates are populated with what you had selected on the calendar, and the day is marked as nonworking. But you also can change these days if you want to.
- If this holiday will happen again during the project (especially if the project goes longer than a year), select the holiday and click Details.
- Under Recurrence pattern, set how often the holiday will repeat.

Note: You can also set a Range of recurrence if the holiday happens repeatedly and then stops.

Note: Recurrences do not refer only to nonworking times. There might be as well exceptions in terms of working hours.
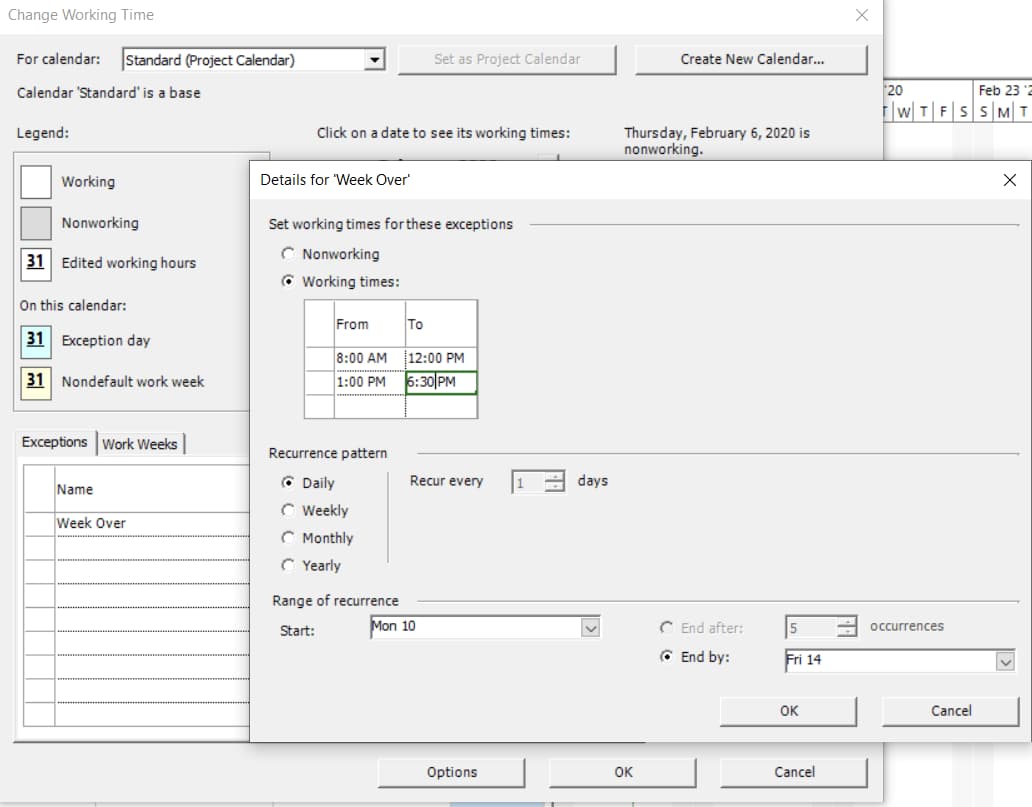
For example: an unexpected problem appeared, and the team has worked an entire day to solve it. In order to avoid a postponing, they decided to work 1.5 hours over the program for a week. In the Change Working Time dialog box, in the Exceptions section, Week Over exception is introduced and its’ interval is set. In the Details for Week Over dialog box, which is displayed by clicking on the Details.. button, Working times intervals (from Set working times for these exceptions section) have to be introduced; Recurrence pattern is Daily in this case and the Range of recurrence is the week which employees choose to work 1.5 hours more. After these settings have been made, click on OK button and the changes will be applied to the project.
- Click OK to return to the Change Working Time dialog box, and then click OK.
Project Plan 365 reschedules tasks around the new nonworking time.
 Practice
1. Let's enter some holidays in our project, applicable to all tasks and resources, during which no work will be conducted. To specify this, we will modify the current project calendar and indicate the non-working days. More exactly, we will add holidays as exceptions to the project calendar. To this end, go to the Project menu and press on Change Working Time option. By doing this, the Change Working Time dialog will be displayed. Make sure that in the drop-down list the Standard Calendar is selected, because this is the calendar we are using in our project and we want to edit it. As you can notice in this list, the Standard calendar is the project calendar, since it is followed by (Project Calendar) after its name.
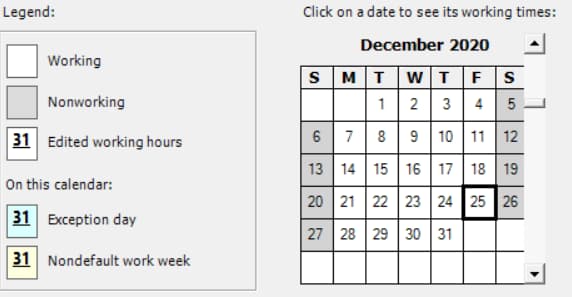
2. You can notice that in the displayed calendar from the Change Working Dialog, you can click on any of the days and in the right side it will show you the working times for that particular day. As you can see, any Monday through Friday according to the Standard Calendar is a working day, and the working day is from 8:00 to 12:00, and then from 1 to 5 PM.
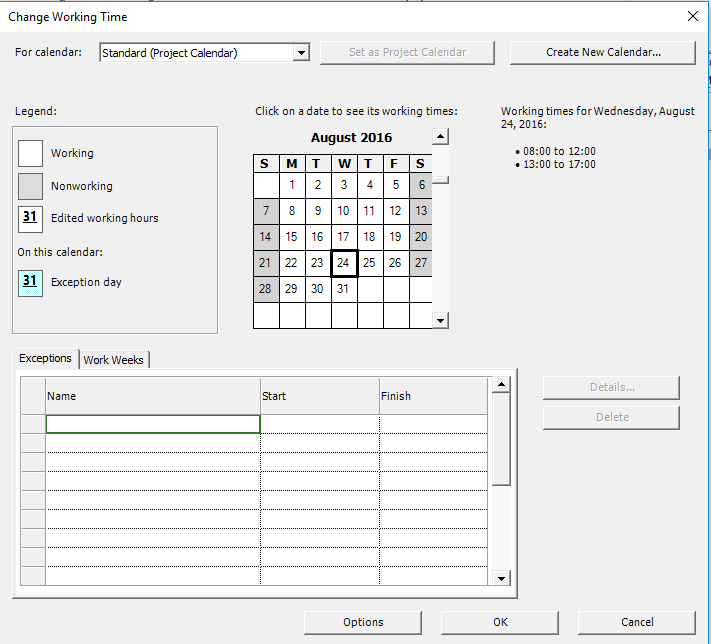
Saturdays and Sundays are non-working days and the cells corresponding to the weekend have grey background, marking them as non-working days according to the legend shown in the left.
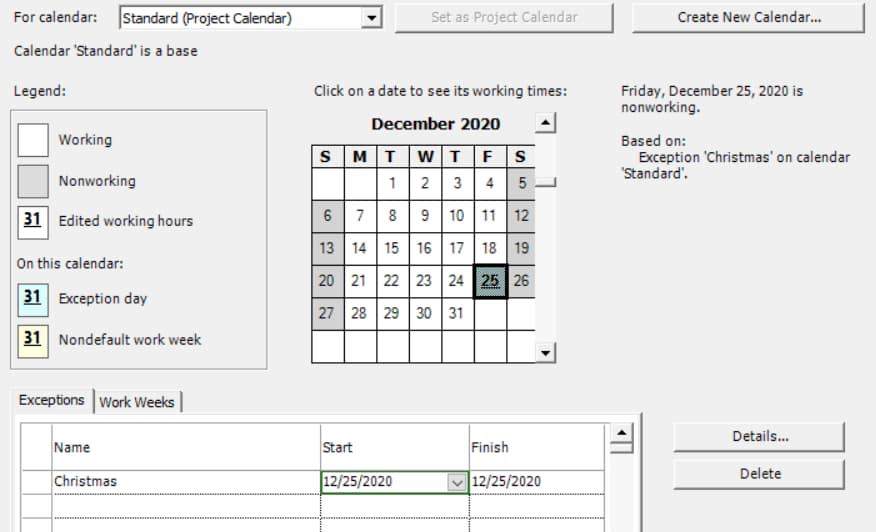
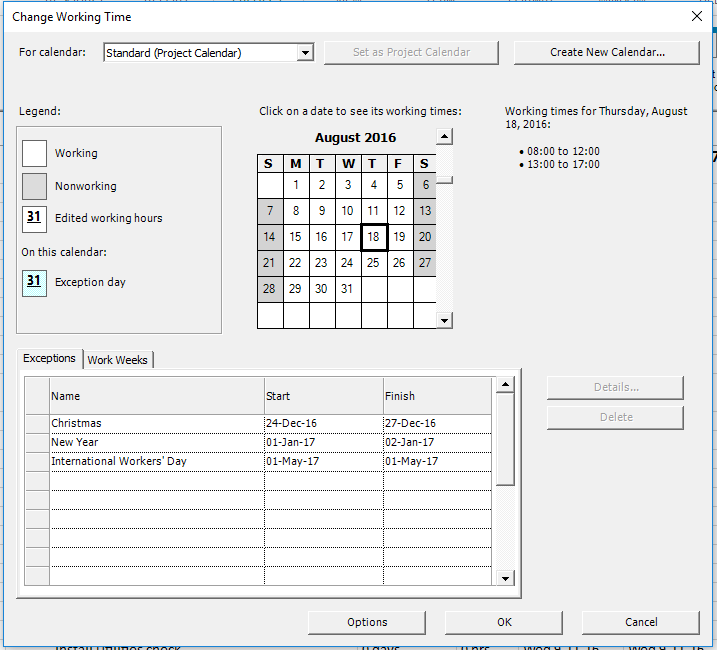
3. Using the Exceptions tab enter three public holidays in the project: Christmas, New Year and International Workers' Day, applicable to all tasks and resources. We will add them as exceptions to the project calendar. Now, in the Name cell enter Christmas as the name of the holiday, and then specify the start and end date of this holiday, let’s say from 24th of December till the 27th of December. For the New Year holiday, proceed in the same way. Specify the 1st of January and 2nd of January from the next year as the interval for this exception and the same for International Workers' Day: enter as the exception period from 1st of May 2017 till 1st of May 2017.
4. If you realize that you entered an exception that you don’t want it anymore, you can select the Name cell and press on Delete button to remove that exception from your project. Or later on you can change the start and finish dates for a particular exception. But for now, we are satisfied as they are. Leave them unchanged.

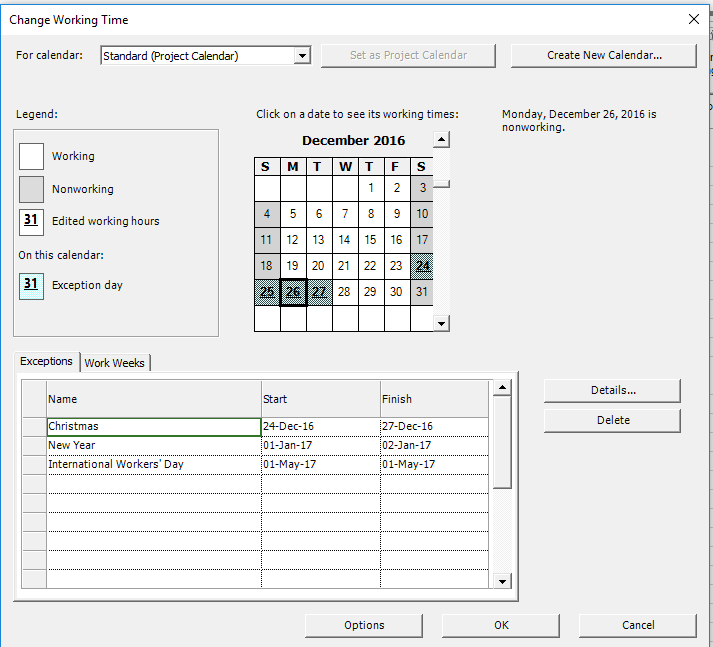
5. If you look in the calendar displayed for December, you will notice that the days from 24 to 27 are specially marked, indicating an exception day. For instance, 26th of December, which is on a Monday and a typical working day in the Standard calendar, is said to be non-working according to the Christmas exception that we’ve previously set:
Press OK button in the Change Working Time dialog, so that these changes will have effect.
6. Once you’ve added the holidays in our project, in the right side of Gantt Chart you can see some extra greyed vertical bars corresponding to the non-working days.
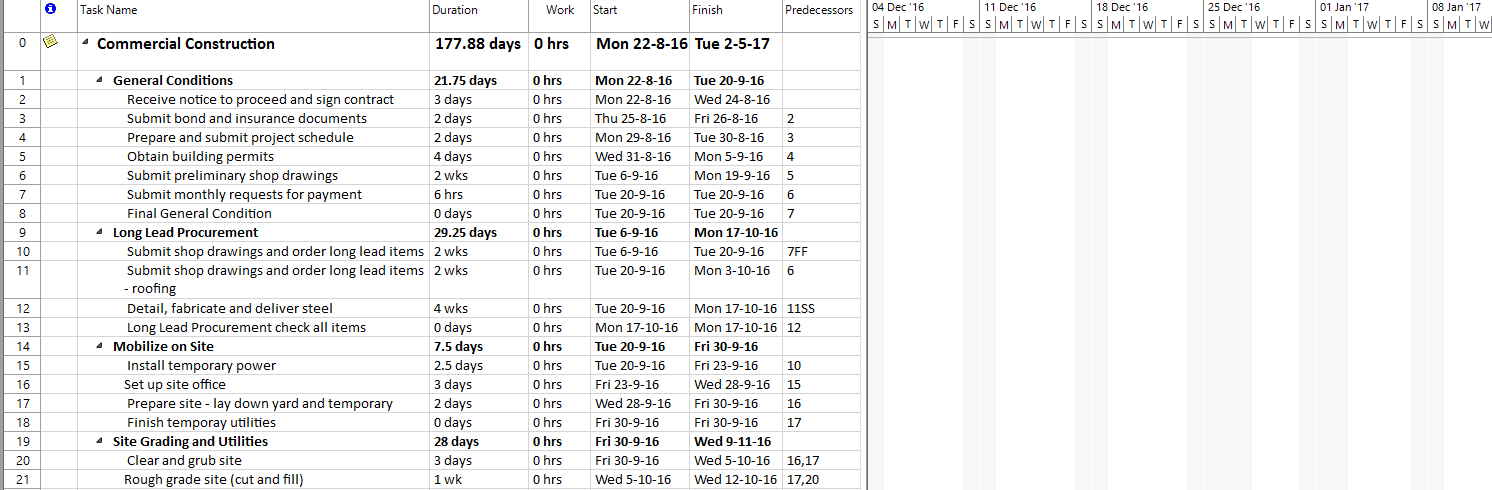
7. In Project Plan 365, tasks can happen only during working time, so you will notice that the finish date for some of our tasks has changed, more exactly the end date was pushed later on and some tasks will start later according to the new finish date of their predecessor.
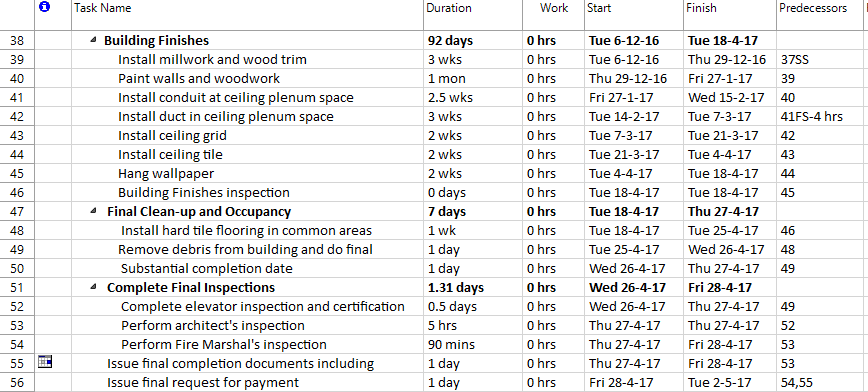
8. If you set some non-working times, tasks will not be allowed to take place during those times. This shows how changes in the calendar affect the tasks in your project. Notice also that the finish date of your project changed and now our project finishes later on 2nd of May:

 Video
Video
If you prefer to see things in action, rather than reading text, watch out this video, which covers some of the topics from this section.