Tracking Costs & Budgeting Projects

Tracking Costs & Budgeting Projects using Project Plan 365

During the formulation and implementation of your team’s project schedule, your team has most likely discussed the budget, and might have asked the following: how much money are we going to spend? How is the money to be spent? What happens when new costs arise…how are those added in? How much have we spent to date? More or less, how much are we off from our initial budget projections?

These questions and more are all questions that Project Plan 365 (or Microsoft Project, for that matter) will answer for you, provided that costs are entered into the application. This simple exercise of entering costs into your project plan will help you ensure the fiscal health of your projects. After all, no one wants a project to come in overbudget, or worst, cancelled midstream due to a lack of funding.

First, let’s understand costs from a budgeting (and software) perspective…

Many schedulers don’t have the ability to track costs (for example, with Wrike and many other popular PM services), or have a separate app or spreadsheet for that, or don’t see the need or simply don’t know how. In PM parlance, that’s a big boo boo; but one that can be easily corrected by following this golden PM rule: always connect the cost of the resource used for any bit of work, with the task itself. Even if your organization has an entire department that handles the finances (and perhaps has their own software to do just that), you should still enter in the costs of resources within Project Plan 365, and also refine these costs over time as they change. This ensures that your project plan is a one-stop shop for both scheduling and financial data – you get the complete project picture!  

Before applying that golden PM rule however, we need to understand how costs are handled within the software. First, think of people as having an associated cost (salaries, consultant fees, vendor charges, etc.). Also, think of materials as having costs associated with each, for example, the price of a palette of bricks, a stack of windows, computers, a desk or a chair. In addition, think of services that can incur costs over the life of a project, such as utility bills or travel expenses.

In Project Plan 365, costs are categorized into three types:

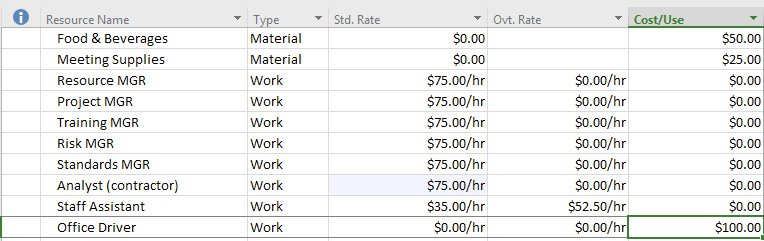
Work: people, equipment or facilities costs, in terms of rates per hour or cost per use. Select this resource type for people / equipment / facilities that are assigned to a task, but are not consumed during the task.

Material: material costs, in terms of a standard rate or a cost per use. Select this resource type to track consumable resources, such as bricks or food stuffs – for things that are used up during the project.

Cost: everything else, in terms of a single one-time charge. Select this resource type to track budgetary items such as travel costs or phone bills that are not dependent on the amount of work done, or on the duration of a task.

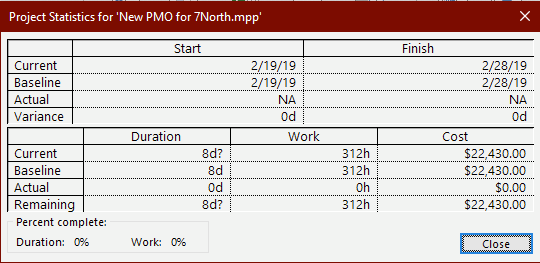
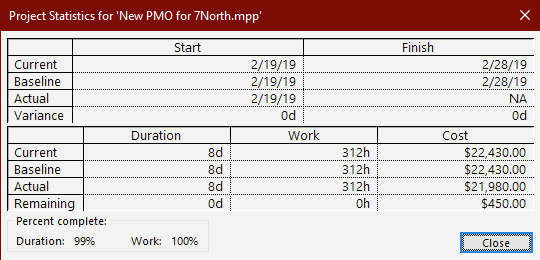
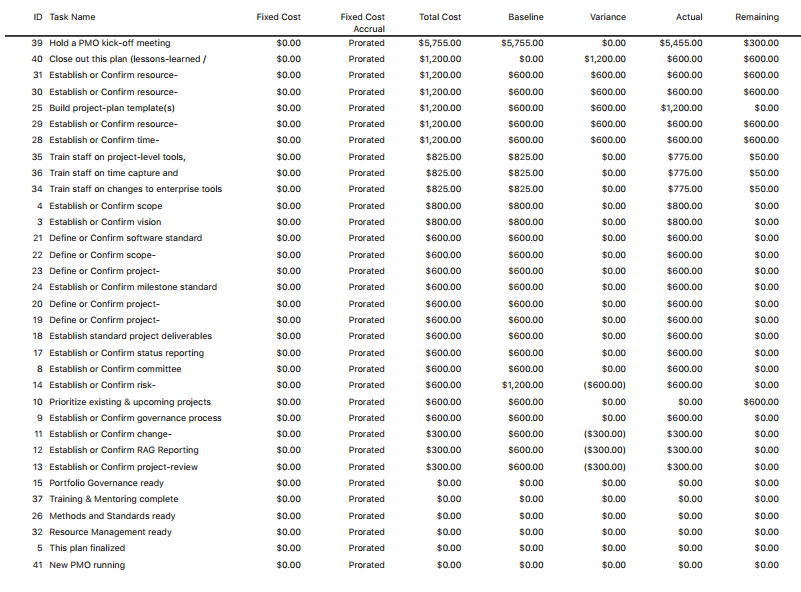
Within any schedule of work, Project Plan 365 automatically calculates the total cost of your project based on your input of resource costs, and the software also flags any variances from your initial budget, as your project progresses over time. In other words, the software calculates how much you planned to spend, are spending now, and how much you’ve overspent or underspent at any given time, or on any task.

It's up to you (as project manager), to determine what costs to track within your project plan, and how. For example, is employee travel tracked or not, or do you want utility bills to be added to the cost of the project? In other words, the granularity of cost tracking is determined by you, the PM; with the level of granularity determining how accurate your cost projections can be (down to the penny, or in much larger round numbers).

Note: If you just want to use the fixed cost column to track costs (i.e. you don’t plan on renting equipment or buying materials by piece,  then you don’t need to add the material resources in the resource sheet as described in the following tutorial. For more on this method, see "Using the Fixed Cost Field..." immediately following the tutorial.

Tutorial: Entering each type of cost (Work, Material & Cost) into the Resource Sheet

If you want to follow along using Project Plan 365, go to the Backstage and select New / New PMO to open up a copy of the template used in this tutorial.

Now that we understand costs from a software perspective, let’s add a few of each type to a project plan, either your own or one of ours. 

All resources should be entered into the Project Plan 365 (or Microsoft Project) Resource Sheet. This resource-related spreadsheet has default columns displayed for entering in the Resource Name, Type, Material Label, Initials, Group, Max Units, Standard and Overtime rates, Cost per use rate, Accrual rate, Base Calendar, and a column for a Code of some sort.

Fortunately, you don’t need to fill each column with data, just the ones needed to calculate costs (for example, for this tutorial we have hidden those we don’t need). You can also add additional columns (such as Email), but let’s leave column manipulation for another tutorial…

In this tutorial, we will cost some resources and begin to budget a project plan, understanding that the financial picture only becomes clear after we apply costed resources to specific tasks within the plan.

Entering costs for resource type WORK

1.

Navigate to the Resource Sheet view and type a name for a resource into a cell under the Resource Name column. After you hit enter, you will see that some of the columns self-populate to a default value, and that the next column has the default Type of Work:

2.

Now you have to determine if you want the resource to be costed by the hour (with or without overtime, based on the calendar), or on a cost-per-use-basis (for example, you are employing someone with a one-time charge per task performed):

Entering costs for resource type MATERIAL

3.

After entering the Resource Name, change the Type to Material and enter the Cost / Use for the material.

4.

Now to complete the Resource Sheet, you would enter in all the Work and Material type resources as required by the task list (see Gantt View, and tasks that require resources).

Entering costs for resource type COSTS

5.

For costs associated with budgetary items such as utility bills or travel expenses (items that do not depend on the work or duration of tasks), you need to enter the name of those costs here; but you won’t be able to enter in the actual cost, just a descriptive name. (See step 6).

6.

To enter in Cost/Use values, you need to flip over to a task list view (such as the Gantt View), to assign this type of cost to the work being done. For example, select the task where the cost incurs, and then use the Task Information popup to enter in the cost of the resource(s) selected. 

In the example below, the cost of a “Conference Space rental” is being applied to a day when the training is planned to take place:

7.

Now, to enter the actual cost of this resource, navigate to Task Information / Resources tab and enter the cost there: 

Do this for all planned expenses not dependent on work or task durations (Cost) – AND - also assign all other resource types (Work and Material) to tasks in the plan, where appropriate.

Using the Fixed Cost Field...

An alternative way of calculating costs is by using the Fixed Cost field (in conjunction with the Cost, Baseline Cost, and Actual Cost fields). To enter fixed costs while looking at your Gantt chart, just flip over to the Project ribbon and select Table / Cost:

Now simply enter any fixed cost amounts into the plan at the appropriate place. Note: never enter costs - or anything else - into a Summary Task field, as those fields are automatically calculated: 

It is a best-practice to use the Notes tab (Task Info pane) to annotate what the fixed cost is about. Once entered, these fixed costs are added to your mix of resource and other costs as represented in the Resource Sheet.

Putting it all together and using your new cost plan

9

Setting a Baseline and Tracking Costs...

Now that you have entered in all the costs that you want to track in your plan, a “baseline” or record of your initial thinking must be captured. Doing so allows you to later look back, and see what you had planned to spend, vs. what you actually spent. (Someone will always ask.) To set a baseline, navigate to Set Baseline on the Project ribbon, and select For Entire Project. Once a baseline is set, you can begin tracking costs as they occur, in terms of baseline costs, actual costs, and remaining costs. In addition, as your project progresses, you can produce budget reports in a variety of formats and for a variety of purposes… no need to use Excel!

Costing at Project Start
Costing at Project End

Sample Budget Report

To get reports on your cost plan, navigate to the Report ribbon and select any of the reporting options found there, for example Costs / Budget Report:

Additional reports can be generated from the Report ribbon that are sure to help you with any financial analysis of your project. For more information on costing and reporting, see our online help, training and videos:

See our complete library of training materials for beginning-to-end lessons on doing all that matters to a PM.

Summing up...

To sum up, we’ve entered in all three types of costs: Work, Material & Cost for every resource in a project plan, and then assigned those costed resources to appropriate tasks in the plan. We also explored using the Fixed Cost field for costing items outside of the Resource Sheet. You can apply this fiscal strategy to new plans being created (for example, to calculate cost projections) or while plans are in progress, i.e. to add additional costs not planned. This wealth of cost data also comes in handy after projects are completed, as you can see from the data how much you overspent (or underspent), and where! 

This strategy of always costing your plans within Project Plan 365 (or Microsoft Project, for that matter), gives managers and project teams real-time cost data that can be used when making financial decisions during project rollout.

For more information on making your project plans viable, see our website. To try out Project Plan 365 for free, download the 30-day trial; and if you are interested in better software for your Project Management Office (PMO), don’t forget to check out our Business (PMO) subscription plan.