Build a Team and Get More Work Done!

Build a Team, and Get More Work Done!

We know that teamwork is important, whatever the project. We've learned to work with others, communicate better and in general, work collectively. But does your software help you facilitate team-building? Well, Project Plan 365 does just that, right out of the box. 

Watch the video and/or read on to find out how to build a team in just a few minutes, no matter where you are within Project Plan 365.

This short tutorial will help you gather your team within the app, and then lets you use what you do know about team work to the best of your team's abilities. In other words, we have added a bit of team-building automation in our latest update...

Gathering the Troops...

First off, all you need to build a team within Project Plan 365, are the email addresses that your team members use. Easy! Here's an example: 

Meet the 7North.Asia team: a lead and co-project manager, an analyst, a partner and a stakeholder.

If you want to follow along and you are brand new to Project Plan 365, then go here to download a 30-day Free Trial.  Here’s how the 7North.Asia team did just that:

1) The Lead PM downloads and installs the Free 30-day Trial for whatever platform the PM is using (in this case, Apple’s MacOS).

2) Now the Lead PM opens the app and then signs up using the new integrated Sign In screen, choosing any of the credential options offered. Apple, Google, Microsoft and LinkedIn accounts can be used – whatever is the most convenient!

3) Once signed in, the Lead PM is prompted to create a new team, as well as identify the business. At this point, one could cancel (X) the team-building workflow and get right to work on the project plan; however, since the Lead PM of 7North.Asia already has a team assembled in the wings, this is the perfect time to get everyone on board.

Note: we do not sell your personal information – or any other information – to third parties; everything entered on our system is considered confidential and kept that way!

Adding Team Members to your Workspace...

4) To identify your team within Project Plan 365, you simply create a list of human resources that can be called upon when needed – just follow the prompts on the “Add Individual Team Member pop-up.”

Here you assign a Project Plan 365 “role” to each team member. In this case, the co-PM for this project is assigned the role of Editor, meaning this PM has more functionality within the app, and more often than not, becomes a paid subscriber when the 30-day Trail expires.
 
When the role of “Read Only” is assigned, that just means that the team member is not expected to make editorial changes to the plan, and will become a free subscriber when the 30-day Trial expires.
 
Repeat this step for each team member you wish to initially add...
 
Note: Roles can be changed at any time using the updated Project Plan 365 Management Portal (see below), and there you can also Add and Delete team members as well.

As new team members are added, they are notified (by email) that they are now part of this team, and each is provided instructions on how to proceed.

Sample email sent to each new member of the team.

5) At this point, the project team is defined, and the Lead PM is sitting in front of a blank project. We recommended immediately saving this blank project to the included My Projects - Drive 365 (a cloud-based drive used for teamwork).

Saving teamwork to the included cloud drive.

6) With the team project plan saved to Drive 365, the Lead PM can now easily assign team members to tasks (as the plan is being developed) using the Resource Names dropdown list: 

Assigning team members to tasks, from a global list of resources. The drop-down also allows the PM to add new members on the fly, right from the drop-down!

Note to Microsoft Project / Project Plan users: existing project plans (with resources defined) that are saved on Drive 365 will enable you to add these resources to the global resource list, and all your projects will then display any added global resources in any resource-related drop-down list.

It is now possible to add human resources from any project, even those created in Microsoft Project!

7) Once your project plan is drafted and ready to be shared with others, you can easily share the plan with your project team by going to TEAM on the ribbon, and then selecting Share:

Sharing with the Team has never been easier - just one click away!

That's it, your done! But read on for more even more team-building help... 

A Note on One-Click Upgrades...

With the Project Plan 365 October 2019 Update, it is now possible to upgrade your subscription plan, on the fly, and just when you need an upgrade feature - such as Real Time Collaboration, Portfolio Dashboards and more. In the following example, our Lead PM @ 7North.Asia has decided to collaborate (in real-time) with other members of the project team, and needs to upgrade to the Business Plan to set that up:

The 30-day Free Trial is automatically upgraded to the Business Plan, so you can check out all the features of Project Plan 365 during your first month.

Two team members collaborating on the project plan in real-time, after upgrading to this Business Plan feature.

Note: you will find several more advanced features such as this within the app, and you don't need to upgrade until you do 🙂 

In Case You Need More Team...

The new portal can be accessed from within the app (see upper right corner) or on the web; just point your browser here to sign in!


Now that the 7North.Asia team is up and running and working on project plans, let’s take a look at a new portal that will help the Lead PM manage the system as project work continues...

To manage subscriptions and to change the administrative password, use the My Account panel:

To manage team members (add, subtract or change roles), use the Team Members panel:

Likewise, to manage projects created by you and your team, flip to the Projects panel to download, delete or otherwise view any project in your portfolio – without ever leaving your browser:

To remove a project from the team's cloud drive, download a copy to store locally (as a backup) and then delete from the portal.

In Union there is Strength....

The Ancient Greek philosopher and storyteller Aesop once said, "In union there is strength" and thousands of years later, we know he was right. That's why the latest version of Project Plan 365 endeavors to strengthen your team-building abilities as best it can. So why not try it out? 

What’s New in the October 2019 Update

What's New in the October 2019 Update...

Hello World!

In 1978, programmer Brian Kernighan coined the now famous digital characters ‘Hello, World’ in his landmark book on how to better code software. Since then, developers have learned to incessantly look for better ways to write code, and to provide better software - version after version – improving over time.

The Project Plan 365 October 2019 Update represents just such an iteration, a “Hello World” moment, so to speak. We’ve packed our free & paid viewer, free trial editor & paid editor, and everything else in between into this update - redefining the user workflow, making it easier to upgrade to new features, providing improved management tools – all to help customers get from the free 30-day trial to a fully-resourced & working project plan as soon as possible. This is great news for any budding PMO, regardless of team size.

Brian Kernighan, author of “The C Programming Language,” 1978.

Now it’s easier to setup a project team and to all begin planning together, all on the same sheet, no matter what device or platform everyone is using. In addition, new team members can be added on the fly, allowing a project manager to increase team resources without any fuss; resource management is essentially built in - from day one! The following walk-through follows a newly created team from the 7North Corporation, who has just opened up a project office in Nepal, and is wanting to have the team begin work on a new project using Project Plan 365…

Meet the 7North.Asia team: a lead and co-project manager, an analyst, a partner and a stakeholder.

Streamlined Free Trial Flow

It is now easier than ever to go from the 30-day Free Trial to a fully working project plan, in a matter of minutes. Here’s how the 7North.Asia team did just that:

1) The Lead PM downloads and installs the Free 30-day Trial for whatever platform the PM is using (in this case, Apple’s MacOS).

2) Now the Lead PM opens the app and then signs up using the new integrated Sign In screen, choosing any of the credential options offered. Apple, Google, Microsoft and LinkedIn accounts can be used – whatever is the most convenient!

3) Once signed in, the Lead PM is prompted to create a new team, as well as identify the business. At this point, one could cancel (X) the team-building workflow and get right to work on the project plan; however, since the Lead PM of 7North.Asia already has a team assembled in the wings, this is the perfect time to get everyone on board.

Note: we do not sell your personal information – or any other information – to third parties; everything entered on our system is considered confidential and kept that way!

Easier Team Building, from the Get Go

During the sign-up process is a great time to build your project team – all you need are the email addresses of your team members.

4) To identify your team within Project Plan 365, you simply create a list of human resources that can be called upon when needed – just follow the prompts on the “Add Individual Team Member pop-up.”

Here you assign a Project Plan 365 “role” to each team member. In this case, the co-PM for this project is assigned the role of Editor, meaning this PM has more functionality within the app, and more often than not, becomes a paid subscriber when the 30-day Trail expires.
 
When the role of “Read Only” is assigned, that just means that the team member is not expected to make editorial changes to the plan, and will become a free subscriber when the 30-day Trial expires.
 
Repeat this step for each team member you wish to initially add...
 
Note: Roles can be changed at any time using the updated Project Plan 365 Management Portal (see below), and there you can also Add and Delete team members as well.

As new team members are added, they are notified (by email) that they are now part of this team, and each is provided instructions on how to proceed.

Sample email sent to each new member of the team.

5) At this point, the project team is defined, and the Lead PM is sitting in front of a blank project. We recommended immediately saving this blank project to the included My Projects - Drive 365 (a cloud-based drive used for teamwork).

Saving teamwork to the included cloud drive.

6) With the team project plan saved to Drive 365, the Lead PM can now easily assign team members to tasks (as the plan is being developed) using the Resource Names dropdown list: 

Assigning team members to tasks, from a global list of resources. The drop-down also allows the PM to add new members on the fly, right from the drop-down!

Note to Microsoft Project / Project Plan users: existing project plans (with resources defined) that are saved on Drive 365 will enable you to add these resources to the global resource list, and all your projects will then display any added global resources in any resource-related drop-down list.

It is now possible to add human resources from any project, even those created in Microsoft Project!

7) Once your project plan is drafted and ready to be shared with others, you can easily share the plan with your project team by going to TEAM on the ribbon, and then selecting Share:

Sharing with the Team has never been easier - just one click away!

One-click Upgrades, in-app!

With the Project Plan 365 October 2019 Update, it is now possible to upgrade your subscription plan, on the fly, and just when you need an upgrade feature - such as Real Time Collaboration, Portfolio Dashboards and more. In the following example, our Lead PM @ 7North.Asia has decided to collaborate (in real-time) with other members of the project team, and needs to upgrade to the Business Plan to set that up:

The 30-day Free Trial is automatically upgraded to the Business Plan, so you can check out all the features of Project Plan 365 during your first month.

Two team members collaborating on the project plan in real-time, after upgrading to this Business Plan feature.

All New Management Portal

The new portal can be accessed from within the app (see upper right corner) or on the web; just point your browser here to sign in!

Now that the 7North.Asia team is up and running and working on project plans, let’s take a look at a new portal that will help the Lead PM manage the system as project work continues...

To manage subscriptions and to change the administrative password, use the My Account panel:

To manage team members (add, subtract or change roles), use the Team Members panel:

Likewise, to manage projects created by you and your team, flip to the Projects panel to download, delete or otherwise view any project in your portfolio – without ever leaving your browser:

To remove a project from the team's cloud drive, download a copy to store locally (as a backup) and then delete from the portal.

Need Assistance with Anything? Ask Erix!

Also included in the Project Plan 365 October 2019 Update, is a first for PM applications – a built-in AI Project Management Assistant that answers basic project planning questions. Erix is currently being trained to answer any question you may have, in regards to our app, or project management in general. Just open up a chat box to say “hello” (or anything else). For more info on Erix, see this page.

Hello World Forever…

Ever since Brian Kernighan published his seminal work “The C Programming Language,” generations of developers have strived to refine their software iteratively, release after release. The Project Plan 365 October 2019 Update follows this tradition, and introduces a streamlined workflow for teams of planners, analysts, stakeholders, etc. – allowing all of them to collaborate on and share plan data, from day-zero to the final conclusion of the project, all with a minimum of expense and fidgeting from the team. We hope you find this update useful, and as we are user-driven in our updates, feel free to let us know what you like or want to see changed in the future. We are here for you – 24x7!

The PMO, Reimagined

The PMO, Reimagined

Historically speaking…

The Project Management Office, or as known in the biz as a PMO, has been evolving within large and medium-size organizations for centuries. However, as with everything else corporate, new technologies are changing the face and features of the typical PMO found within. PMOs are now popping up within small companies, and on an ad-hoc or one-off basis, with small projects being managed by one or two managers in the same fashion as projects tasking hundreds. But before examining this latest trend in the world of project management, let’s take a look at where and why they came to being…

The very first record of a PMO dates back to the 1800s, when the British Parliament established a management group to provide governance over the agricultural industry, with a focus on improving productivity, refining taxation policies and increasing exports. This PMO, like all future ones, cross-cut through multiple departments and management teams, and reported directly to the top. Fast forward to the early 1900s in America, where we find the US Government using the PMO concept to control costs and improve transparency within civil engineering endeavors.

By the 1950s, government administrations had established PMOs within NASA, the Coastguard and the National Science Foundation. Most other gov’t agencies began to follow suit, with American corporations mimicking this model as well. Within these 20th century corporations, PMOs were formed to specifically benefit the org by:

Early PMO Benefits

  • Established closer relationships with clients and other stakeholders.
     
  • Enhanced the org’s ability to deliver projects on time, within budget


  • Standardized governance processes and facilitating the sharing of resources, methodologies, tools and techniques 
  • Established best-practices, and increasing the capture and sharing of institutional knowledge.

PMO design and structure developed concurrently with the model of project management we find in use today – the “Iron Triangle” of time, cost and quality. As the practitioner community developing this model of project management grew, so did the literature on (and practice of) PMOs expand. For example, by the third edition of the PMBOK Guide (the PM bible compiled by the Project Management Institute), the establishment of a PMO for any project, regardless of size or duration, is recommended by the institute and detailed as a best practice for all organizations doing project work.

The Modern PMO…

With that backdrop, we can better understand the wide variety of PMO structures that provide different services within so many organizations. Sometimes called a Centre of Excellence, Performance Office, or Portfolio or Programme Management Office, the PMO usually consists of lead project managers overseeing the org’s work effort and monitoring output in terms of time, cost and quality. Today’s PMOs work hand in hand with HR, Finance, QA and C-Level departments to provide them with the estimation, monitoring and reporting that they all need. In addition, PMOs support the personnel doing the work (for example, construction, engineering, manufacturing and production professionals). PMOs act as a hub for standards and guidelines, as well as data-driven best-practices and software tools.

However, the modern PMO is not without problems, despite the benefits described above. In most cases of today’s PMOs, they have become part of the political landscape of the organization, and in some cases, a commodity (to be touted or blamed for project performance). Often, a PMO may become just another silo within an organization, hindering its ability to complete a charter of understanding the complex relationships between strategies, projects and organizational structures. (See The Project Management Office: it’s just not what it used to be, International Journal of Managing Projects in Business 9(2):282-308 · April 2016.)

In addition, running a PMO can be expensive and when itemized as overhead, subject to budget cuts and other revenue anomalies. As a political body, a PMO is also subject to C-Level criticism when projects go awry, or do not perform as predicted (deservedly or not).

Partially to blame for PMO woes, is the fact that the very best practices for running a PMO originate from a very loud echo chamber of business books, blogs and professional organizations – all mimicking each other, and producing practices that may not be based in science (where a list of functions is selected by successful traits). In other words, PMOs are often established and run based on dubious and unscientifically collected data. So, its no wonder that some small, light-weight and nimble companies often opt to forgo the formation of a PMO altogether – often to their own detriment.

The PMO, Reimagined for the 21st Century

By 2015, it was estimated that more than 75 percent of all small businesses (<$100 million in revenue) had established a PMO, while 95 percent of large businesses (>$1 billion) lead the way. So there is no doubt that the benefits of having a PMO within your small business would include:

Modern PMO Benefits

  • Increases your bottom line

  • Improves customer satisfaction

  • Enhances stakeholder participation


  • Helps you better understand portfolio performance
  • Standardizes what works and rules out what doesn’t 

Some ask, “Is a major hiring initiative, a large budget and tons of software really needed to realize these benefits?” One member of the Microsoft Project User Group (MPUG.org) thinks not, and PM Gaton expresses his views on a PMO-in-a-Box design here. Basically, his idea is to smartly use software to automate more of the functionality of a PMO, without all the people and expense of hosting a traditional 20th century one.

The idea of providing a low-cost and tools-based PMO environment, where anyone with task-leading abilities could slot into a virtual PMO is not new however, and today, many leading software developers are trying (and failing) in this regard. Examples of new-age virtual PMO environments pop up on the web almost daily, and include the likes of Basecamp, Monday, Trello, Smartsheets, Wrike and a host of others – all attempting to mimic the PMO environment of yesteryear, yet each adding 21st century innovations. These innovations include social networking and cloud computing.

Taking What Works and Making it Better, Cheaper and more Inclusive

Arguably, the most successful project management software of all time is Microsoft Project, which started out as a DOS character-based system back in 1984. Now, after more than a dozen iterations, Microsoft supplies a very elaborate “PMO-in-a-Box” design, known as Project Server / Project Online. The base tool (Project) allows anyone to develop project schedules, assign resources to tasks, track progress, manage budgets, and analyze workloads in many ways traditionally performed by highly specialized PMO personnel.

In addition, Project Server (in conjunction with SharePoint Server and other requirements), creates a platform that many large-scale PMO deployments use to manage portfolio and project data in a distributed and customizable way. However, because of an astronomically high price-tag and burdensome IT-staff requirements, smaller businesses with limited capital are left in the cold, fending off project dilemmas on their own.

Enter Project Plan 365…

Project Plan 365 Business & Enterprise solutions take what’s best from a MS Project Server-based PMO experience, and delivers a like experience more affordable and better suited for very small- to medium-sized business. In addition, Project Plan 365 apps allow Apple users to contribute to the PMO, just like their Microsoft-based brothers and sisters – a support feature that Microsoft dropped way back in 1991.

This allows the small biz owner to achieve PMO goals just as the titans of industry do today, all using a standardized format for their project data. Project Plan 365 users can communicate directly with Microsoft Project users via a single project management “language” and protocol. Considering that over the decades, that wealth of project data worldwide has grown into the petabytes, this common data format has profound implications for big-data mining and other AI possibilities – making the PMO of the 2020s one of the leading influencers in all future business to come.

For more information on starting your own small-business PMO, see www.projectplan365.com.

Tracking Costs & Budgeting Projects

Tracking Costs & Budgeting Projects using Project Plan 365

During the formulation and implementation of your team’s project schedule, your team has most likely discussed the budget, and might have asked the following: how much money are we going to spend? How is the money to be spent? What happens when new costs arise…how are those added in? How much have we spent to date? More or less, how much are we off from our initial budget projections?

These questions and more are all questions that Project Plan 365 (or Microsoft Project, for that matter) will answer for you, provided that costs are entered into the application. This simple exercise of entering costs into your project plan will help you ensure the fiscal health of your projects. After all, no one wants a project to come in overbudget, or worst, cancelled midstream due to a lack of funding.

First, let’s understand costs from a budgeting (and software) perspective…

Many schedulers don’t have the ability to track costs (for example, with Wrike and many other popular PM services), or have a separate app or spreadsheet for that, or don’t see the need or simply don’t know how. In PM parlance, that’s a big boo boo; but one that can be easily corrected by following this golden PM rule: always connect the cost of the resource used for any bit of work, with the task itself. Even if your organization has an entire department that handles the finances (and perhaps has their own software to do just that), you should still enter in the costs of resources within Project Plan 365, and also refine these costs over time as they change. This ensures that your project plan is a one-stop shop for both scheduling and financial data – you get the complete project picture!  

Before applying that golden PM rule however, we need to understand how costs are handled within the software. First, think of people as having an associated cost (salaries, consultant fees, vendor charges, etc.). Also, think of materials as having costs associated with each, for example, the price of a palette of bricks, a stack of windows, computers, a desk or a chair. In addition, think of services that can incur costs over the life of a project, such as utility bills or travel expenses.

In Project Plan 365, costs are categorized into three types:

Work: people, equipment or facilities costs, in terms of rates per hour or cost per use. Select this resource type for people / equipment / facilities that are assigned to a task, but are not consumed during the task.

Material: material costs, in terms of a standard rate or a cost per use. Select this resource type to track consumable resources, such as bricks or food stuffs – for things that are used up during the project.

Cost: everything else, in terms of a single one-time charge. Select this resource type to track budgetary items such as travel costs or phone bills that are not dependent on the amount of work done, or on the duration of a task.

Within any schedule of work, Project Plan 365 automatically calculates the total cost of your project based on your input of resource costs, and the software also flags any variances from your initial budget, as your project progresses over time. In other words, the software calculates how much you planned to spend, are spending now, and how much you’ve overspent or underspent at any given time, or on any task.

It's up to you (as project manager), to determine what costs to track within your project plan, and how. For example, is employee travel tracked or not, or do you want utility bills to be added to the cost of the project? In other words, the granularity of cost tracking is determined by you, the PM; with the level of granularity determining how accurate your cost projections can be (down to the penny, or in much larger round numbers).

Note: If you just want to use the fixed cost column to track costs (i.e. you don’t plan on renting equipment or buying materials by piece,  then you don’t need to add the material resources in the resource sheet as described in the following tutorial. For more on this method, see "Using the Fixed Cost Field..." immediately following the tutorial.

Tutorial: Entering each type of cost (Work, Material & Cost) into the Resource Sheet

If you want to follow along using Project Plan 365, go to the Backstage and select New / New PMO to open up a copy of the template used in this tutorial.

Now that we understand costs from a software perspective, let’s add a few of each type to a project plan, either your own or one of ours. 

All resources should be entered into the Project Plan 365 (or Microsoft Project) Resource Sheet. This resource-related spreadsheet has default columns displayed for entering in the Resource Name, Type, Material Label, Initials, Group, Max Units, Standard and Overtime rates, Cost per use rate, Accrual rate, Base Calendar, and a column for a Code of some sort.

Fortunately, you don’t need to fill each column with data, just the ones needed to calculate costs (for example, for this tutorial we have hidden those we don’t need). You can also add additional columns (such as Email), but let’s leave column manipulation for another tutorial…

In this tutorial, we will cost some resources and begin to budget a project plan, understanding that the financial picture only becomes clear after we apply costed resources to specific tasks within the plan.

Entering costs for resource type WORK

1.

Navigate to the Resource Sheet view and type a name for a resource into a cell under the Resource Name column. After you hit enter, you will see that some of the columns self-populate to a default value, and that the next column has the default Type of Work:

2.

Now you have to determine if you want the resource to be costed by the hour (with or without overtime, based on the calendar), or on a cost-per-use-basis (for example, you are employing someone with a one-time charge per task performed):

Entering costs for resource type MATERIAL

3.

After entering the Resource Name, change the Type to Material and enter the Cost / Use for the material.

4.

Now to complete the Resource Sheet, you would enter in all the Work and Material type resources as required by the task list (see Gantt View, and tasks that require resources).

Entering costs for resource type COSTS

5.

For costs associated with budgetary items such as utility bills or travel expenses (items that do not depend on the work or duration of tasks), you need to enter the name of those costs here; but you won’t be able to enter in the actual cost, just a descriptive name. (See step 6).

6.

To enter in Cost/Use values, you need to flip over to a task list view (such as the Gantt View), to assign this type of cost to the work being done. For example, select the task where the cost incurs, and then use the Task Information popup to enter in the cost of the resource(s) selected. 

In the example below, the cost of a “Conference Space rental” is being applied to a day when the training is planned to take place:

7.

Now, to enter the actual cost of this resource, navigate to Task Information / Resources tab and enter the cost there: 

Do this for all planned expenses not dependent on work or task durations (Cost) – AND - also assign all other resource types (Work and Material) to tasks in the plan, where appropriate.

Using the Fixed Cost Field...

An alternative way of calculating costs is by using the Fixed Cost field (in conjunction with the Cost, Baseline Cost, and Actual Cost fields). To enter fixed costs while looking at your Gantt chart, just flip over to the Project ribbon and select Table / Cost:

Now simply enter any fixed cost amounts into the plan at the appropriate place. Note: never enter costs - or anything else - into a Summary Task field, as those fields are automatically calculated: 

It is a best-practice to use the Notes tab (Task Info pane) to annotate what the fixed cost is about. Once entered, these fixed costs are added to your mix of resource and other costs as represented in the Resource Sheet.

Putting it all together and using your new cost plan

9

Setting a Baseline and Tracking Costs...

Now that you have entered in all the costs that you want to track in your plan, a “baseline” or record of your initial thinking must be captured. Doing so allows you to later look back, and see what you had planned to spend, vs. what you actually spent. (Someone will always ask.) To set a baseline, navigate to Set Baseline on the Project ribbon, and select For Entire Project. Once a baseline is set, you can begin tracking costs as they occur, in terms of baseline costs, actual costs, and remaining costs. In addition, as your project progresses, you can produce budget reports in a variety of formats and for a variety of purposes… no need to use Excel!

Costing at Project Start
Costing at Project End

Sample Budget Report

To get reports on your cost plan, navigate to the Report ribbon and select any of the reporting options found there, for example Costs / Budget Report:

Additional reports can be generated from the Report ribbon that are sure to help you with any financial analysis of your project. For more information on costing and reporting, see our online help, training and videos:

See our complete library of training materials for beginning-to-end lessons on doing all that matters to a PM.

Summing up...

To sum up, we’ve entered in all three types of costs: Work, Material & Cost for every resource in a project plan, and then assigned those costed resources to appropriate tasks in the plan. We also explored using the Fixed Cost field for costing items outside of the Resource Sheet. You can apply this fiscal strategy to new plans being created (for example, to calculate cost projections) or while plans are in progress, i.e. to add additional costs not planned. This wealth of cost data also comes in handy after projects are completed, as you can see from the data how much you overspent (or underspent), and where! 

This strategy of always costing your plans within Project Plan 365 (or Microsoft Project, for that matter), gives managers and project teams real-time cost data that can be used when making financial decisions during project rollout.

For more information on making your project plans viable, see our website. To try out Project Plan 365 for free, download the 30-day trial; and if you are interested in better software for your Project Management Office (PMO), don’t forget to check out our Business (PMO) subscription plan.

The Importance of Resource Calendaring

The Importance of Resource Calendaring

With so many projects of late either failing, partially failing or coming in way over budget, those of us in the business of managing projects are concerned, and rightly so.

The reason for project failures and cost bloats are many fold, and this article only covers one problem that falls under the category of resource management - future posts here will cover other reasons, such as problems in task, cost and collaboration management.

While proper calendaring is just one important aspect of resource management, it is often forgotten about amid the furry of rapid project design and implementation.

In our rush to meet project-design deadlines, our up front estimates for human or material resources are often more vague than accurate, and this lack of precision often proves detrimental later on down the project road.

So let's take a look at just how that dynamic works (imprecise calendaring), or in this case, doesn't work to the benefit of project outcomes.

Proper calendaring (or in other words, knowing when your workforce is available for work) is important during all phases of project management, from the initial proposal & budget work-up, to the final analysis conducted once the project is complete.

While your organization may have a standard working calendar (start/end times, company days off, corporate holidays, etc.), it’s important to realize that individuals - and even materials - can have unique calendars that will deviate from the standard one used by your organization, and if not taken into consideration, can skew any plan calculations significantly.

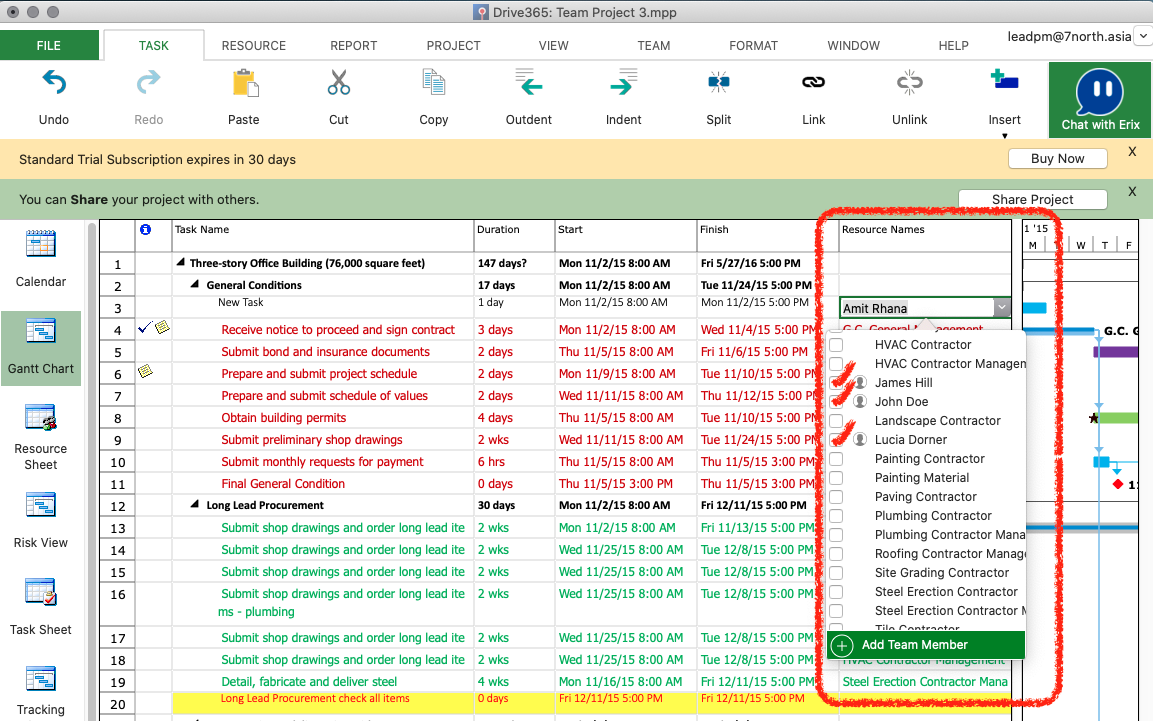
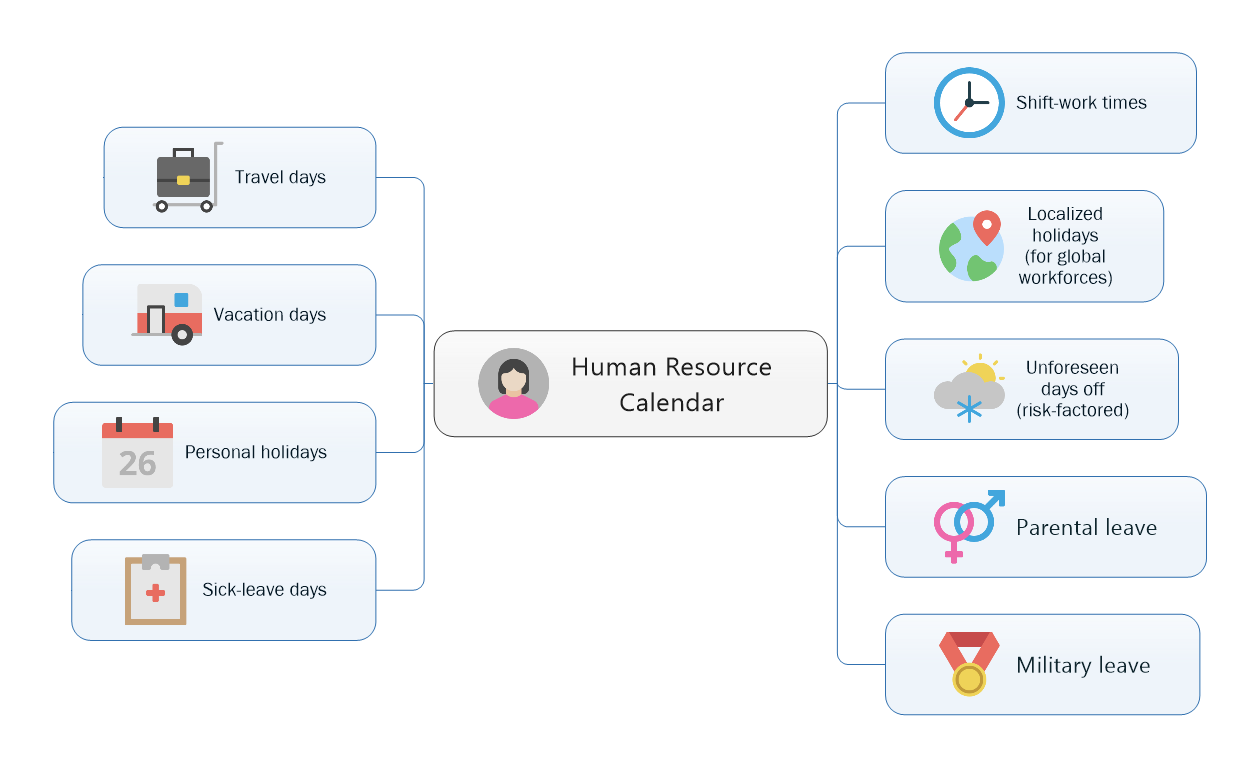
So let's first look at the relationship between a human resource, and their related calendar data points. Figure 1 shows the many related data points for any given human resource.

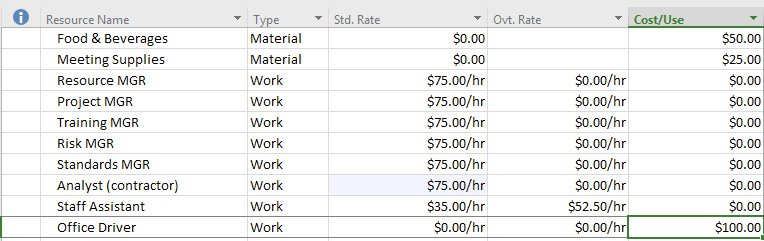
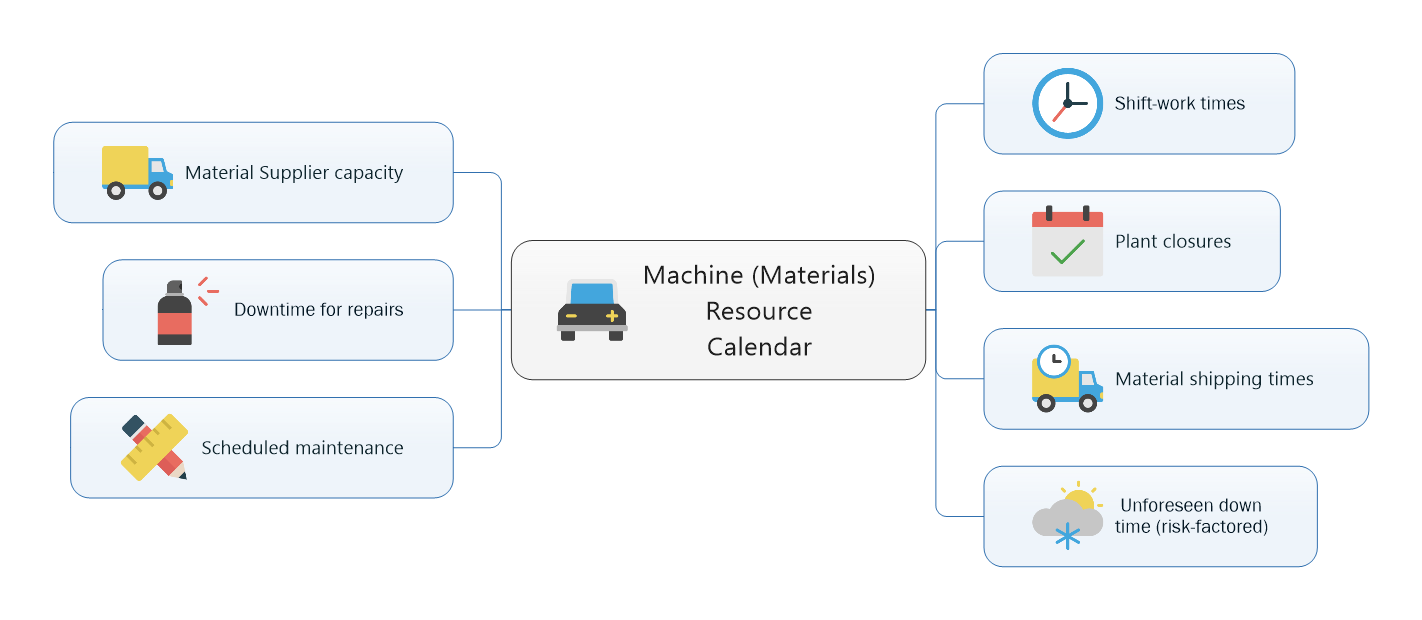
In addition to these human resource calendar deviations, even materials can be considered to have their own calendar data points - see Figure 2.

 Although with specific materials, you usually have them or not, but machines that use material resources can certainly be thought of as having a calendar with data points.

These points of concern (shift-work times, special leaves and holidays, etc.) are all factors that affect the bottom line, in terms of workforce availability, project costs and length of task durations.

One must look at all of these points combined to get a more complete picture of your project's scope.

Implications during the Initial Phase

So when preparing a proposal for any project, instead of picking a number out of a hat (for resource costs) or relying on an enterprises standard 8-hour / 5-day work week, you can use the above data points to get an much better estimate all of these data points are factored in.

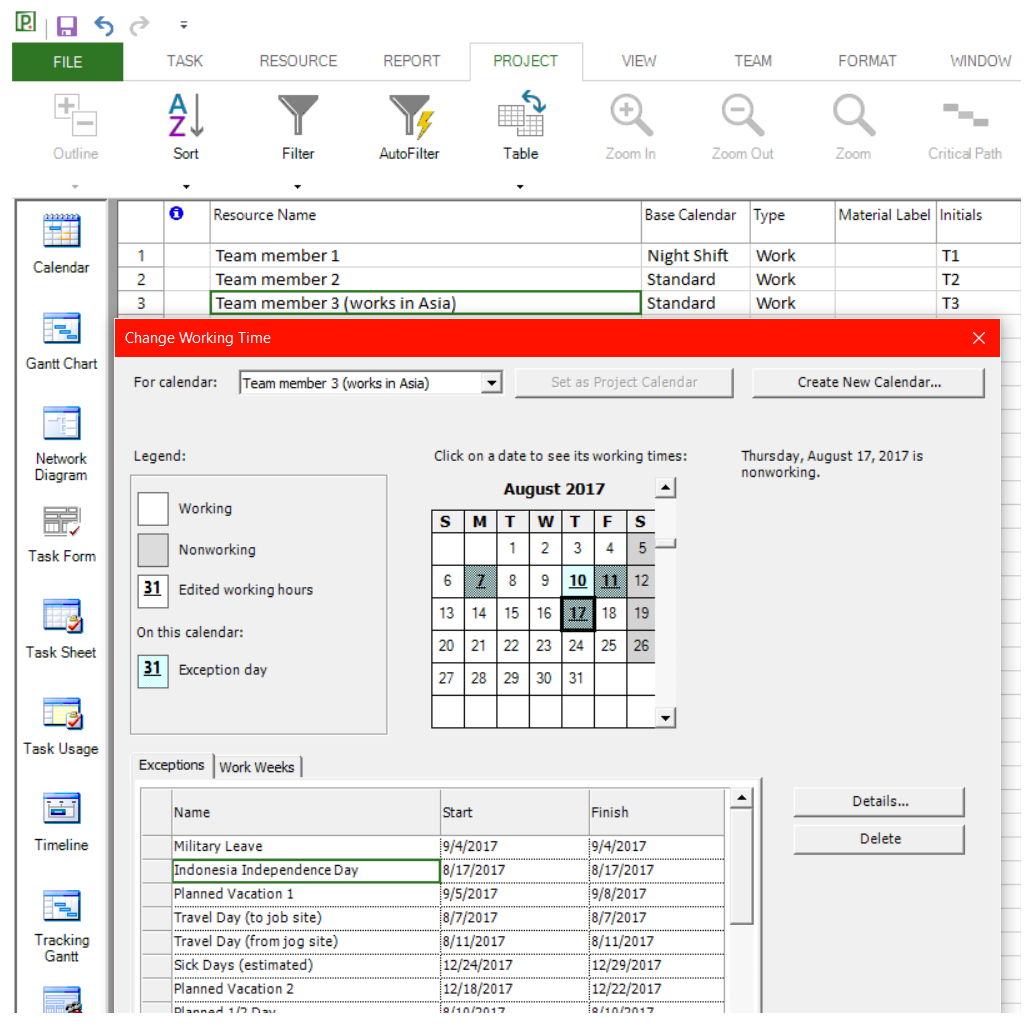
One common example of an error during this phase, is when a globalized company uses a standard US calendar for work being performed in Asia, where workers may be using a 10-hour / 6-day workweek - see Figure 3.

But regardless of location, if these often forgotten factors are not considered, you might be proposing a planned budget and schedule that can never be met.

Implications during the Middle Phase

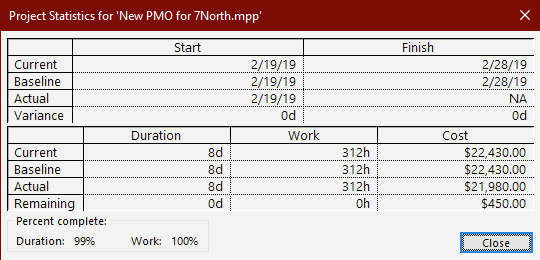
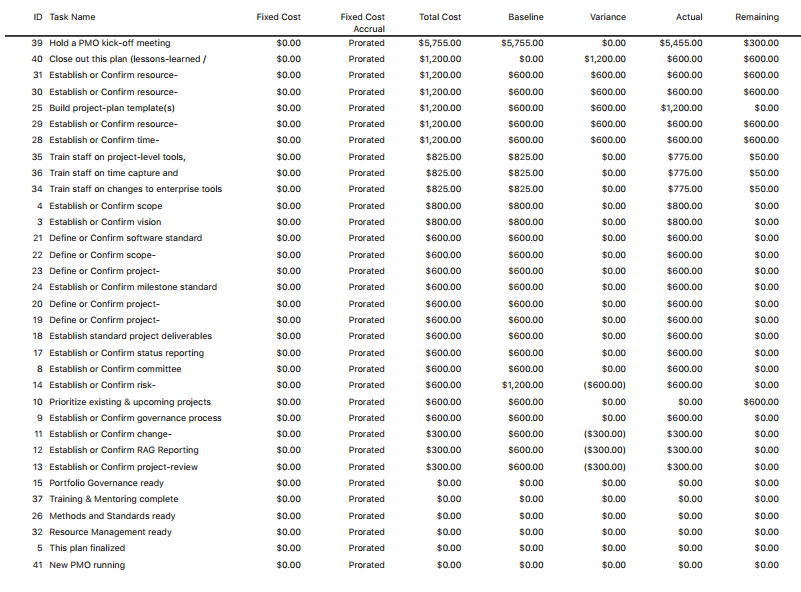
When scheduling the work, unless precise calendaring is used that takes into account all possible calendaring points, planned schedules will most likely be shorter than the actual outcome, and cause your project to have needless cost overruns and delays.

Implications during the Final Phase

When evaluating project performance during the post-mortem, the results will be skewed by the initial errors in calendaring, and that will not be helpful when repurposing previous project data in order to project costs and schedules for the next like-project coming down the road.

In Conclusion…

So, in this post we have 1) explored the importance of calendaring across all phases of project planning, 2) shown how a single resource has many calendar data points, and 3) been given a simple procedure for getting a handle on your project's workforce availability (and how that affects project scope).

The benefit of proper calendaring should become evident in your next project that takes this knowledge into consideration, so give that a try – since as they say - the proof is in the pudding!

Watch this space for future posts that will help ensure that your project is successful, and never placed into the category of "failed" or "partially failed."

Project Success Rates
Machine Resource Calendar
Figure 2. While materials are not thought to have calendar data points, the machines or processes that use them certainly can! (click to enlarge)
Human Resource Calendar
Figure 1. Human resource calendar data points that may deviate from a standard calendar. (click to enlarge)
Granular calendaring tool
Figure 3. Use a scheduling tool (such as Project Plan 365, Microsoft Project, etc.) that is granular enough to capture important calendaring data points, on a per resource basis. (click to enlarge)