Keeping Track with Agile

Keeping Track with Agile... Using Project Plan 365!

Why Agile?

Agile project management is an iterative and incremental approach to delivering requirements throughout the project life cycle. Mainly used in software development, it has gained momentum in many other industries due to its emphasis on collaboration, flexibility, continuous improvement, and high-quality results. It uses popular project management frameworks such as Scrum (which uses Sprints that are time-boxed iterations, typically two weeks long and used to organize tasks and for quick goal shifting) and Kanban (which uses Backlog and Board status to manage work in progress).

Agile is great for teams who are looking for adaptiveness, clear and measurable deliverables, and a flexible approach to project delivery.

Why Project Plan 365?

Project Plan 365 supports both the Agile and Waterfall PM methodologies, all within the same app. That means you don’t have to choose one over the other - you get the best of all worlds - all in one place. With Project Plan 365, you can easily switch between Scrum and Kanban boards - with no disruption to data.

Project Plan 365 is especially data-flexible, meaning your data files can also be opened using Microsoft Project apps - as well as others - and Project Plan 365 actually extends the functionality of Agile planning over using Microsoft Project alone.

This tutorial will show you how to create your first Agile plan, and will also show you how to convert your Scrum to Kanban, in just one click. A practice file is available online, in case you want to follow along. If unfamiliar with Scrum & Kanban (and the difference between the two), see this cheat sheet from Development That Pays. Ok, let’s get started…

To start tracking your first Scrum...

1 Click on File/New, and choose Scrum Project.

Project templates are available for both Scrum and Kanban

2 The Sprint Planning Board displays, allowing you to add project tasks (as board items - just like sticky notes). Once added, you can move tasks into different Sprint cycles; just drag and drop to suit.

To start, an empty board…

3 To create a new board item, click on New Task, and then fill in the task description, then click Add. Repeat for any sprint task you would like to create.

Once board items are created, you can arrange them into Sprints using drag & drop

As you create the list of tasks, you sort them into Sprints (by default, three are included; Sprint 1, Sprint 2 and Sprint 3). In Agile methodology, a Sprint is a fixed time frame for work to be completed. By default, Project Plan 365 includes three sprints, with each sprint lasting 2 weeks (you can always add more; that's explained soon). As a result, the default Agile project duration is 6 weeks (3 sprints x 2 weeks):

You can change default Sprint durations by clicking Manage on the Scrum ribbon

Behind the scenes, as you add tasks to Sprint boards, they are also added to the Project Schedule. From these planning boards and sheets, you can always switch to any other view to see your data within different contexts. Go ahead, try it!

With the Manage Sprints sheet, you can set your Sprint durations (which can vary) and specify the start date of your first Sprint. All the other Sprints will be automatically calculated based on this first Sprint date. By default, Project Plan 365 generates Sprints through to the project’s finish date. But you can also specify a custom date:

Setting a custom date for Sprints

At this point, the task dates are not updated within the Gantt Chart View to reflect the sprint dates – but we know the dates of each sprint by looking at the Manage Sprints sheet.

4 To move tasks between sprints, you can drag and drop them within the Sprint Planning Board:

Creating Sprints on the Spring Planning Board

And you can also sequence tasks using the Current Sprint Board:

Sequencing Sprints on the Current Sprint Board

5 You can complete task details for Sprint board items by using either the Current Sprint Sheet or the Sprint Planning Sheet; there you can add resources, deadlines, work estimates, as well as reassigning Sprint numbers or changing the board status for each task:

Filling in task details using the Sprint sheets (Current and Planning; note that each differ slightly)

Both sheets are similar, with the major difference being that the Sprint Planning Sheet does not show completed tasks, and does show the Agile column by default.

You can add or hide columns to any view in Project Plan 365, for example you can hide the Task Summary column or add the Agile column anywhere you’d like. Also, setting Agile=No will remove that task from all Agile views.

6 You can further customize your sheets by, say, adding the % Complete column, and then tracking progress here:Both sheets are similar, with the major difference being that the Sprint Planning Sheet does not show completed tasks, and does show the Agile column by default.

Adding the % Complete column is very useful

7 You can also customize your boards by, say, adding/deleting/re-naming/moving board columns, or by deleting tasks, assigning resources, marking 100% completes, etc.

Adding, deleting, renaming or moving columns with a right click
Manipulating tasks with right-clicks

Switching between the two Agile flavors...

If you want to switch between the two flavors of Agile (Scrum or Kanban), you can do this from the Scrum ribbon/Agile, from the Project ribbon/Agile, or from the Kanban ribbon/Agile.

Just hit the button you need!
Kanban boards and sheets - just like with Scrum!

When switching to Kanban, you will see very similar features to Scrum. Kanban is all about visualizing your work, limiting work in progress, and maximizing efficiency (or flow). In contrast, Scrum has a Sprint Planning Board that allows you to select which tasks belong to each Sprint. You will not find this when switching to Kanban. Here you use the Backlog Board and Backlog Sheet instead (which is the similar to the Current Planning Board within Scrum).

In conclusion...

To sum up, in this tutorial we learned how to:

  1. Start a Scrum from scratch.
  2. Add tasks to the Sprint Planning Board.
  3. Sequence tasks using the Current Sprint Board
  4. Add details to tasks and manipulate columns in both the Current Sprint Sheet and in the Sprint Planning Sheet.
  5. Switch between Scrum and Kanban displays of the project plan.
For help with this - or anything else PM-related at all - please complete a support ticket and we’ll get right back to you. 

To learn more...

Introducing Erix – Your Virtual PM Assistant

Introducing Erix - Your New PM Assistant!

HELLO WORLD, and welcome to the 4th wave of the Industrial Revolution. This latest iteration of tech is marked by voice-activated AI, expanded robotics, IoT, autonomous vehicles and more... including software that solves tough problems - as well as performing menial or repetitive tasks best offloaded to a virtual assistant in the first place.

With that said, we would like to introduce you to Erix, the world's first Project Management (PM) Assistant built into your app. To introduce yourself to Erix, just open up Project Plan 365 and look to the upper-right corner. 

Introducing Erix 1.0...

Erix 1.0 is currently an in-app chatbot that interacts with  with you via the keyboard. You type in PM-related questions, such as:

  • What is a WBS? 
  • What is Critical Path? 
  • What is a Milestone?

Then Erix provides answers to these kinds of basic PM questions, and can also handle "How do I..." and "What is..." type  queries.

In short, Erix 1.0 can help newer project managers with PM terms and methodolgies, without ever taking their eyes off the screen.

However, Erix is not stopping there...

Next Up, Erix 2.0...

The next iteration of Erix will do more, as this assistant becomes more intelligent over time and more familiar with the data sitting in your plans. 

In Erix  2.0, you will be able to interact with your .MPP-formatted project files, and essentially help you improve your plans, just as any human team member can. For example, Erix will be able to answer questions about your plan-in-progress such as: 

  • Show me the Critical Path.
  • When is the next Milestone due?
  • What tasks are running late?

Erix will give project managers a capable & smart assistant, without an added resource cost! In addition, any Microsoft Project user will be able to interact with Erix, by simply opening up the .MPP file in Project Plan 365.

Erix 3.0 and beyond...

Once Erix has graduated and is a certified PMP (from PMI)Erix will be able to: 

  1. Help you pass your own PMI certification exams.
  2. Solicit real-world experiences from the PM the community (to help Erix better solve PM problems) using big data.
  3. Support voice conversations between Siri and Google Assistant, allowing voice conversations between users of the app and Erix itself.
Look up and right for Erix
Ask Erix anything and help Erix learn
Let Erix know if Erix was helpful - or not!

What You Can Do Now...

Are You Managing Risk? You Should Be.

Risk Management

Are You Managing Risk? You Should Be.

Risk management is a fundamental part of any project management regimen, and if you are not following a process for managing any potential risks you may encounter along the way, you are in serious risk yourself; as risk not mitigated during the rollout of a project is a primary cause of project failure today.

But what is “risk” in the first place?

Simply put, risk is any uncertain event, task or condition that impacts at least one of the project’s objectives as it occurs.

Fortunately for planners, there is a well-documented protocol for incorporating risk taking (and risk management) into your daily project-management routine. This article covers a basic risk management protocol, provides templates to follow that protocol, and then describes how you can use Project Plan 365 to help you mitigate risks along the way. While Risk Management is a well-documented discipline in itself, by following a simple procedure and creating a document or two, anyone can successfully prepare for and mitigate risks as they present themselves…

Risk Management Basics

First, the process of risk management for any project goes like this:

  1. Plan for any potential risks you may encounter during the life of your project (create a Risk Management plan, specific to the project on hand). A downloadable template is provided here to get you started.
  2. Layout a process for risk identification, analysis, response, monitoring and reporting within the newly created plan. In addition, any contingency plans for the identified risks should be documented here, along with those responsible for carrying out the prepared mitigations (command & control).
  3. Develop a risk register to identify risks, where you rate the likelihood that the risky situation will occur, the seriousness of each risky situation, and the impact on the project if that risk were to go unchecked. A downloadable template is provided here to help you out.
  4. Maintain a risk log, documenting any interventions and follow-ups as needed.
  5. In your planning software, identify risky tasks and review them periodically as your project is rolled out. Also, update your project plan based on any risk mitigations performed, or new risks encountered.

Now, for those using Project Plan 365, the following tutorial will get you started recording and displaying risk within your plan.

Note to Microsoft Project Users:
If you are a Microsoft Project user, you can use this procedure as well, but you must first use Project Plan 365 to set things up within your .MPP file. Then, when you open up your project file in MS Project, you should see any identified risk as described below (just add a column containing Outline Code7 and rename the column to Risk).

Identifying Risky Tasks within Project Plan 365

Project Plan 365 offers a simple yet effective way of tracking and managing the risks you have identified in your Risk Register (from your Risk Management Plan). Just follow these steps to get started:

1 ) To turn on the Risk Management feature within Project Plan 365; just go to Backstage | Options | Risk Management and click the Enable Risk Management System checkbox, and then tap OK.

2 ) Once the Risk Management System is enabled, switch your plan to the Risk View, where you can identify any risky tasks in your plan by changing values in stored in the Risk column: *

* To learn how to insert a Risk column into any view, see our online training (click Support above).

The Risk View is handy, as this view allows you to go through your entire plan to quickly “tag” tasks with a risk value, and then this view will automatically sort all tasks by the value selected (in this case: low, medium, high or No Value).

3 ) You can also add your Risk column to any view you desire, for example, to the Gantt Chart View:

Any view can contain your Risk column.

4 ) Using the Risk column (by clicking the twisty), you can filter out the values you don’t want to see. In this example, we are filtering on just the high values. Once filtered, the view will only show tasks with a high-risk value:

Filtered list of high risk tasks.

In addition to filtering risky tasks to display just what you want, you can also customize the default risk labels to display anything you want, such as labels used in your Risk Management Register, Logs, or Plan. Just edit the Risk Level grid found under Options to suit your requirements:

Customize your risk labels here, to suit your needs.

Risk Reporting Within Project Plan 365

Once Risk values are added to tasks, a Risk Report can be generated by navigating to the Report ribbon and selecting one of the available reports:

Resulting Overview report

Summing Up...

By synchronizing a Risk Management Plan right alongside your project plan, you can track risky tasks within your schedule, and stay on top of any activity that may go wrong during the course of your project rollout. In addition, you can produce Risk Reports or otherwise use your project schedule to control and mitigate risks as they materialize, all according to plan.

To start managing project risk today, subscribe to the Project Plan 365 Business Plan without delay!

Risk Management the easy way - subscribe to Project Plan 365 today!

For more information about Risk Management within Project Plan 365, see this help page.

Simple Calendaring in Project Plan 356

Simple Calendaring in Project Plan 356

When scheduling a project in either Microsoft Project or Project Plan 365, you can change the calendar for your project, i.e. the days your work is ongoing – or not! In fact, you can tailor calendars in many ways, for example, you can have unique calendars for people (resources), for tasks and for the project as a whole. Having all these custom calendaring options is great, but can be a bit complex and confusing to set up (see here). 

What if all you need to do is change the days of the week everyone is working, for example if your project locale is somewhere Friday & Saturday is considered weekend time off (or, if you are lucky enough to just work 4 days a week instead of 5)? In these simple cases, the latest version of Project Plan 365 provides a much easier way to change your project calendar.

And what if you just want to extend the default work week (M-F) by one day, perhaps to finish up some work left over from Friday, using Saturday to get that done. Here too, Project Plan 365 provides a quick way to change the project calendar to reflect that one extra day of work.

Case 1 – Changing the Default Work Week

In the case where all want to do is adjust the work days within a week, for example, to indicate your project is being rolled out Sunday through Thursday, instead of the usual Monday through Friday, then just follow these steps:

1 ) Open Project Plan 365 and go to the File menu to select Options:

2 ) In the Options dialog, go to the Schedule tab and check or uncheck the desired-working days from the Default working days group:

A default work week, for example, used in most Muslim-oriented countries.

In the example above, we’ve changed the default work week, and have also updated the default project calendar all in one go.

3 ) Click OK. 

Case 2 – Changing a Single Day

In the case where all want to do is extend or limit your work by a single specific day, for example to finish up some work left over from Friday - on Saturday, then just follow these simple steps:

1 ) Within your plan, open the date-picker from anywhere within in the Start/Finish column and click on any non-working day that you wish to change (in this case, Sat):

2 ) When clicking a non-working day (or a working day for that matter), an Alert message appears, from which you have these three options:

If you selected a non-working day (in this example, Saturday the 7th) and then hit the Make this a working day radio button, clicking OK makes that Saturday a working day.

3 ) Here you can also Adjust the default working days (just as we did in Case 1 above), i.e. if you decide you are working all Saturdays from here on out, you can just select the Saturday checkbox to make that so:

TIP: You can also use this alert to MOVE a task to the next working day (by selecting any task and hitting the radio button named the same).

4 ) Click OK, and you’re done.

Summing Up...

For these common cases of calendaring adjustments, you can simply use Options / Schedule to change the default work week, or just click on a Start/Finish date (from any view) to make changes to a particular day. This technique greatly simplifies tailoring your work days to the days you are actually working - or not!

Note: Of course, you can always do all of this the “hard” way (by using the Change Working Time dialog), but the two cases described here do not need such heavy lifting, and this simple method allows Project Plan 365 users to make the most common calendar adjustments in the shortest amount of time. (Sorry Microsoft Project users, this feature is not available to you.)

To start calendaring the easy way, subscribe to Project Plan 365 right away!

Taking Snapshots, the Project Management Way

What is a Baseline?

A baseline is generically known as a value or condition against which future measurements can be compared. Within the context of project management, these values and conditions are the project’s scope, cost and schedule. A project baseline can be thought of as a “snapshot” of a project’s initial condition, just before work begins.

Baselines are used to evaluate project performance over time, by comparing an initial project snapshot with any subsequent images captured while your project progresses. Baselines are also used to quantify any variances from the original plan while the plan is in motion.

You can also think of a project baseline as a “sanity check,” in the sense that project sanity is defined as not making the same mistake over and over again while hoping for a better result!

Once your project is designed, capturing an initial project baseline is the first step taken to ensure better project performance — and PM sanity – over time. The baseline draws a line in the sand that says, “This is what we thought was going to happen, vs. what actually happened.”

Most decent project management tools have a feature for capturing the initial baseline and displaying any variances from that initial line in the sand. Project Plan 365 & Microsoft Project are no exception. Both can store and display up to 10 baselines for any given project (or for a select group of tasks). The typical baseline metrics most project managers use are: baseline duration, work and cost. However, many other metrics can be defined and then displayed.

When setting up a project plan, it is important to remember to set the initial baseline before putting the schedule into play. In other words, this step needs to be taken before work begins, but after you have designed your project plan and when you are ready to roll.

Note: Forgetting to set an initial baseline is a common mistake, and this boo-boo can’t easily be rectified once your plan is in motion.

>>> To work along with the following tutorial, download this sample plan (and Project Plan 365, if you don't have already) <<<

To visualize how a baseline is used, let’s take this simple three-day, three-task, three-person project as an example, before the initial baseline has been set:

Step 1. Open a plan in Gantt Chart view for a project  with no baseline set:

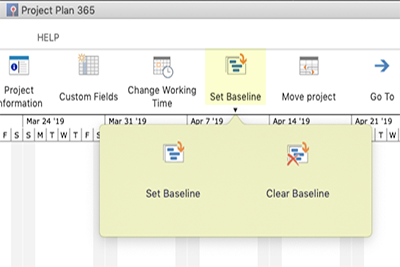
Step 2. Navigate to the Project ribbon / Set Baseline and set the baseline there:

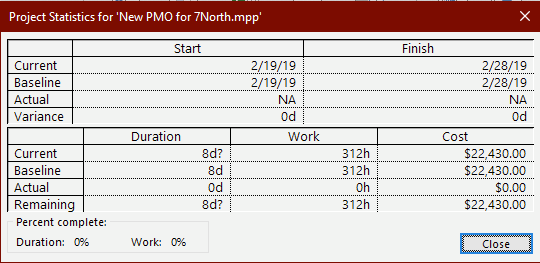
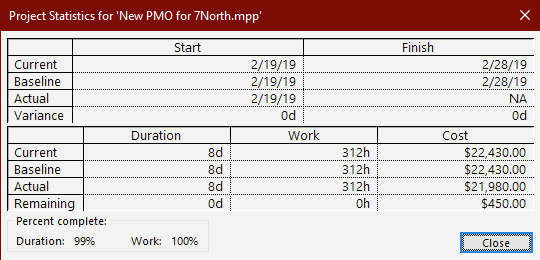
Once you have set an initial baseline, the app begins crunching numbers and updating baseline values in fields and on the Tracking Gantt chart, as each change is made:

Step 3. Now with a baseline set, you can begin tracking and then see the changes made to your plan. Let’s assume that our three-day, three-task, three-person project was completed, but with Team member 1 — being the slowpoke that he is — is taking two days to complete the one-day task as planned. The resulting display in our project plan now shows this variance, using actual values and baseline values - and displaying a baseline “shift” in the Tracking Gantt chart:

Variances (baseline shift) are shown in baseline fields and on the Tracking Gantt chart. Baseline shifts are an important indicator of project performance over time and should be employed by every project manager when evaluating project metrics.

A quick way of seeing these shifts in your plan, is to use the Project ribbon to view Project Information / Project Statistics, which are updated in real-time. Project Statistics shows basic baseline values and variances from the actuals:

-- This article first appeared on MPUG.org on November 21, 2017 and appears here with permission of the author.

To begin implementing baselines within your plans, simply subscribe to Project Plan 365 today!

Innovations in Sub Building – and PM!

How New Technology, Better Collaboration, Simulations and Modular Designs Make for Project Success: An Examination of Nuclear Submarine Building

Some of the largest and most expensive projects completed of late have been fraught with huge time & cost overruns. These unexpected delays and expenses cause partial or full project failures with much hardship for all involved! Yet there have been a few cases where multi-billion dollar projects have been completed on time, under budget and beyond all odds - with a minimum of rework. Well, reasonably so…

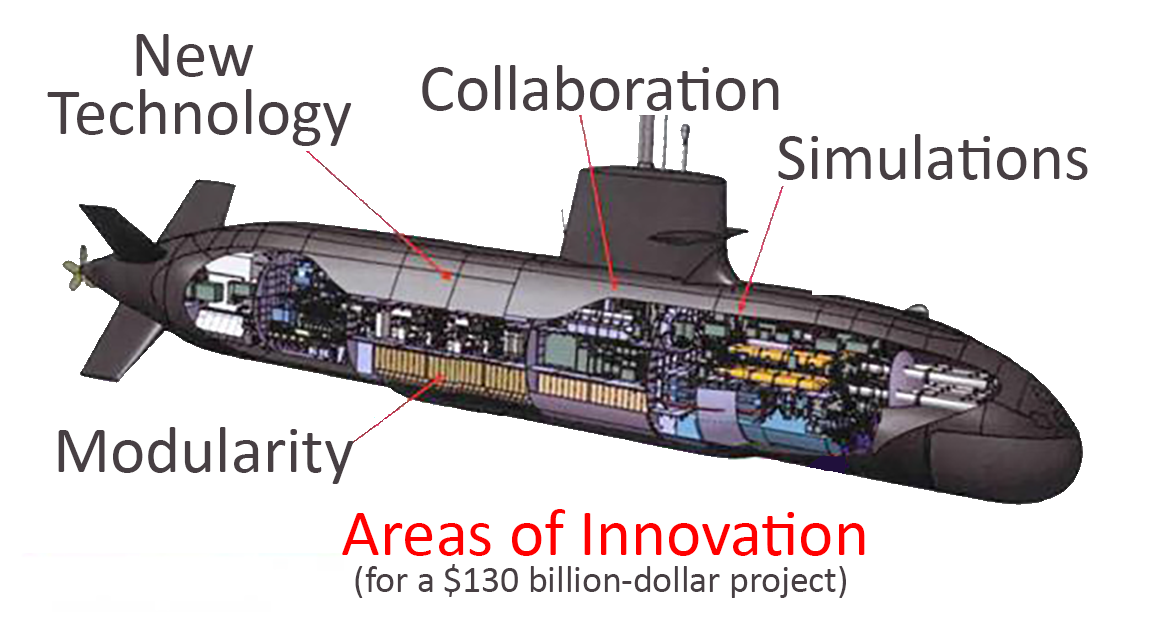
The development of the USA’s Virginia-class nuclear submarine – a collaboration between two fierce competitors (General Dynamics and Newport News Shipbuilding) – is just such a success story. This US DOD project produced modernized submarines that cost far less to build and maintain than the previous model then in service (the Seawolf-class submarine). There were four key innovations that contributed to the Virginia-class project success:

1. Virginia-class submarines were designed using the then new technology – CAD (computer-aided design) – eliminating the mountain of paper blueprints needed to begin the project.

2. Resources from two competing companies were employed in order to cut down on build time – placing them in anunnatural collaboration.

3. A simulator was built to test the design of crucial command components – before installation on the submarine assembly.

4. The interior of the submarine was built in modular parts (some the size of a small house) that could be slid in and out of the hull later on down the road, thus extending overall life expectancy of the class.

By examining these innovations more closely, we can glean our own lessons-learned likely applicable to our own projects, no matter how large or small.

How innovations in technology helps any project manager…

It may seem obvious to use the latest & greatest technology when starting a new project, but that is not always the case. Sometimes project managers like to stick with what they know (works), and also like to play it safe, “If it ain’t broke, don’t fix it.”

This wasn’t the case for Virginia-class planners, as they knew they needed to use technology innovations to bring their project in under budget, and under the intense political scrutiny of 1990’s defense-budget reviews. So they took a gamble, used the new CAD software and went completely paperless for their build plans.

Now while today’s planning tools have made great strides in the elimination of all sorts of paper previously employed (by just using our beloved software), we should also follow the Navy’s lead and hold technology reviews. Since new tech arrives almost daily, we should examine new developments in technology before the start of every new project.

For example, if one were starting a project today and haven’t upgraded to Project Plan 365 (Business or Enterprise plan) - or Microsoft Project 2019 - then some thought should be given to upgrading. But no matter what technology you are using to plan and rollout your projects, it’s important to know that the tech is changing all the time.

How innovations in collaboration can turbo-charge project finish-times…

As project managers, we are always talking about collaboration (one of the most famous buzzwords of the 21st century), but from what I’ve seen, we rarely innovate in this regard before the start of each new project. We suggest a “collaboration review” before the start of your next project, where your team spends some time discussing how to better work together on the next new thing – take the Navy’s lead here and consider something outrageous and uncomfortable, like collaborating with the competition. That’s what the US Navy did when rolling out the Virginia-class project, and they shaved years off delivery times.

Another good idea is to take a look at Real-Time Collaboration (rTc), which is a feature of Project Plan 365 that puts all the players together - from design to final wrap-up. 

How innovative modular designs can save you time and money…

We tend to think of modularization as something that happens during manufacturing processes, like building “plug & play parts” for phones or cars. But have you ever thought of building project plans in a modular fashion? Fortunately for Project Plan 365 and Microsoft Project users, this is such an easy thing to do – if some foresight is used.

Project Plan 365 users that have subscribed to either the Business (PMO) or Enterprise (EPM) plans, can build parts of a plan, manipulating either individual parts or the whole plan at will. Likewise, Microsoft Project users can use the Master Project / Subproject feature to build modular parts of a plan, and those parts can be easily re-used later on down the line.

Hint: Subprojects are the reusable bits. That’s what the Navy did with reusable parts of  the submarine, so surely we can do that with our projects. The end result will be less time spent reworking old plans to fit new projects, and in short, we’ll just save a lot of time and money.

How innovative simulations can make any project more risk-resistant…

The Virginia-class engineers knew they had no time to design components that would later have to be redesigned because they didn’t quite work when actually installed in the final product. So they built a simulator to test critical component-designs before actually putting them into action. (As an added benefit, personnel who would later have to operate those components, had a shorter learning curve.)

Use Project Plan 365 / Microsoft Project to do the same – by conducting what-if scenarios during any initial project plan design. It’s so easy to do: just run simulations by changing draft plan values inside of the app – thus simulating various scenarios, like unexpected changes in resource allocations, schedules or budget. 

Similar to what Navy engineers did with their simulator, project managers can make their project plans more efficient and less risky by first spending some time running project-plan simulations – before ever putting the plan into play!

So you’re not planning on building a nuclear submarine anytime soon…

Of course, most of us are not planning on building a replacement for the Virginia-class submarine, or any kind of billion-dollar submersible for that matter, but by taking the lessons learned from those that did, we can see how the innovations deployed on that project can lead to our own – even if our projects are much smaller and less costly.

By innovating our use of technology, new collaboration techniques, modular plan designs and simulations, we too can roll out projects as successful as the Virginia-class nuclear submarine.

-- This article first appeared on MPUG.org on November 21, 2017 and appears here with permission of the author.

To begin leveraging innovation in tech, collaboration, modularization and simulaton, simply subscribe to Project Plan 365 today!

What is a Work Breakdown Structure?

What is a Work Breakdown Structure (WBS)?

A work breakdown structure or WBS is a common term in project management. The concept is used each time a new project is designed — and is best thought out before entering any data into a .MPP file. Yet even though the WBS is an important construct to project managers, creating and using a WBS in the project design phase does not occur with the regularity that you might expect.

Some of this lack of use of the WBS stems from the complicated definition; a 243-page specification published by the United States Department of Defense (MIL-STD-881C) was initially developed back in the 1960s to help NASA and the U.S. military better manage mega-projects, like building rocket systems or getting to the moon. Yet for those outside of the US government, no one wants to adopt a practice that takes 243 pages to describe.

It doesn’t have to be that difficult.

A WBS is really just a visual breakdown of a project into smaller components — think hierarchy – which makes planning for (and creating) the required deliverables easier to accomplish for any project team.

The benefits of designing a project that incorporates a WBS are multifold:

  • The WBS helps define key deliverables and sub-components of deliverables before work is scheduled and started, resulting in a smoother rollout during the project. The scope of your project is captured in the WBS, helping to prevent mission- or scope-creep later.
  • The WBS provides a much-needed collaborative tool that can be reviewed early on with project teams, management and other stakeholders before a plan is locked in.
  • The WBS gives everyone a clear, visual representation of a project, without having to wade through the minutia and tedium of other types of project metrics or documentation.
  • Through use of a numbering schema, the WBS identifies parts of a plan numerically (often called WBS codes), which can be used in many ways during the execution of your project. For example, a repetitive deliverable that is identified by number can be easily resourced, costed or scheduled programmatically from within Project Plan 365 (or many other scheduling tools).

To develop a WBS for your next project, just follow these three golden rules:

First, the 100% Exhaustive & Mutually Exclusive Rule provides that within every level of your WBS, everything you need to deliver is represented within that level. For Level 1 of your hierarchy, for instance, you should find everything that you need to deliver for your project in totality. Within level 2 of that hierarchy, everything you need to deliver for that subcomponent of your project is included (and nothing else). There should be no overlap in scope between the various levels of your WBS. Just the act of creating the WBS exposes deliverables or events that may detrimentally overlap in your plan — and therein lies the beauty of employing a WBS. This figure shows a sample WBS structure set up in a “mind map” format.

Figure 1. First "branch" of a WBS showing a breakdown as levels within a plan.

Second, the Make a Logical Structure Rule provides that you make a visible representation of your WBS in a hierarchy that makes sense, and is easy to read. In olden times, this was often done in PERT charts. In today’s world of simplification, a much more recognized and modern visualization tool is the ubiquitous mind map, as shown in the figure above.

Note: the numbering schema that goes along with this hierarchy can be automatically generated within Project Plan 365 (see Figure 2 for an example), and WBS codes should be generated this way instead of typing them within the Task Name.

Figure 2. An automatically-numbered schema can be created within the .MPP - just add the WBS column to any view and BOOM - you're done!

Third, Grammar Rules should be followed, but don’t worry, this grammar is easier than you think! Here’s how you do it:

  1. Use descriptive nouns to describe all your deliverables and sub-deliverables
  2. At the lowest levels, use action verbs to describe what’s needed to make each sub-deliverable “happen.” Figure 3 shows WBS grammar rules in action.
  3. Use row #1 to name the project and set the title of the plan.
Figure 3. Syntax of a best-practice WBS.

In summary...

By following these three golden rules, your WBS will become an invaluable tool throughout your project planning experience: from the initial design collaboration – to the actual scheduling in Project Plan 365 — you will surely come to depend on having a WBS prepared for every project that you manage.

To give Work Breakdown Structures a try, simply subscribe to Project Plan 365 today!

Cloud Basics for PMs

Cloud Basics for Project Managers

Over the past decade or so, the concept of ‘cloud’ has become synonymous with a place where we store all things work-related (such as documents and data). In many cases, a ‘cloud’ represents the place where we work (i.e. within a digital workspace like SharePoint or Project Plan 365).

For project managers, we often speak in fluffy terms that reflect this new atmospheric characteristic of the modern workplace: “…just put that in cloud” is common geek-speak for putting any bit of communication or data in a place where everyone else can get to it.

However, how many of us really understand this amorphous reference to a metaphor taken straight out of metrology?

While developing a new file-storage option rolled out in Project Plan 365 (a popular look-alike to Microsoft Project), we gained insight into the common understanding (and misunderstanding) of what the ‘cloud’ means to everyday project managers. Sorin Fiscu (CEO of Housatonic Software) explains: "While my team was analyzing user trends for tens of thousands of project managers, only a tiny fraction of the user-base was implementing a cloud storage system."

He wondered why, so this article explores why individual PMs and organizational PMOs have not embraced the cloud as wholeheartedly as other professionals, such as programmers, engineers, marketers, etc. who are all working in legitimate cloud-computing environments.

Demystifying the Cloud Concept

Before discussing why or why not the cloud should be used during your daily work regimen, let’s explore what the ‘cloud’ really is…

Eric Griffith (Feature Editor @ PC Magazine), extolls that the ‘cloud’ is nothing more than a buzzword and is not really new – especially if you were born after the invention of the internet. Eric explains that the ‘cloud’ is the internet, for all intent and purposes. He also points out that the cloud is not an upgrade to your hard drive, and is not about attaching a NAS (network-storage device) to your company LAN (local area network) and calling it a cloudy day.

Instead, Eric enthusiastically explains that the cloud is really a paradigm shift in computing (call that cloud computing), and that this shift fundamentally changes the way we approached all of our work within a computing environment. Well, obviously he was right, as 2016 was the year that Microsoft introduced Planner and made OneDrive for Business a key component within the Office 365 suite. In essence, these and other additions to Office 365 (like Project Online) signify a shift away from terrestrial computing as we know it – away from using Microsoft-Project standalones like Project Server and SharePoint to something seemingly more ethereal and out of our control…something somewhere up in the clouds.

But, ethereal the real ‘cloud’ is not...

As the Office 365 concept portrays, we are not just saving bits of information or knowledge to the collective. We are actually using software that does not exist on earth as we know it, such as on our computing devices in the form of apps and programs. Instead, we are now in the realm of Software-as-a-Service (SaaS), which means you no longer “own” computer programs, but rent them instead. In many cases, you never install anything on your computing device, but just log into the service using whatever web browser you have at hand.

SaaS leads us further upwards in a trajectory to the cloud, where even our computing infrastructure is now found there. That’s called PaaS, or Platform as a Service, where your entire IT department is soon to be extinct, with applications and infrastructure (all those black boxes with blinking lights) being moved out of your company basement and into someone else’s worry basket. In the case of a PaaS, internet service vendors (ISVs) perform the duties your old IT gal or guy did back in the day (when you had hardware and software in-house). Figure 1 explains:

Figure 1. PaaS explained

Organizations that currently deploy Microsoft Servers in-house (SQL, SharePoint, and the Project Web part), are considering (or being pushed) into moving all of that out of the organization’s IT basement and into the cloud using the Microsoft Azure offering (which is essentially the setup shown in Figure 1 above). This takes your entire company’s IT setup and moves it offsite and upwards into a stratosphere owned solely by Microsoft, but rented to you and your company on a per-seat basis.

Why PMs should use the Cloud (and why we don’t)

Getting back down to earth for a moment, you may be wondering why in the world you or your organization would depart on such an adventure, considering the other million things that your organization has on its plate. The old adage of “if it ain’t broke, why fix it” comes to mind. Outside of the fact that most projects fail (or partially fail) in the world today, here are a few reasons why SaaS and PaaS should be considered as a computing environment for project management (and PMO) work. SaaS plus PaaS equals:

  • Better and easier collaboration between planners, partners, and stakeholders
  • Faster “time to market” for new projects planned collectively in the cloud
  • No up-front investments for hardware or software
  • Minimized operational costs, especially if you are now paying big bucks for an IT department
  • Enhanced productivity, as planners and partners work together at the speed of electrons
  • Access to project data anywhere, anytime using whatever device or platform at hand
  • Secure and customized access to data by project workers, partners, management, and even the public
  • Centralized project management activities, with no more disparate project managers working in isolation

So, what’s not to like, a good planner will ask. The major inhibitor (in our opinion), is that this is a huge change in the way that we have used computers in the past to plan out our projects. And as some planners rightly equate, change means re-work, more expense, and in general, more headache.

But, change is what we are good at, no?

Another inhibitor for smaller PMOs and organizations with just a handful of planners is that all of the above may seem overkill when trying to meet the bottom line and come out with more green than red at the end of the year. Many dozens of dollars per person per year may seem like a lot when all is said and done. Training people on new software, and setting up access for all to experience the wonders of cloud computing, may also be prohibitive in the middle of a busy schedule.

Another concern heard most is security and privacy. PM may ask, if my data is in the cloud, can’t it be hacked easier than if on my company’s local network? Well, one has to just look at the Equifax breach, the Sony breach, or any other security or privacy breach over the last few years. Do you really feel safer with your project data on the ground, rather than, say in a Microsoft-controlled cloud?

With some of your concerns heard, let’s harken back to the fact that most all projects endeavored either fail or partially fail in the world today. Perhaps there is one big reason to switch to a total cloud computing environment – to succeed!

Project Plan 365's secure cloud: Drive 365

To help subscribers of the Project Plan 365 Business (PMO) or Enterprise (EPM) plans succeed, we have included access to a secure, private cloud for all of your project data, and that's called Drive 365. This is a much simpler way to implement cloud computing (as show in Figure 1 above).  With Drive 365, the entire concept is condensed; part of our service to you is to store your critical project plans (those that relate to your project portfolio) safely and securely. 

In this way, not only are portfolio statistics generated automatically, but you don't have to worry about where any of your critical files are, or if they are safe from prying eyes or not. And you don't need to understand anything else.

In summary...

During this blurb on cloud computing, we have discovered that “let’s put it in the cloud” means much more than just storing your MS project file on OneDrive or Dropbox. We also see now that there are a few different tiers within modern cloud-computing: there is one tier where you or your organization use SaaS offerings to collaborate on project planning, and then there is the more extreme tier where most of your IT department is displaced by PaaS. In this case, all those servers and mysterious doo hickeys once housed in your IT basement are now gone, leaving you with more party space when it comes time to celebrate your project success. And if you need an instant cloud environment, all that's needed is a subscription plan to Project Plan 365.

To give PM cloud computing a try, simply try us out free for 30 days! 

Tracking Costs & Budgeting Projects

Tracking Costs & Budgeting Projects using Project Plan 365

During the formulation and implementation of your team’s project schedule, your team has most likely discussed the budget, and might have asked the following: how much money are we going to spend? How is the money to be spent? What happens when new costs arise…how are those added in? How much have we spent to date? More or less, how much are we off from our initial budget projections?

These questions and more are all questions that Project Plan 365 (or Microsoft Project, for that matter) will answer for you, provided that costs are entered into the application. This simple exercise of entering costs into your project plan will help you ensure the fiscal health of your projects. After all, no one wants a project to come in overbudget, or worst, cancelled midstream due to a lack of funding.

First, let’s understand costs from a budgeting (and software) perspective…

Many schedulers don’t have the ability to track costs (for example, with Wrike and many other popular PM services), or have a separate app or spreadsheet for that, or don’t see the need or simply don’t know how. In PM parlance, that’s a big boo boo; but one that can be easily corrected by following this golden PM rule: always connect the cost of the resource used for any bit of work, with the task itself. Even if your organization has an entire department that handles the finances (and perhaps has their own software to do just that), you should still enter in the costs of resources within Project Plan 365, and also refine these costs over time as they change. This ensures that your project plan is a one-stop shop for both scheduling and financial data – you get the complete project picture!  

Before applying that golden PM rule however, we need to understand how costs are handled within the software. First, think of people as having an associated cost (salaries, consultant fees, vendor charges, etc.). Also, think of materials as having costs associated with each, for example, the price of a palette of bricks, a stack of windows, computers, a desk or a chair. In addition, think of services that can incur costs over the life of a project, such as utility bills or travel expenses.

In Project Plan 365, costs are categorized into three types:

Work: people, equipment or facilities costs, in terms of rates per hour or cost per use. Select this resource type for people / equipment / facilities that are assigned to a task, but are not consumed during the task.

Material: material costs, in terms of a standard rate or a cost per use. Select this resource type to track consumable resources, such as bricks or food stuffs – for things that are used up during the project.

Cost: everything else, in terms of a single one-time charge. Select this resource type to track budgetary items such as travel costs or phone bills that are not dependent on the amount of work done, or on the duration of a task.

Within any schedule of work, Project Plan 365 automatically calculates the total cost of your project based on your input of resource costs, and the software also flags any variances from your initial budget, as your project progresses over time. In other words, the software calculates how much you planned to spend, are spending now, and how much you’ve overspent or underspent at any given time, or on any task.

It's up to you (as project manager), to determine what costs to track within your project plan, and how. For example, is employee travel tracked or not, or do you want utility bills to be added to the cost of the project? In other words, the granularity of cost tracking is determined by you, the PM; with the level of granularity determining how accurate your cost projections can be (down to the penny, or in much larger round numbers).

Note: If you just want to use the fixed cost column to track costs (i.e. you don’t plan on renting equipment or buying materials by piece,  then you don’t need to add the material resources in the resource sheet as described in the following tutorial. For more on this method, see "Using the Fixed Cost Field..." immediately following the tutorial.

Tutorial: Entering each type of cost (Work, Material & Cost) into the Resource Sheet

If you want to follow along using Project Plan 365, go to the Backstage and select New / New PMO to open up a copy of the template used in this tutorial.

Now that we understand costs from a software perspective, let’s add a few of each type to a project plan, either your own or one of ours. 

All resources should be entered into the Project Plan 365 (or Microsoft Project) Resource Sheet. This resource-related spreadsheet has default columns displayed for entering in the Resource Name, Type, Material Label, Initials, Group, Max Units, Standard and Overtime rates, Cost per use rate, Accrual rate, Base Calendar, and a column for a Code of some sort.

Fortunately, you don’t need to fill each column with data, just the ones needed to calculate costs (for example, for this tutorial we have hidden those we don’t need). You can also add additional columns (such as Email), but let’s leave column manipulation for another tutorial…

In this tutorial, we will cost some resources and begin to budget a project plan, understanding that the financial picture only becomes clear after we apply costed resources to specific tasks within the plan.

Entering costs for resource type WORK

1.

Navigate to the Resource Sheet view and type a name for a resource into a cell under the Resource Name column. After you hit enter, you will see that some of the columns self-populate to a default value, and that the next column has the default Type of Work:

2.

Now you have to determine if you want the resource to be costed by the hour (with or without overtime, based on the calendar), or on a cost-per-use-basis (for example, you are employing someone with a one-time charge per task performed):

Entering costs for resource type MATERIAL

3.

After entering the Resource Name, change the Type to Material and enter the Cost / Use for the material.

4.

Now to complete the Resource Sheet, you would enter in all the Work and Material type resources as required by the task list (see Gantt View, and tasks that require resources).

Entering costs for resource type COSTS

5.

For costs associated with budgetary items such as utility bills or travel expenses (items that do not depend on the work or duration of tasks), you need to enter the name of those costs here; but you won’t be able to enter in the actual cost, just a descriptive name. (See step 6).

6.

To enter in Cost/Use values, you need to flip over to a task list view (such as the Gantt View), to assign this type of cost to the work being done. For example, select the task where the cost incurs, and then use the Task Information popup to enter in the cost of the resource(s) selected. 

In the example below, the cost of a “Conference Space rental” is being applied to a day when the training is planned to take place:

7.

Now, to enter the actual cost of this resource, navigate to Task Information / Resources tab and enter the cost there: 

Do this for all planned expenses not dependent on work or task durations (Cost) – AND - also assign all other resource types (Work and Material) to tasks in the plan, where appropriate.

Using the Fixed Cost Field...

An alternative way of calculating costs is by using the Fixed Cost field (in conjunction with the Cost, Baseline Cost, and Actual Cost fields). To enter fixed costs while looking at your Gantt chart, just flip over to the Project ribbon and select Table / Cost:

Now simply enter any fixed cost amounts into the plan at the appropriate place. Note: never enter costs - or anything else - into a Summary Task field, as those fields are automatically calculated: 

It is a best-practice to use the Notes tab (Task Info pane) to annotate what the fixed cost is about. Once entered, these fixed costs are added to your mix of resource and other costs as represented in the Resource Sheet.

Putting it all together and using your new cost plan

9

Setting a Baseline and Tracking Costs...

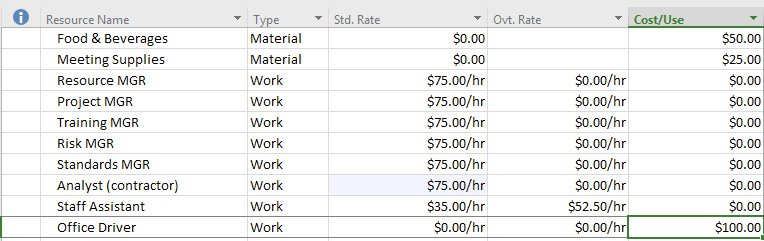
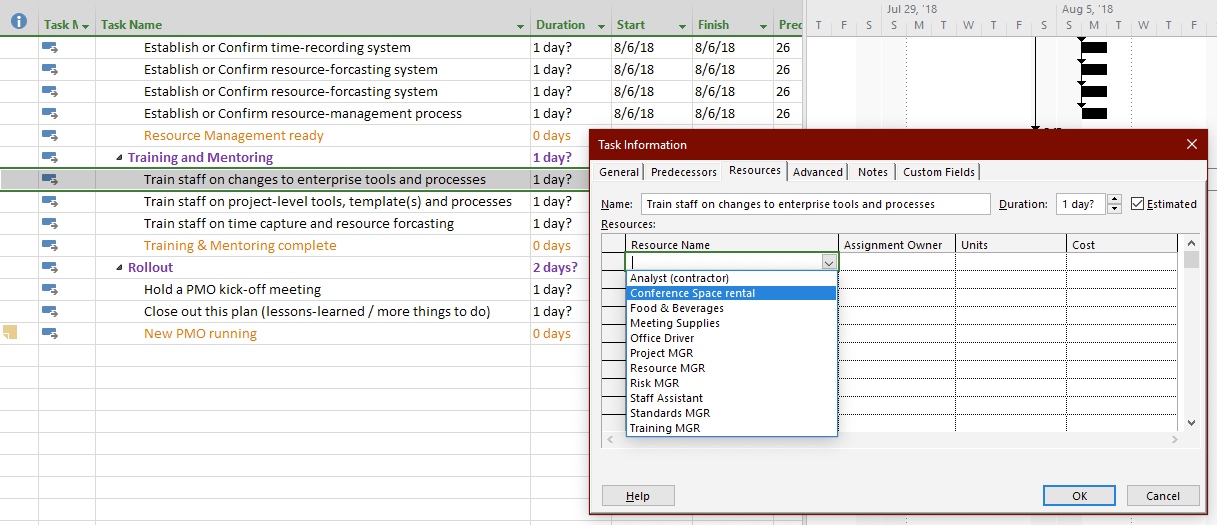
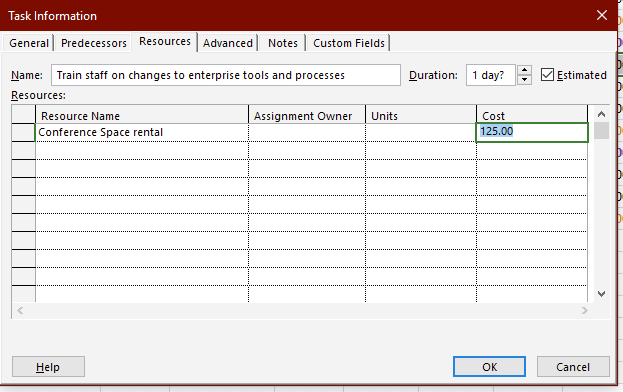
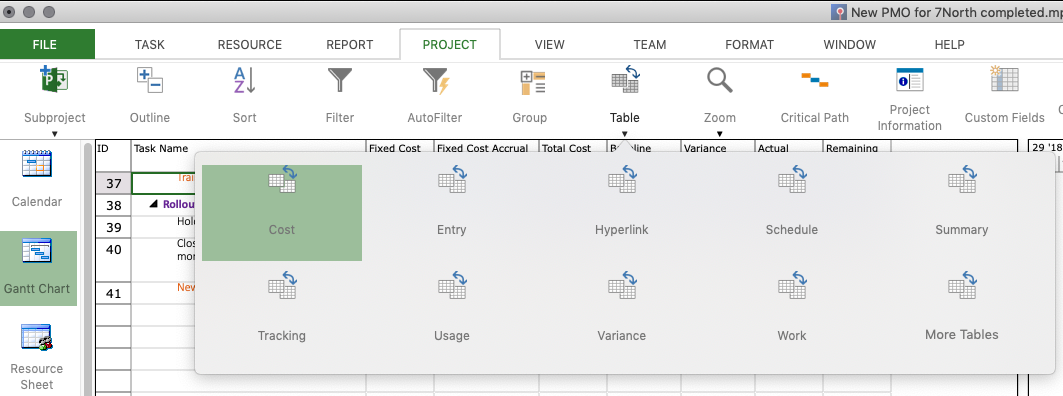
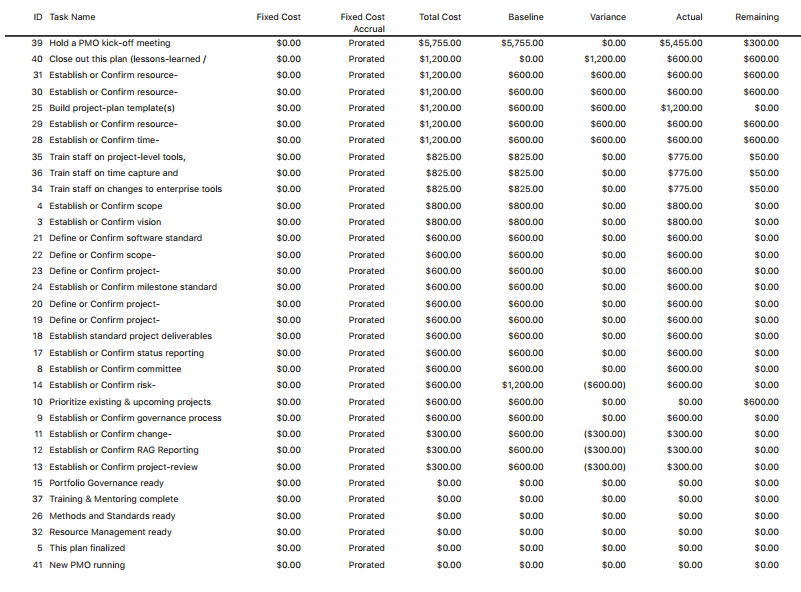
Now that you have entered in all the costs that you want to track in your plan, a “baseline” or record of your initial thinking must be captured. Doing so allows you to later look back, and see what you had planned to spend, vs. what you actually spent. (Someone will always ask.) To set a baseline, navigate to Set Baseline on the Project ribbon, and select For Entire Project. Once a baseline is set, you can begin tracking costs as they occur, in terms of baseline costs, actual costs, and remaining costs. In addition, as your project progresses, you can produce budget reports in a variety of formats and for a variety of purposes… no need to use Excel!

Costing at Project Start
Costing at Project End

Sample Budget Report

To get reports on your cost plan, navigate to the Report ribbon and select any of the reporting options found there, for example Costs / Budget Report:

Additional reports can be generated from the Report ribbon that are sure to help you with any financial analysis of your project. For more information on costing and reporting, see our online help, training and videos:

See our complete library of training materials for beginning-to-end lessons on doing all that matters to a PM.

Summing up...

To sum up, we’ve entered in all three types of costs: Work, Material & Cost for every resource in a project plan, and then assigned those costed resources to appropriate tasks in the plan. We also explored using the Fixed Cost field for costing items outside of the Resource Sheet. You can apply this fiscal strategy to new plans being created (for example, to calculate cost projections) or while plans are in progress, i.e. to add additional costs not planned. This wealth of cost data also comes in handy after projects are completed, as you can see from the data how much you overspent (or underspent), and where! 

This strategy of always costing your plans within Project Plan 365 (or Microsoft Project, for that matter), gives managers and project teams real-time cost data that can be used when making financial decisions during project rollout.

For more information on making your project plans viable, see our website. To try out Project Plan 365 for free, download the 30-day trial; and if you are interested in better software for your Project Management Office (PMO), don’t forget to check out our Business (PMO) subscription plan.

Getting to Microsoft Project – on a Mac!

Getting to Microsoft Project - on a Mac!

If you are a project manager using Apple devices, then you know that a PC-bias still exists in the software industry, especially when it comes to anything Microsoft Project. But in 2019, we have options. 

While most all software manufactures provide versions of their apps and services that work on both Macs and PCs, Microsoft does not have a macOS version of Project, making your team project work awkward, indeed. To restore harmony in this fractured computer-verse (Mac vs. PC, Apple vs. Google, iOS vs. Android, Siri vs. Alexa, etc.), there are a number of ways for you and your project team to get to Microsoft Project plans:

  1. The long road, where you use an app to create a “virtual” second computer onboard the hard drive of your MacBook, iMac or MacPro (called a virtual machine), and then you install Microsoft Project within a virtual Windows.
  2. The winding road, where you meander from Safari to the Project Online website (through an Office 365 subscription), or you are directed to some other project website running SharePoint with a Project Server, and that’s where you do all of your project work - from within a web browser.
  3. The short cut 

This article discusses the long and winding road (and reveals the shortcut) in terms of pros and cons, as well as providing estimated “travel” costs for your journey…

1) The Long Road: Virtualizing your Mac to run Microsoft Windows + MS Project

What may sound like a quick jog (just run windows on your Mac) this is actually the road less traveled, and for good reason. This slog involves subscribing to one of many providers of a virtualization layer (Parallels Desktop, VMware, etc.) used before you install any flavor of Microsoft Windows that you may have on hand - and finally, once that’s all up and running, then can you install Microsoft Project and get to your work on an Apple device.

1) The Long Road: Virtualizing your Mac to run Microsoft Windows + MS Project

PROS

  • In addition to running Microsoft Project, you can install and run any Windows app that you want.
  • If something goes wrong with Windows or Project (as things sometimes do), you can just “blow away” that virtual machine and use your automatically created backup copy.

CONS

  • Requires one more subscription to a software service (for example, Parallels or VMWare).
  • Adds another layer to your Mac that needs a bit of worrying about (in addition to everything else that worries you).
  • Creates files so large (after all, there’s an entire computer stuffed inside) you may have to upgrade your Mac’s internal hard drive to something gigabytes bigger.

2) The Winding Road: Using Project Online and all the rest to get there....

There are many reasons that you might want to take the meandering path of using your Mac’s web browser to access Microsoft Project data, but simplicity would not be one of them. If all you want to do is to open, edit or create new Microsoft Project files, then don’t install SharePoint Server or any other servers just to do that – that would be silly and overly complex in this age of cloud computing and software-as-a-service (SaaS). Just jump to #3 for a much shorter path.

winding road

PROS

  • This setup may be essential to your large enterprise (in other words, you have no choice but to follow this path).

CONS

  • If you work anywhere that the internet doesn’t, you are out of luck.
  • If you are a small-to-mid sized business, the expense of it all may bust your bottom line.
  • If you are the Project Manager for your team without dedicated IT support, this could be trouble.

    (It’s easier to raise children then to manage all of these systems.)

3) The Shortest Distance Between Two Points: Project Plan 365

If all you want to do is to collaborate with other folks sharing or creating Microsoft project data, then just download the free 30-day trial of either Project Plan 365 for Mac or Project Plan 365 for iOS. This gives you the flexibility to work on any Microsoft Project-created data file, regardless of your hardware or internet connection. Both apps allow you to do exactly the same thing: open, edit or create any Microsoft Project file (.MPP) with no conversions or imports from other odd formats, like .XML or .XLSX - or any other type of file where things can go wrong and mess with your precious project data. This is by far the “shortest distance between two points” for any Project Manager wanting to work on a Mac.

Current users of Microsoft Project will instinctively know how to use Project Plan 365, as the interface is virtually the same – no learning curve here to slow you down.

In addition, by subscribing to the Business (PMO) plan, project managers (especially those working in small-to-medium sized businesses) can augment their Microsoft Project experience as well, by using such Project Plan 365 features as real-time collaboration, portfolio and resource management and more. In short, a Project Management Office (PMO) can be set up on the cheap and within a few hours after your team subscribes to this plan.

PROS

  • The simplest solution for the stated problem.
  • The cheapest solution for the stated problem.
  • Adds even more to the experience of being a Microsoft Project user, and gives your team more capabilities as you roll out your projects.

CONS

  • None to speak of 🙂 

The Bottom Line...

The bottom line depends on how far you are willing to go, just to get to a Microsoft Project file, or to collaborate with your team who are all using the same set of Microsoft Project data. Must your team use Project Online / SharePoint / Project Server because your management team has made that edict? Well, we feel for you… perhaps a new Microsoft laptop is in your future, leaving your shiny new Mac in the dust. But if not, taking the shortcut (#3 above) is going to save you time and money: 

Road Taken...

1. The long road:

2. The winding road:

3. The shortcut:

Cost per user, per year (in USD)

Approximately $1000

Mega-bucks in Enterprise dollars!

$200

Which solves the problem? #1 yes, #2 not really and #3, sure thing! 

In addition to user cost savings per year, other intangibles are gained, such as the convenience of working on your project plans (or having someone else updating your plan) no matter where in the world you or anyone on your team is working (say on the plains of the Sudan, the beaches of Fiji or atop Mt. Everest) – you will always have a way to edit your Microsoft Project plans on your favorite Apple device.

Project Plan 365 also allows you to take Microsoft Project files and go well beyond what you can do within the Microsoft app; for example, with Project Plan 365 you can build a PMO on the cheap, manage and report on your entire portfolio of projects, and store your files in a private and secure cloud - without having to purchase expensive software servers or buy any more new hardware.