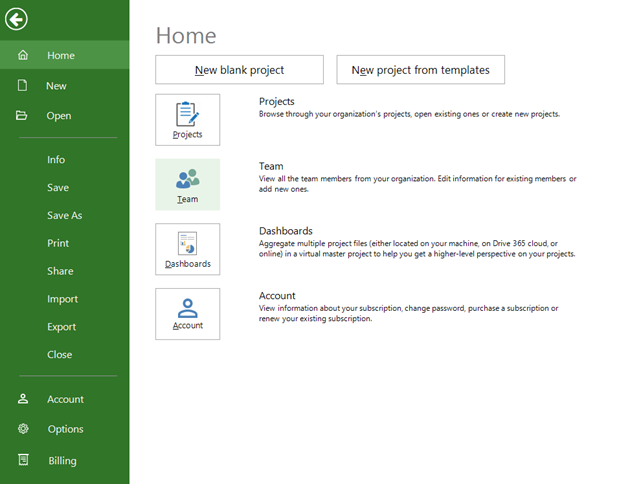
What does the “Manage Divisions” functionality do?
The Manage Divisions functionality allows you to restrict member access to certain projects based on assigned division.
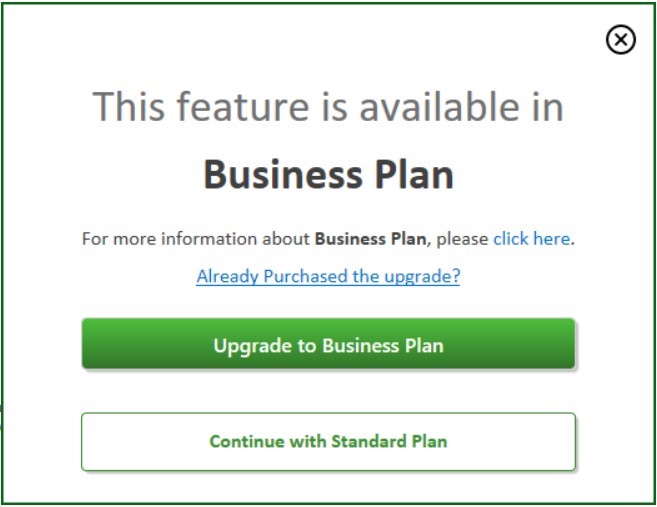
Is the “Manage Divisions” feature available for Standard Subscription?
The Manage Divisions feature is available only for Business Subscription. If you have a Standard Subscription and you want to use this feature, you must upgrade to Business Plan.
Why can’t I access projects from a division in Drive 365?
You cannot access projects from a division of which you are not part of, or you do not have administrator rights.
How do I create a new division?
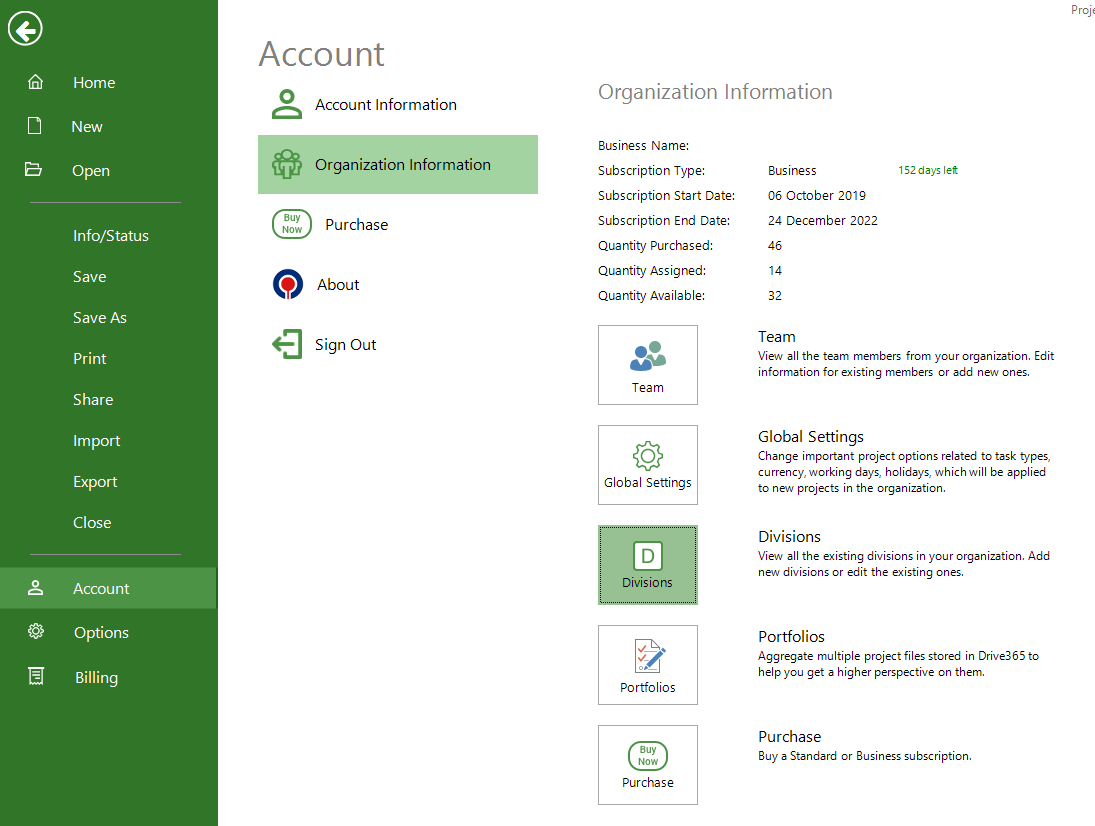
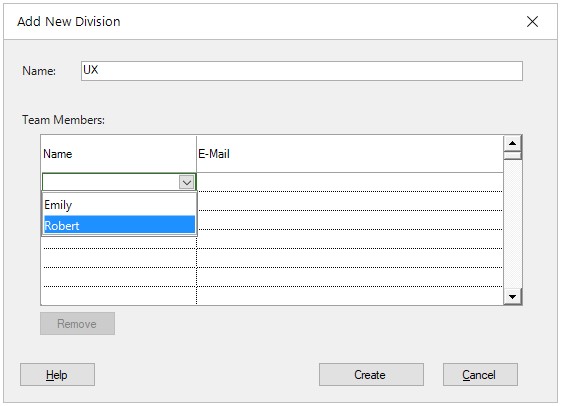
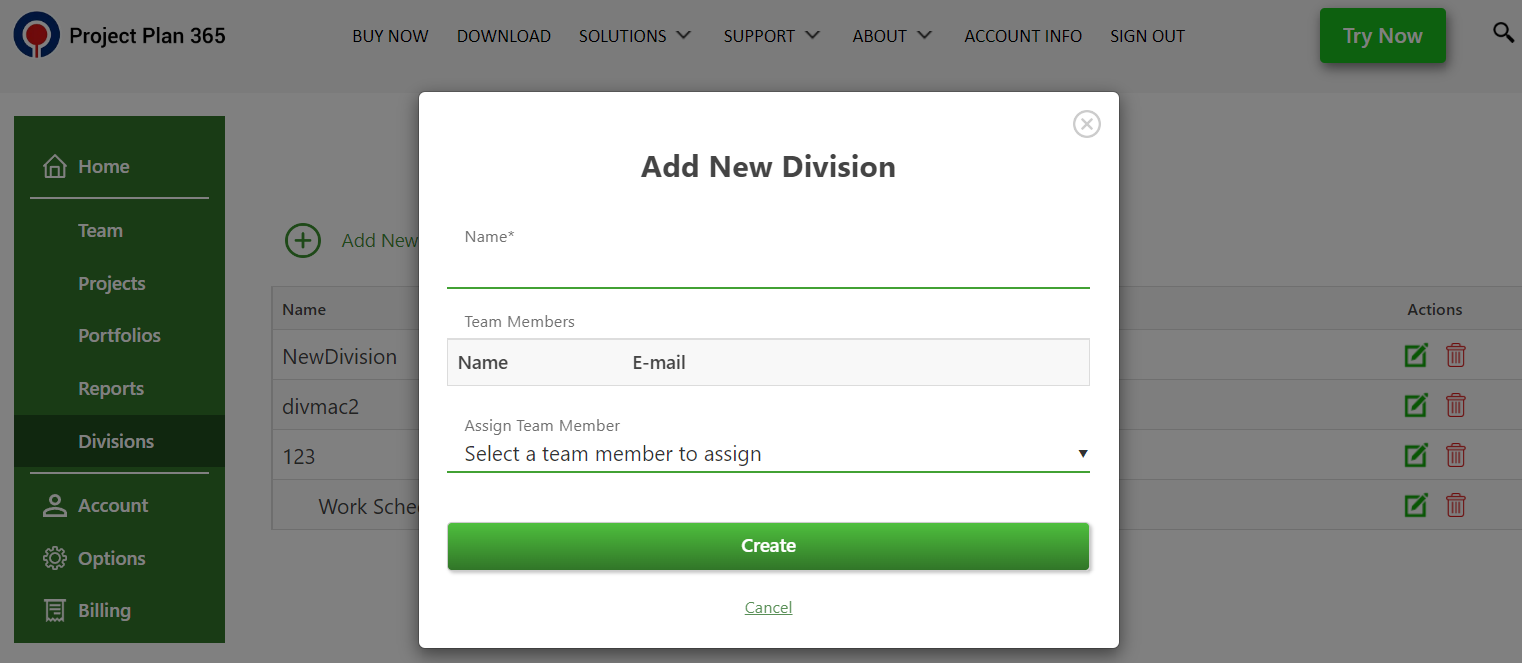
To create a new division, go to File menu – Account - Organization Information, then click Divisions. In Divisions dialog, click Add New Division. Type division’s Name and add Team Members by choosing the team member from the drop-down list. The Name and E-mail for the team members have dropdowns with strict autocomplete.
How do I delete a division?
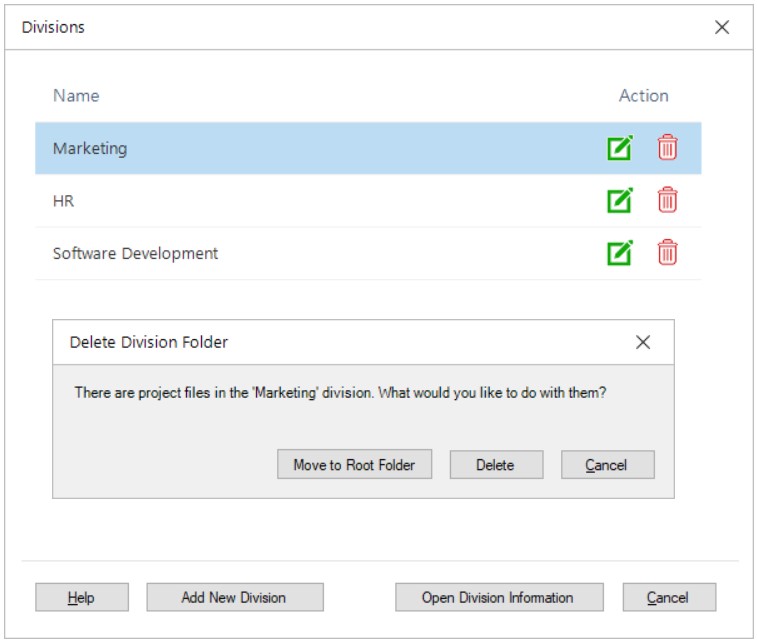
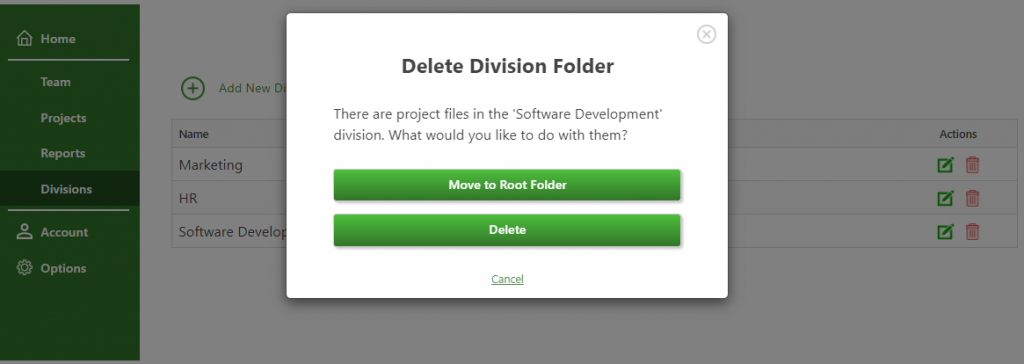
To delete a division, go to File menu – Account - Organization Information, then click Divisions. In Divisions dialog, click Delete icon for a division. If you have projects that belong to that division, you will be asked if you want to delete them all or moving them to the root folder.
How do I add a team member to a division?
To add a team member to a division, go to File menu – Account - Organization Information, then click Divisions. In Divisions dialog, click Edit icon for that division. Add the team member by choosing him from the drop-down list. The Name and E-mail for the team members have dropdowns with strict autocomplete.
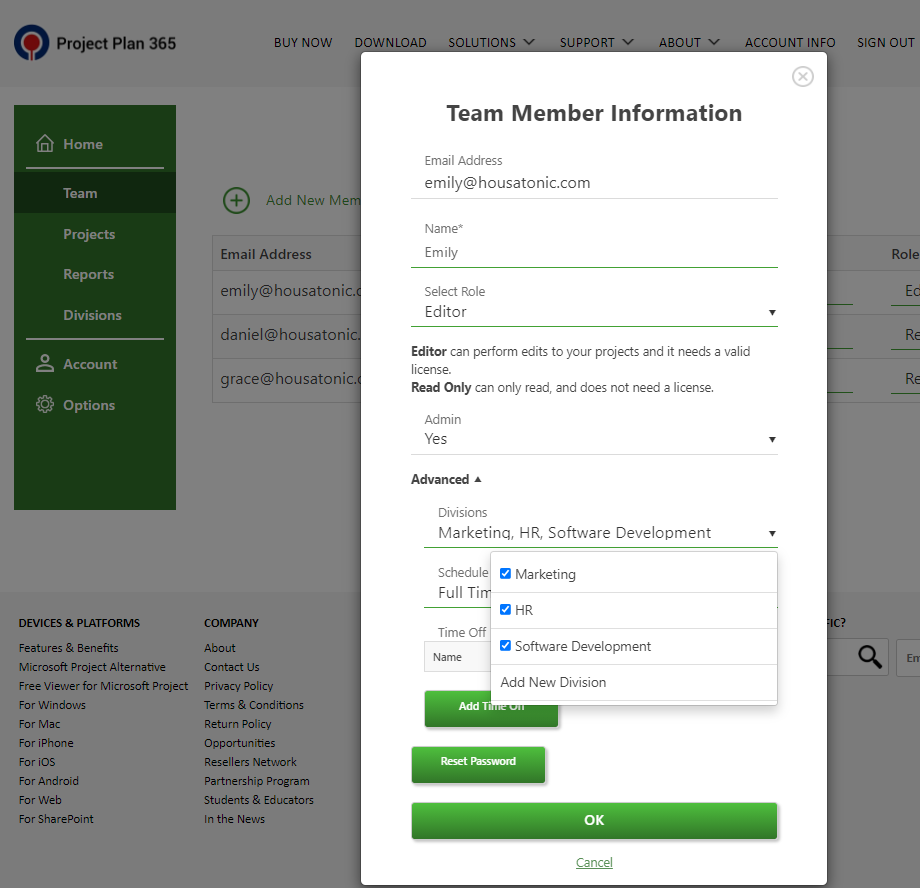
How do I assign a division to a team member?
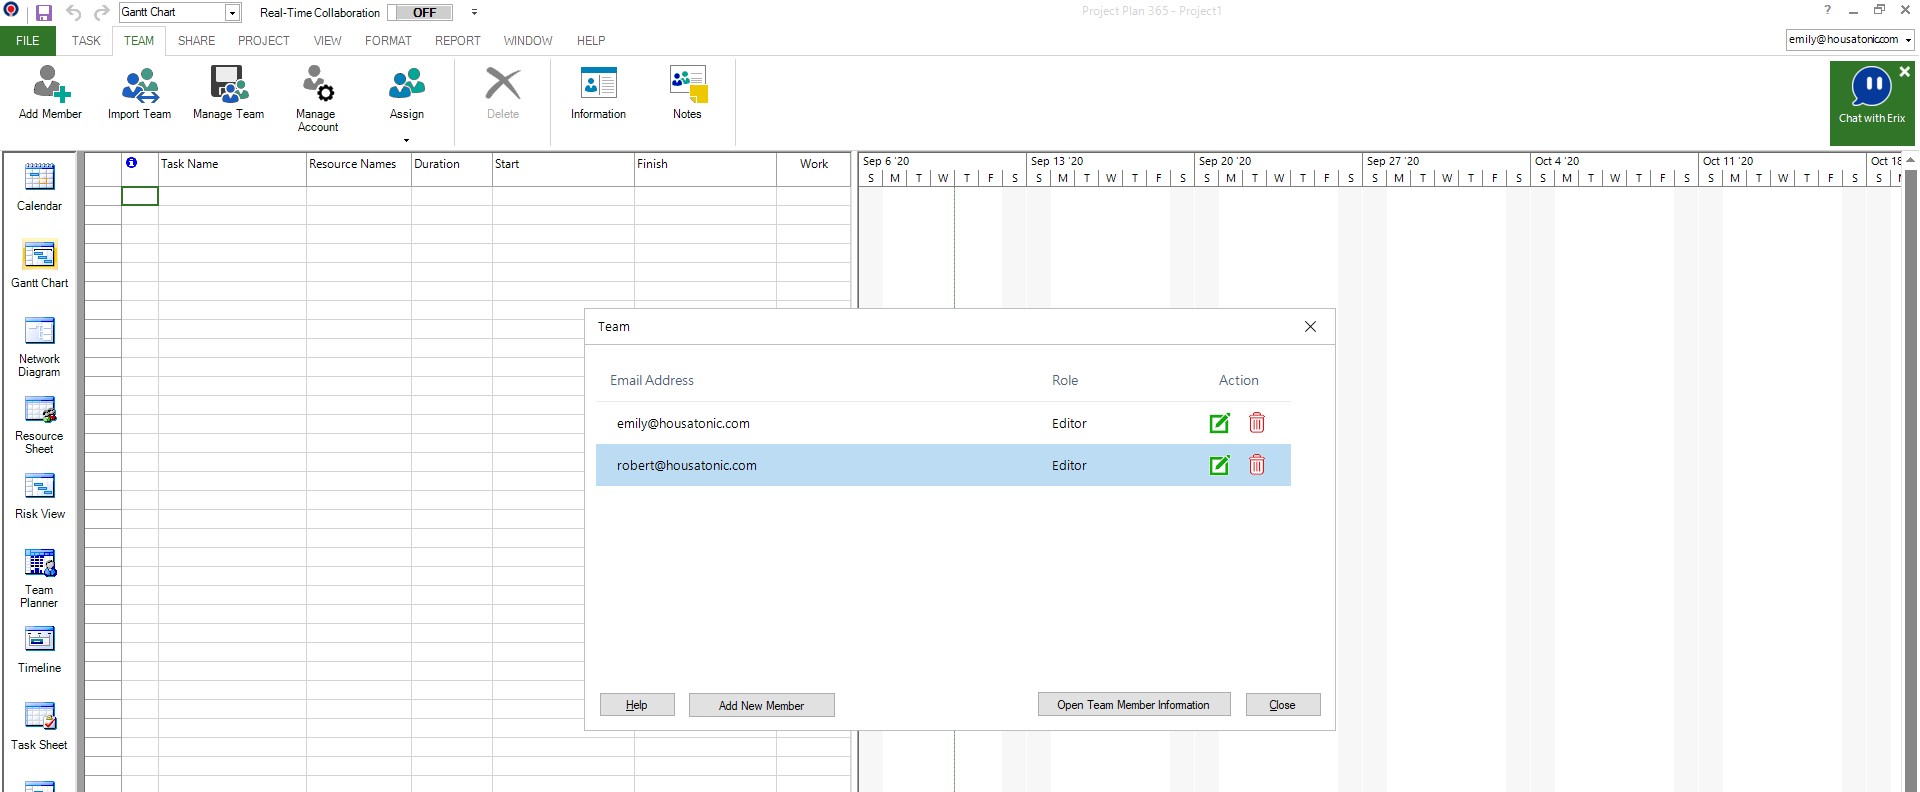
To assign a division to a team member, go to Team menu – Manage Team. In Team dialog, click Edit icon for a team member. Then, assign the divisions you want from the Divisions combo box.
Why can’t I delete projects from Drive 365?
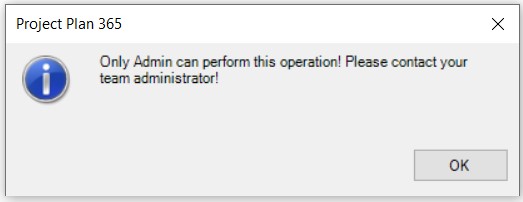
To delete projects from Drive 365 you must have Admin rights. Please contact your team administrator.
Why can’t I delete divisions from my organization?
To delete divisions from your organization you must have Admin rights. Please contact your team administrator.
Why can’t I edit a division’s information?
To edit a division’s information you must have Admin rights. Please contact your team administrator.
Why can’t I create divisions in my organization?
To create divisions in your organization you must have Admin rights. Please contact your team administrator.
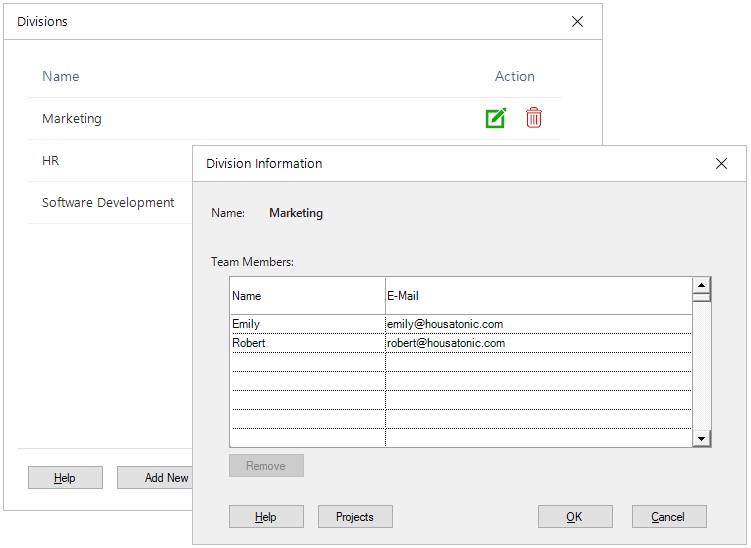
How do I remove a team member from a division?
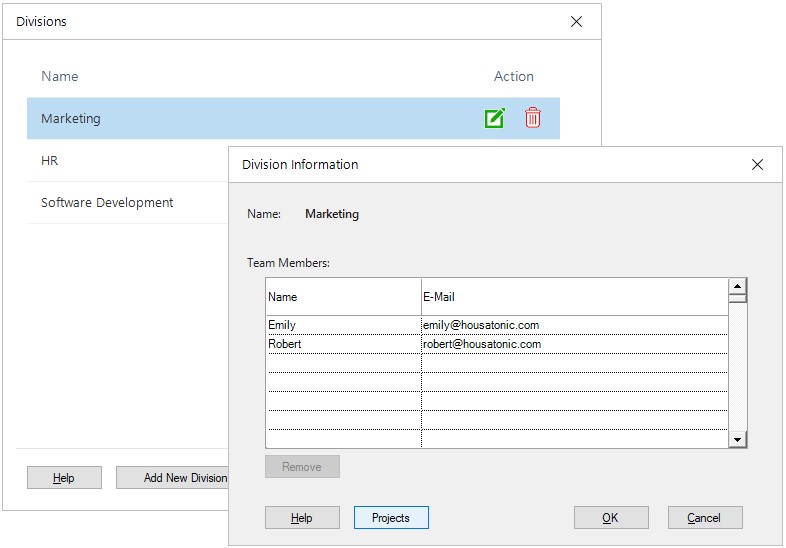
To remove a team member from division, go to File menu – Account – Organization Information and click Divisions button. Select the needed division and then click Open Division Information button. In Division Information dialog, select the team member you want to remove and click Remove button. Note that you must have Admin right to perform this operation.
How do I edit a division from my organization?
To edit a division from your organization, go to File menu – Account – Organization Information and click Divisions button. Select the needed division and then click Open Division Information button or click Edit icon.
How do I view the projects from a specific division from my organization?
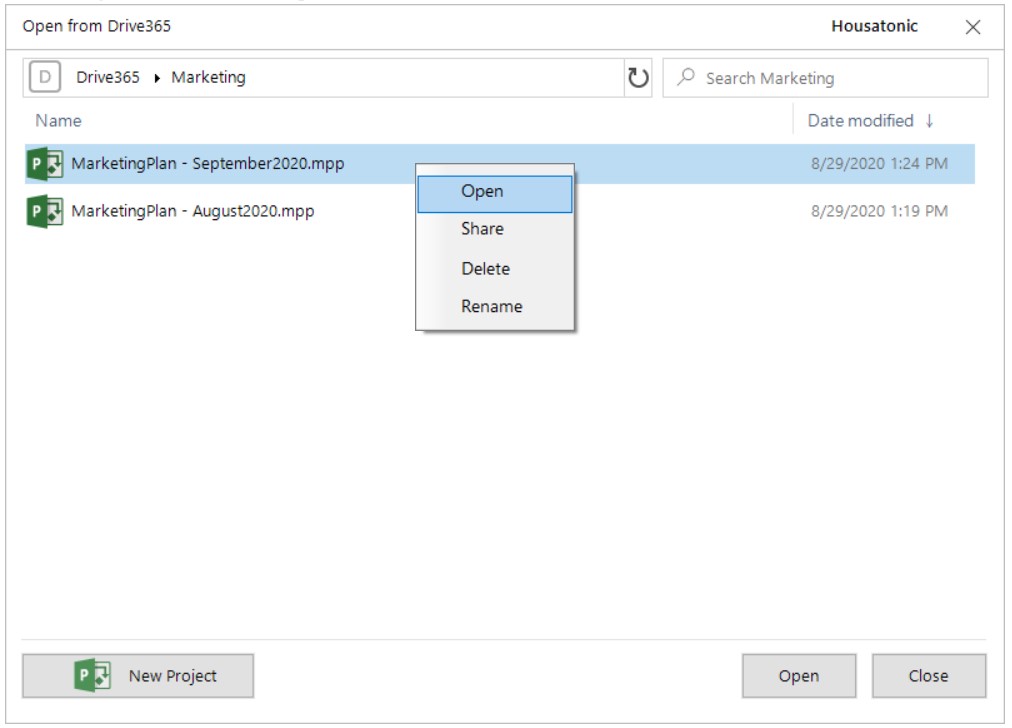
To view all the projects from a specific division from your organization, go to File menu – Account – Organization Information and click Divisions button. Select the needed division and then click Projects button to view all the projects that belong to the selected division.
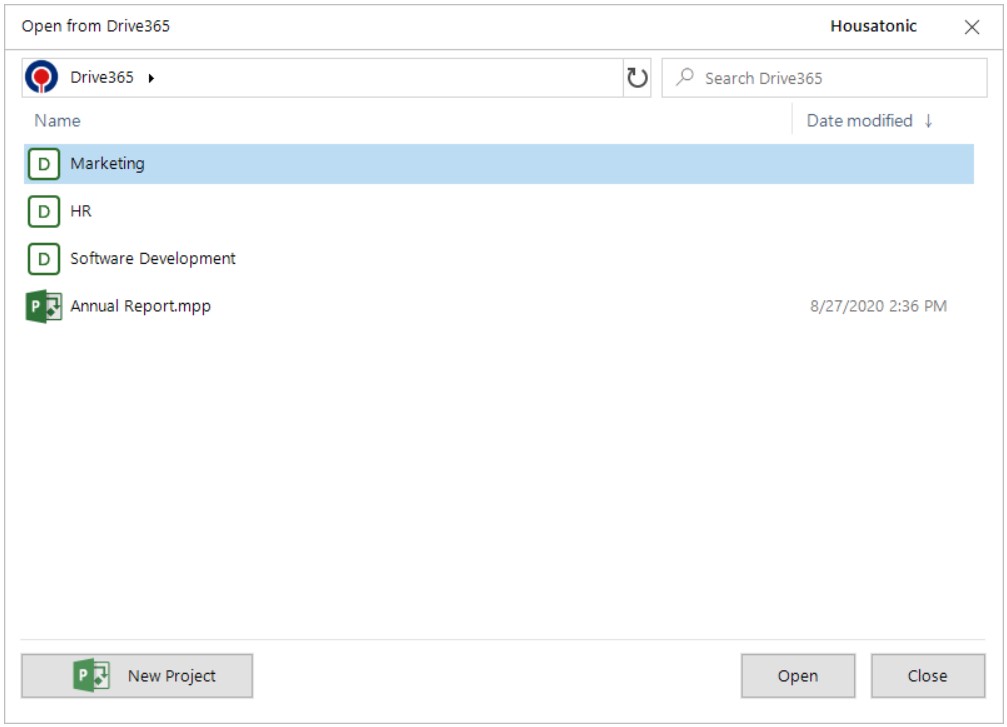
You can also go to File menu – Open – My Projects – Drive 365 and click on the right division folder in order to view the division’s projects.
Can I delete a division but keep the division’s projects?
Yes, you can keep the division’s projects. When deleting the division, you will be asked if you want to delete them all or moving them to the root folder. Click Move to Root folder if you want to keep all the division’s projects.
How do I save a project to a division?
To save a project to a division, go to File menu – Save As – My Projects – Drive 365, select the proper division’s folder and click Save. Note that you must be part of that division to be able to access the division’s folder.
Can a team member be part of multiple divisions?
Yes, a team member can be part of as many divisions as needed.
How do I sort the organization divisions by their names?
To sort divisions in a different order, click the Name column heading in the Divisions dialog. Click the column heading again to sort in the reverse order.
How can I separate project files to be accessed only by certain team members?
In order to restrict member access to certain projects based on assigned division you can use the "Manage Divisions" functionality. For more information, please read the Manage Divisions article.
How can I create a folder in the Drive 365 cloud location?
n the Drive 365 cloud location you can create a division, not a folder. In order to create a new division, go to File menu – Account – Organization Information, then click Divisions. In Divisions dialog, click Add New Division. Type division’s Name and add Team Members by choosing the team member from the drop-down list. For more information, check the Manage Divisions online help article.
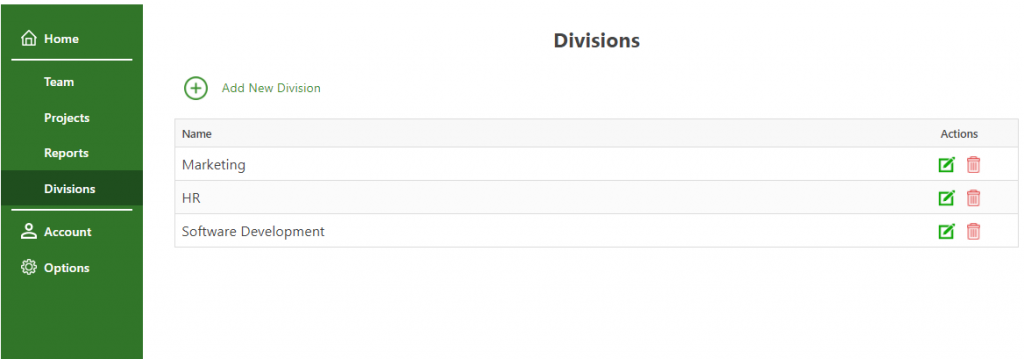
Step by step on how to view all divisions in your organization:
1. Go to File menu – Account - Organization Information.
2. Click Divisions;

Note: The Divisions feature is available only in Business Plan. If you have a Standard Subscription and you want to use this feature, you must upgrade to Business Plan.
- View all divisions in your organization.
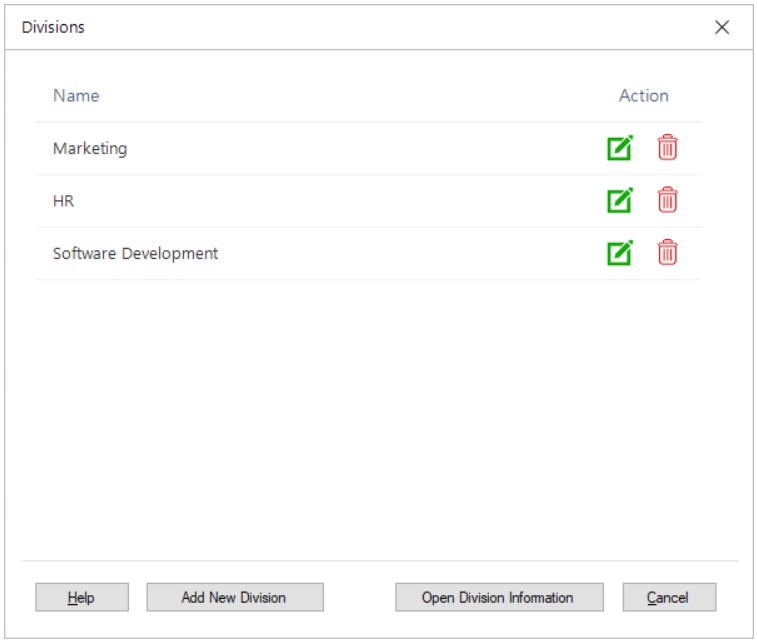
Step by step on how to manage a division:
1. Go to File menu – Account - Organization Information.
2. Click Divisions;

3. Select a division and click Open Division Information button (or you can also click on Edit icon).
4. In Division Information dialog you can view and edit the Name of the division and the Team Members that are part of the selected division.
5. To remove a team member from the division, select the team member and click Remove button.
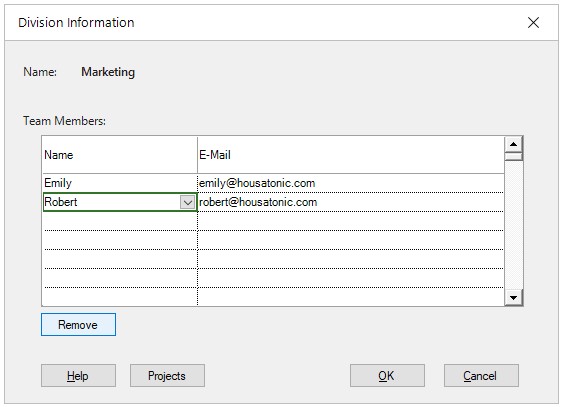
Note: The Division Information dialog is editable only for admins.
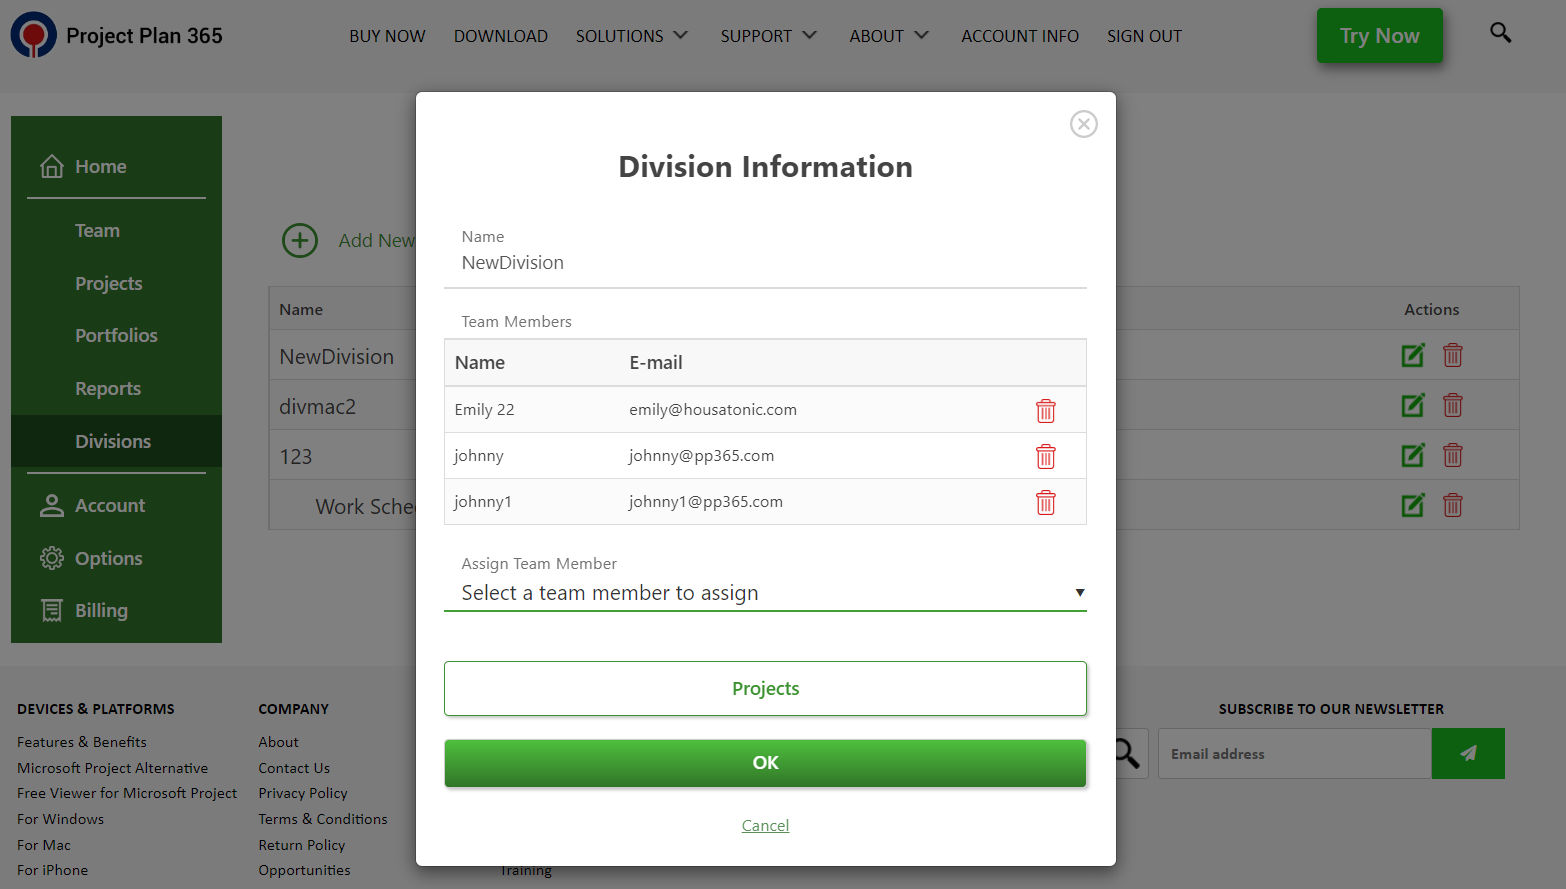
Note: You can also manage divisions in Portal by going to Divisions tab and clicking Edit icon for a division.
Step by step on how to view and manage projects that belong to a division:
1. Go to File menu – Account - Organization Information.
2. Click Divisions;
3. Select a division and click Open Division Information button (or you can also click on Edit icon).
4. Click Projects button.
5. Projects dialog will be displayed, and you can view in the division’s folder all the projects that belong to that division.
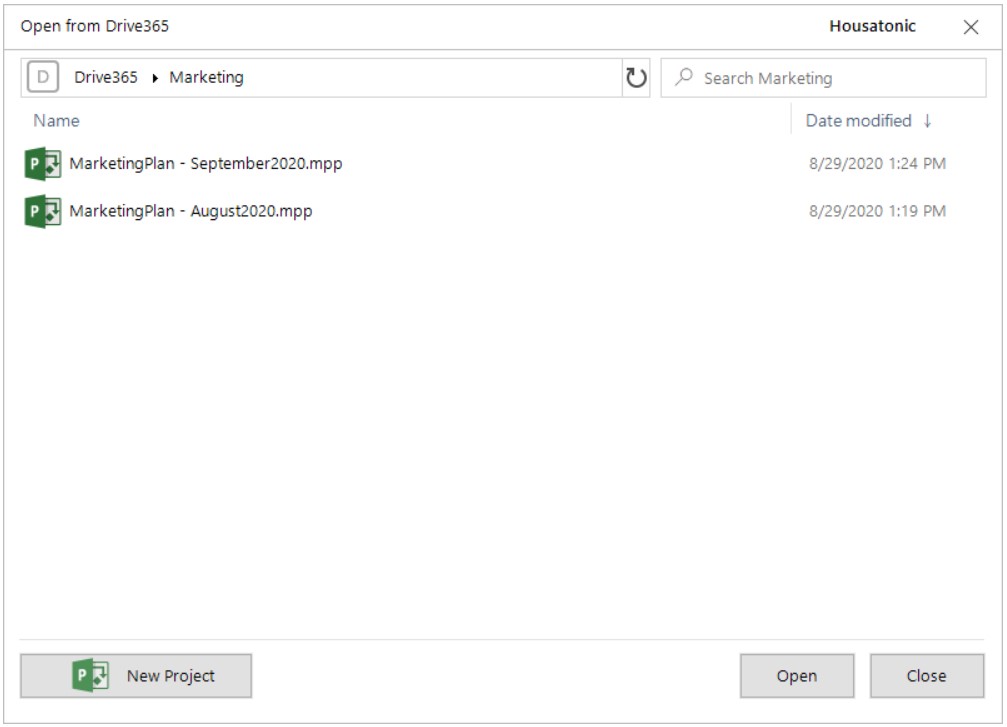
Note: You can also view the division’s projects by going to File – Open – My Projects - Drive 365 and open the division’s folder.
6. You can Create, Open, Edit, Save and Share any project if you are part of that division.
Note: Only users with Admin rights can Delete projects from divisions.
Note: You can also browse divisions folder in Portal by going to Projects tab.

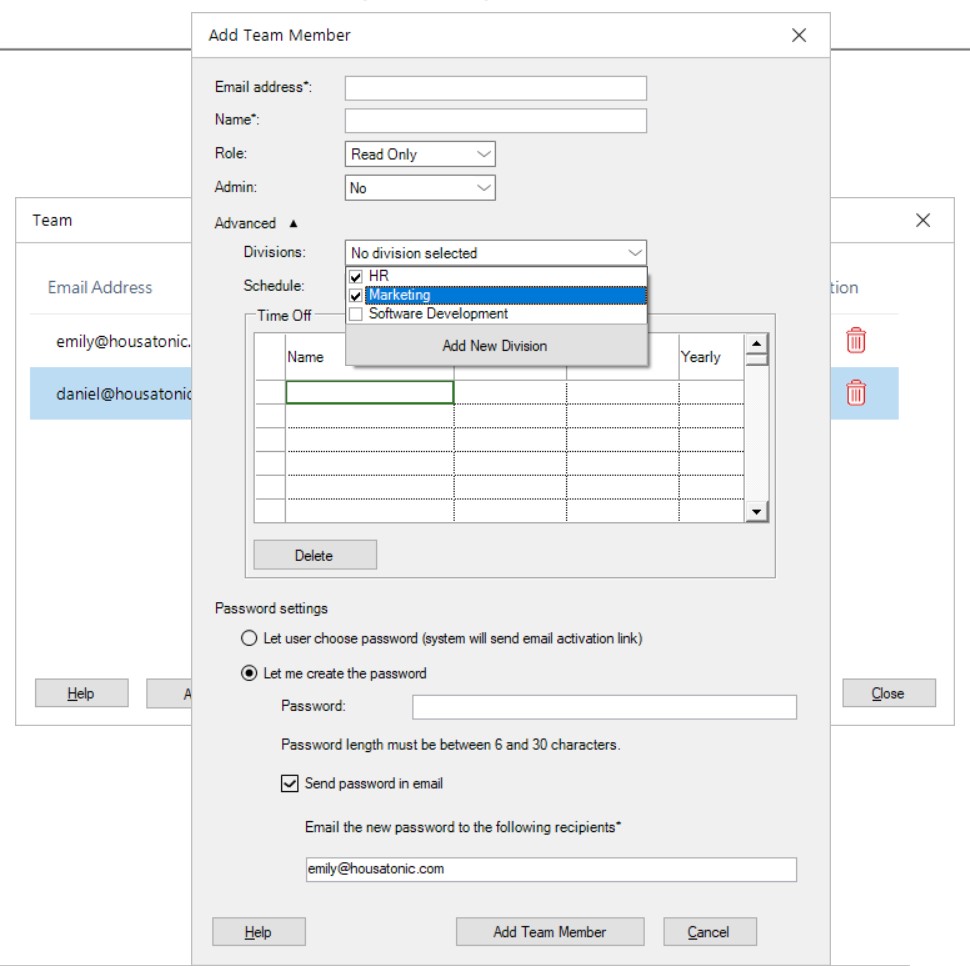
Step by step on how to create a new division in your organization:
Note: Only users with Admin rights can create new divisions.
There are two ways to create a new division in Project Plan 365 app. One way is by creating it from the Divisions dialog:
1. Go to File menu – Account - Organization Information.
2. Click Divisions;
3. Click Add New Division;

Another way is when assigning it to a team member:
1. Go to Team menu – Manage Team.
2. In Team Member Information dialog you will find Divisions drop-down list at the end of which you can choose Add New Division option.
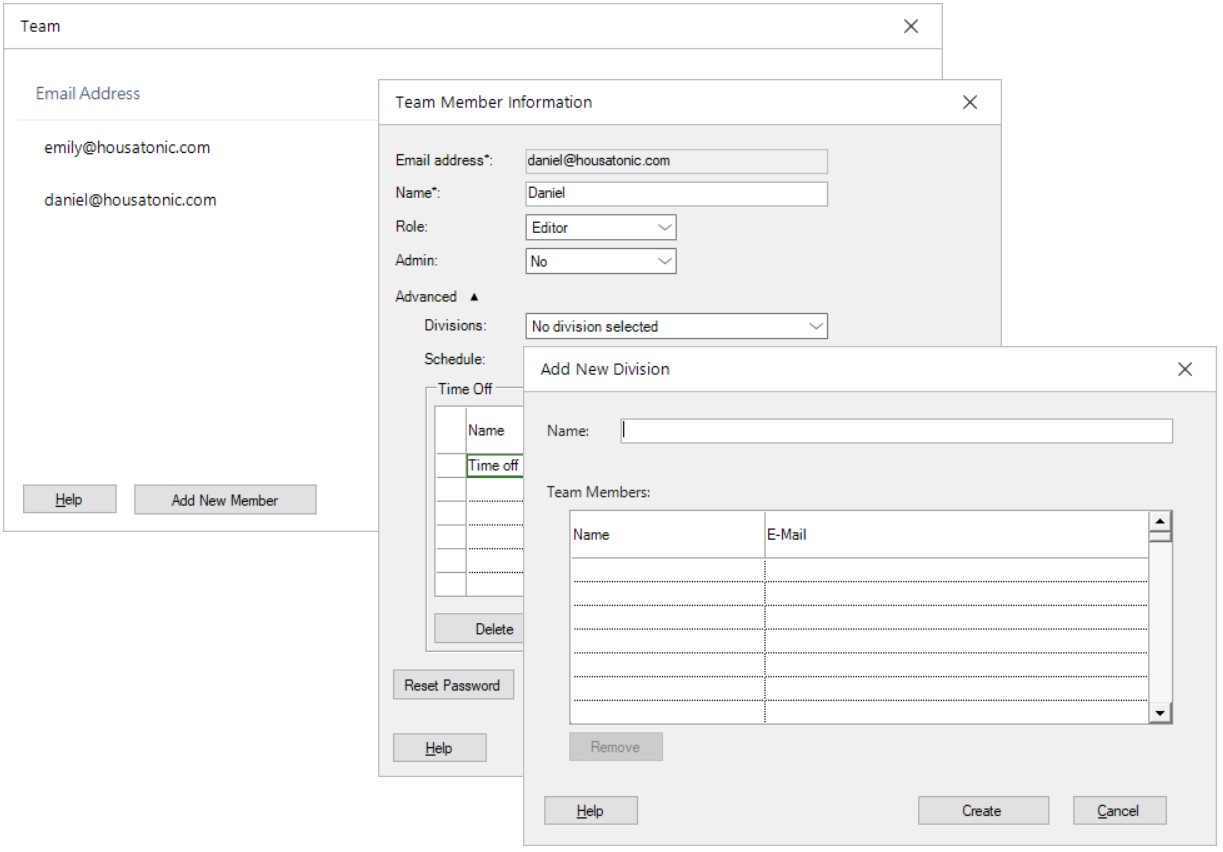
3. Type division’s Name;
4. Add Team Members by choosing the team member from the drop-down list. The Name and E-mail for the team members have dropdowns with strict autocomplete.
Note: Only organization team members can be added to divisions.
5. Click Create Division button to create the division and save the changes.
Note: You can also create a new division in Portal by clicking Add New Division in Divisions tab.
Step by step on how to delete a division:
Note: Only users with Admin rights can delete divisions.
1. Go to File menu – Account - Organization Information.
2. Click Divisions.
3. Select a division and click the Delete icon.
4. If you have projects that belong to the selected division, you will be asked if you want to delete them all or moving them to the root folder.
Note: You can also delete a division in Portal by going to Divisions tab and clicking Delete icon for a division.
Step by step on how to assign a division to a team member:
Note: Only users with Admin rights can assign divisions to team members.
1. Go to File menu – Home – Team (or Team menu – Manage Team).
2. Click Add new Team Member button or Edit icon for a team member;
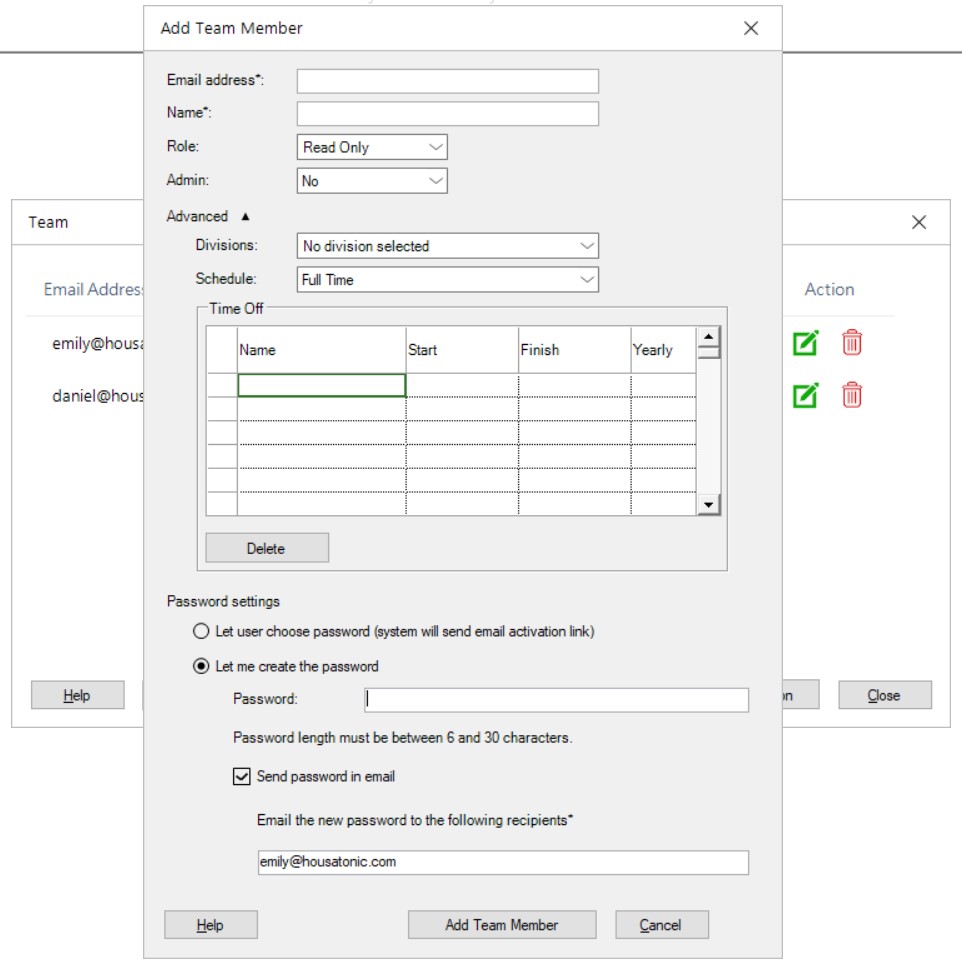
3. In Add Team Member dialog or Team Member Information dialog, assign the divisions you want from the Divisions combo box.
Note: A user can be in multiple divisions.
4. Click OK to save the changes.
Note: You can also assign divisions to a team member in Add Individual Team Member dialog or Team Member Information dialog from Portal.