
What does the Scheduled Reports functionality do?
The Scheduled Reports functionality allows you to schedule and customize Project Status reports.
How to create a Scheduled Report from Online Portal page?
To create a Scheduled Report from Online Portal page, follow the steps below:
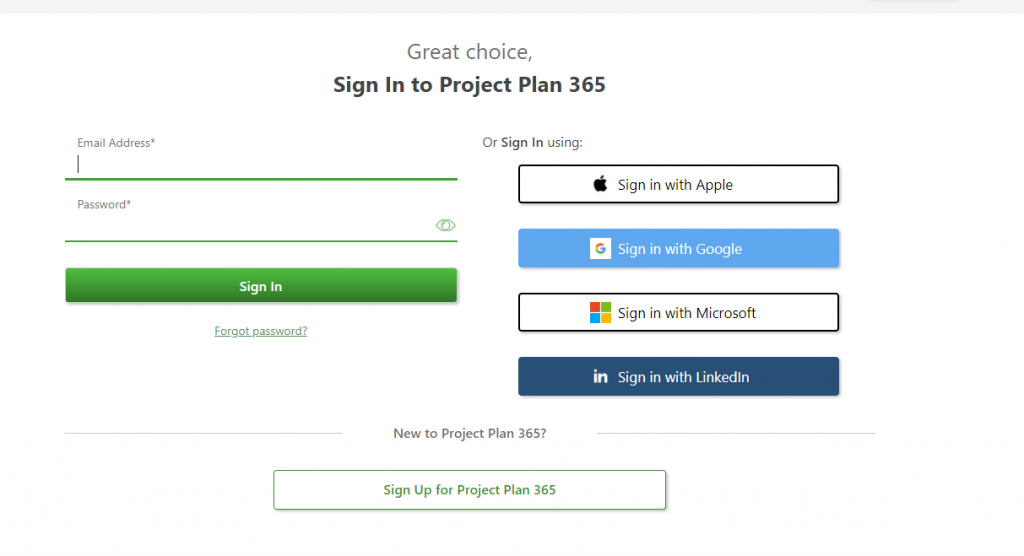
- Go to our Online Portal page and Sign In with your email and password.
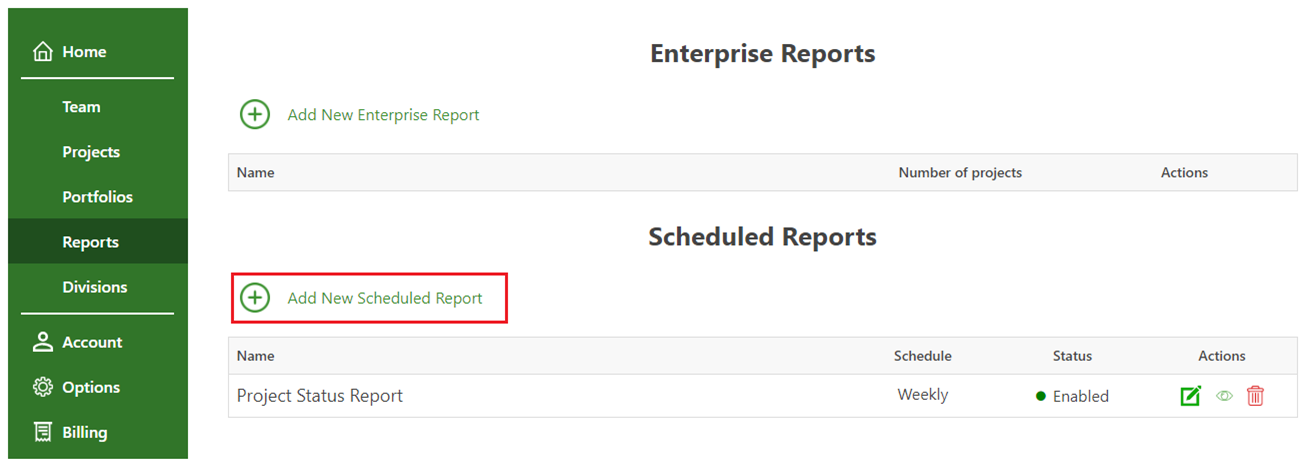
- Click on the Reports tab and then on the Add New Scheduled Report.
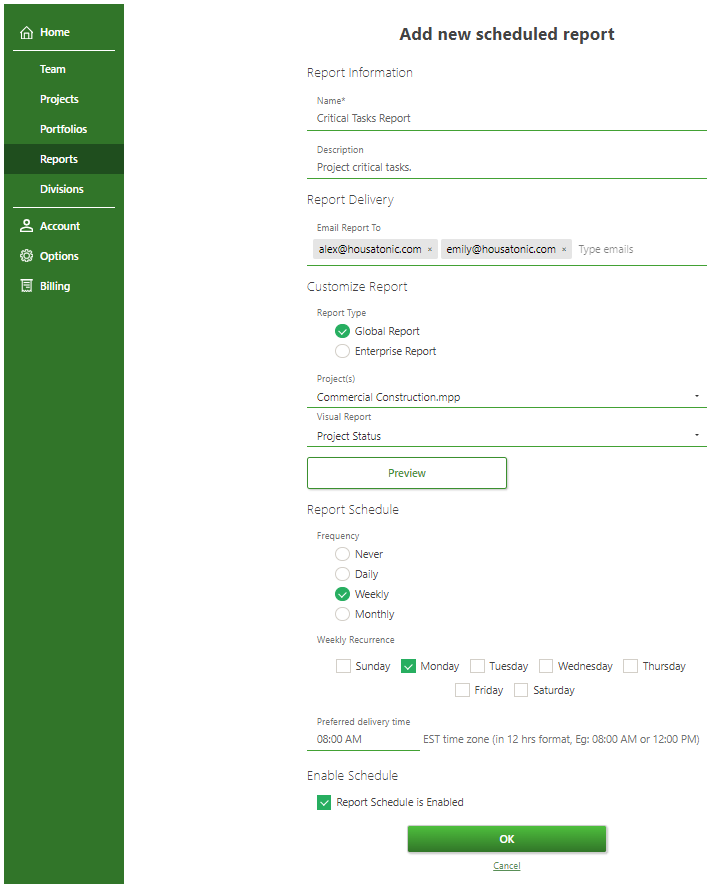
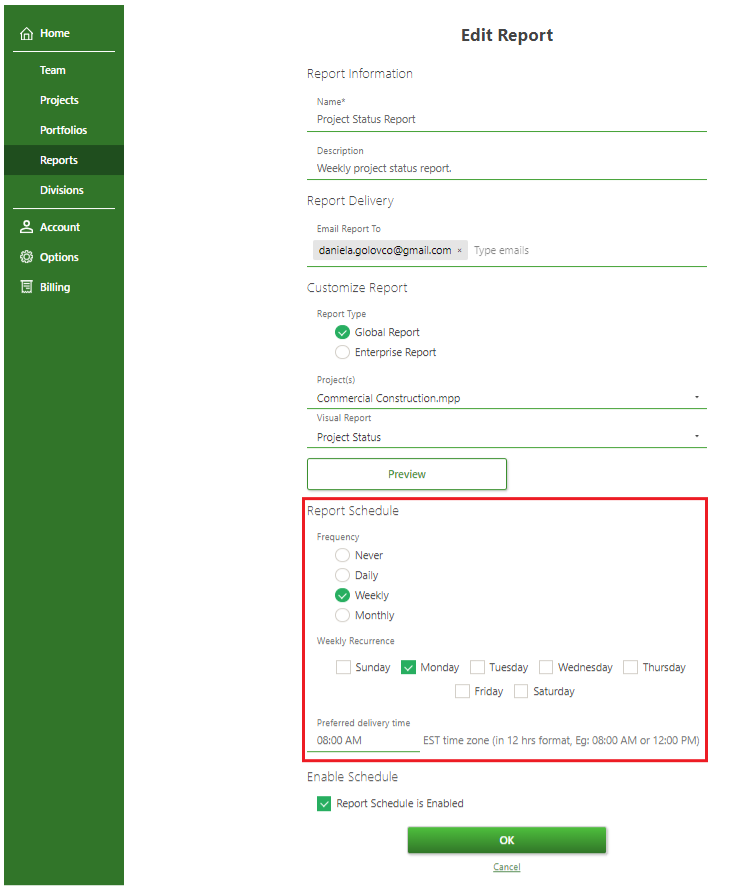
- Fill in all the required fields with the desired information and press OK in order for the report to be created.
Note that Password Protected MPP files are not supported by Scheduled Reports! If you do add password protected MPP file to scheduled reports, the report will not be sent and Preview will be unavailable!
How to create a Scheduled Report directly from the application?
To create a Scheduled Report directly from the application, follow the steps below:
- Go to the Report menu – Scheduled Reports;
- Click on the Add New Scheduled Report button;
- Fill in all the required fields with the desired information and press OK in order for the report to be created.
Note: Password Protected MPP files are not supported by Scheduled Reports! If you do add password protected MPP file to scheduled reports, the report will not be sent and Preview will be unavailable
How to edit a Scheduled Report?
To edit a Scheduled Report, go to our Online Portal page and Sign In with your email and password. After that, click on the Reports tab and then on the Edit button for the desired report. Then, make the desired changes to the report and click OK for the changes to apply.
You can also edit a Scheduled Report directly from the application, by going to the Report menu – Scheduled Reports. Click on the “Edit” button for the desired report, make the changes and click “OK” for the changes to apply.
How to enable a Scheduled Report?
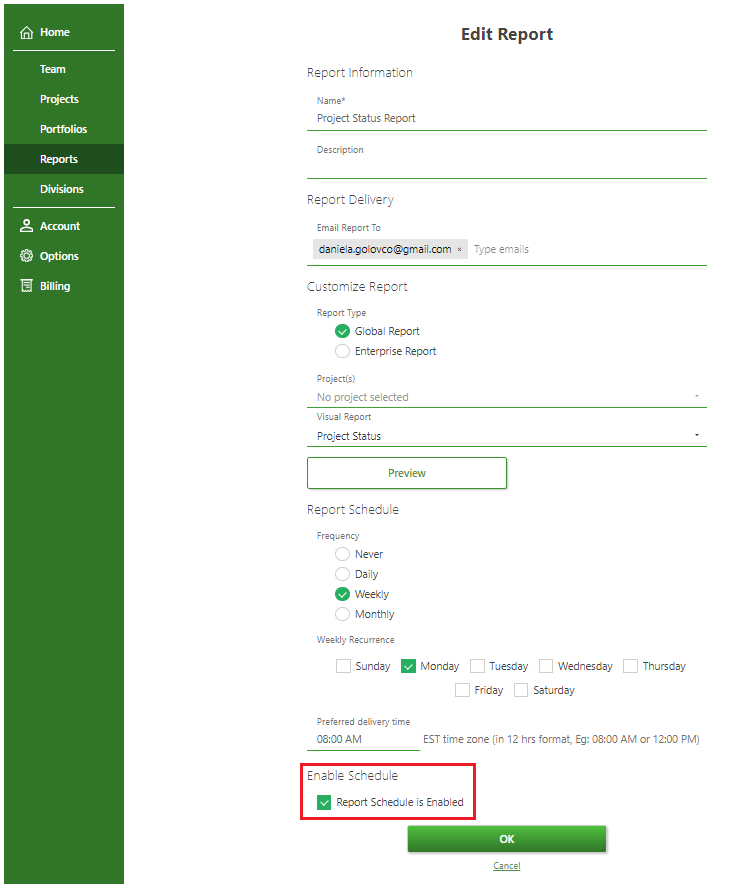
To enable a Scheduled Report, go to our Online Portal page and Sign In with your email and password. After that, click on the Reports tab and then on the Edit button for the desired report. Then, from the Enable Schedule section, check the Report Scheduled is Enabled field and press OK for the changes to apply.
You can also enable a Scheduled Report directly from the application, by going to the Report menu – Scheduled Reports. Click on the “Edit” button for the desired report and from the Enable Schedule section, check the Report Scheduled is Enabled field and press OK for the changes to apply.
How to disable a Scheduled Report?
To disable a Scheduled Report, go to our Online Portal page and Sign In with your email and password. After that, click on the Reports tab and then on the Edit button for the desired report. Then, from the Enable Schedule section, uncheck the Report Scheduled is Enabled field and press OK for the changes to apply.
You can also disable a Scheduled Report directly from the application, by going to the Report menu – Scheduled Reports. Click on the “Edit” button for the desired report and from the Enable Schedule section, uncheck the Report Scheduled is Enabled field and press OK for the changes to apply.
How to delete a Scheduled Report?
To delete a Scheduled Report, go to our Online Portal page and Sign In with your email and password. After that, click on the Reports tab and then on the Delete button for the desired report. A message will appear saying “Are you sure you want to permanently delete the report?” then click OK for the changes to apply.
You can also delete a Scheduled Report directly from the application, by going to the Report menu – Scheduled Reports. Click on the “Delete” button and then click “OK” in the message that appears for the changes to apply.
How to preview a Scheduled Report?
To preview a Scheduled Report, go to our Online Portal page and Sign In with your email and password. After that, click on the Reports tab and then on the Preview icon for the desired report. A message will appear saying “Generating report, please wait…” . After that, your report will be generated.
You can also preview a Scheduled Report directly from the application, by going to the Report menu – Scheduled Reports. Click on the “Preview” icon for the desired report.
Note that you can also preview a report by entering in Edit mode for the desired report and then click on the Preview button.
How many projects can I add in a Scheduled Report?
In a Scheduled Report you can add only 10 projects. If you want to select more than 10 projects, the following message will be displayed: “Limit reached (10 items max)”.
What type of subscription do I need to be able to create a Scheduled Report?
You are allowed to create Scheduled Reports with both Standard and Business subscriptions. Please note that with the Standard subscription you are allowed to create only one Scheduled Report and with the Business Subscription you are allowed to create unlimited Scheduled Reports.
What are the predefined Visual Reports I can add in a Scheduled Report?
You can add the following predefined Visual Reports in a Scheduled Report:
- Project Status - displays the overall status of the project, including the percentage complete, duration, and cost.
- Upcoming Tasks - displays tasks that are scheduled to start in the next week or two.
- Critical Tasks - displays tasks that are critical to the project's success.
- Late Tasks - displays tasks that are overdue.
- Task Cost Overview - displays the total cost of tasks in the project, broken down by resource and task
- Milestone - displays project milestones and their associated tasks.
- Resource Overview - displays resource assignments and their workloads.
- Burndown Report - displays the progress of tasks over time.
- S-Curve Report - displays the progress of costs or work over time.
- Project Goals - displays the project goals and objectives.
Can I edit a Visual Report used in a Scheduled Report?
To edit a Visual Report used in a Scheduled Report, in the app, go to menu Reports – Visual Reports – select the desired report – click OK– in the Designer page make the desired changes – then save the project by going to menu File – Save.
Note: To learn more about how to edit visual reports go to the Visual Reports Online Help Article.
Can I add multiple Visual Reports in the same Scheduled Report?
You can add only one Visual Report per Scheduled Report.
Why am I receiving a Project Status Report?
When you save a project file in Drive 365 for the first time, a default Project Status Report is automatically scheduled with weekly delivery.
To edit the report, go to the Reports page in our Online Portal or, in the app, go to menu Report – Scheduled Reports.
Where do my projects need to be saved in order to create a Scheduled Report?
In order to create a Scheduled Report, your projects need to be saved in our Drive 365 Cloud.
How can I add a description for my Scheduled Report?
To add a description for the Scheduled Report, go to our Online Portal page and Sign In with your email and password. After that, click on the Reports tab and then on the Edit button for the desired report. Then, in the Description section add the desired text in order to describe your Scheduled Report. Then press OK for the changes to apply.
You can also add a description directly from the application, by going to the Report menu – Scheduled Report. Click on the “Edit” icon for the desired report, in the “Description” section add the desired text and click “OK”.
Can I create two Scheduled Reports with the same name?
You are not allowed to create two Scheduled Reports with the same name.
How can I receive the Project status report daily?
In order to receive a Project Status report daily, follow the steps below:
- Go to our Online Portal page and Sign In with your email and password.
- Go to Reports tab, click on the Edit button for the desired report (if you have a report created) or click on the Add New Scheduled Report to create a new report.
- In the Report Schedule section – Frequency, select Daily.
- Press OK for the changes to apply.
Please note that the preferred delivery time uses the EST (Eastern Standard Time) time zone, not the time zone set on your device.
You can apply the above settings by accessing the Scheduled Reports option from the Report menu, directly from the application.
How can I receive the Project status report weekly?
In order to receive a Project Status report weekly, follow the steps below:
- Go to our Online Portal page and Sign In with your email and password.
- Go to Reports tab, click on the Edit button for the desired report (if you have a report created) or click on the Add New Scheduled Report to create a new report;
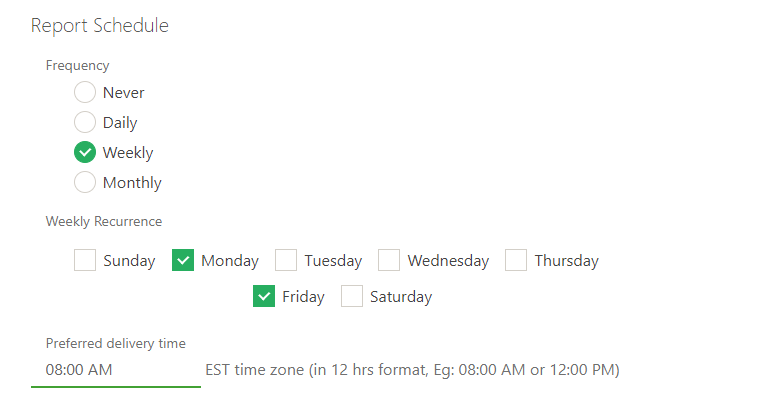
- In the Report Schedule section – Frequency, select Weekly. You can also select the Weekly Recurrence and set in which day of the week to receive the Project Status Report email.
- Press OK for the changes to apply.
Please note that the preferred delivery time uses the EST (Eastern Standard Time) time zone, not the time zone set on your device.
You can apply the above settings by accessing the Scheduled Reports option from the Report menu, directly from the application.
How can I receive the Project status report monthly?
In order to receive a Project Status report monthly, follow the steps below:
- Go to our Online Portal page and Sign In with your email and password.
- Go to Reports tab, click on the Edit button for the desired report (if you have a report created) or click on the Add New Scheduled Report to create a new report;
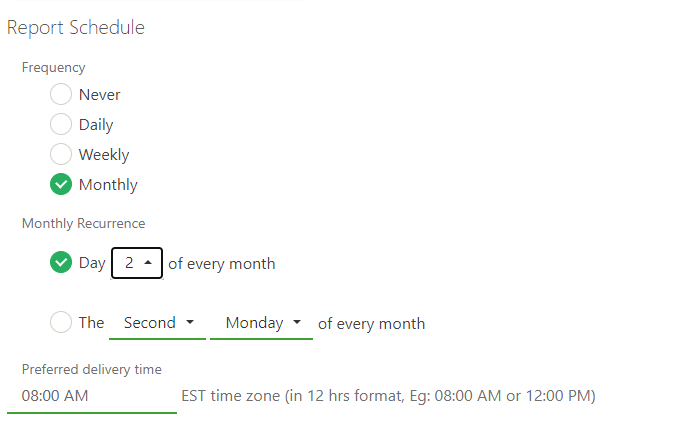
- In the Report Schedule section – Frequency, select Monthly. Then you can also select the Monthly Recurrence.
- In the Monthly Recurrence section, you can select in which day the report will be sent.
- Press OK for the changes to apply.
Please note that the preferred delivery time uses the EST (Eastern Standard Time) time zone, not the time zone set on your device.
You can apply the above settings by accessing the Scheduled Reports option from the Report menu, directly from the application.
Can I add multiple emails in the “Email Report To” field?
You can add multiple email addresses in the “Email Report To” field of either team members or people outside of your team.
How will I receive my Scheduled Report?
Based on the entered email addresses and the set delivery time, you will receive an email with the Scheduled Report attached as a PDF document.
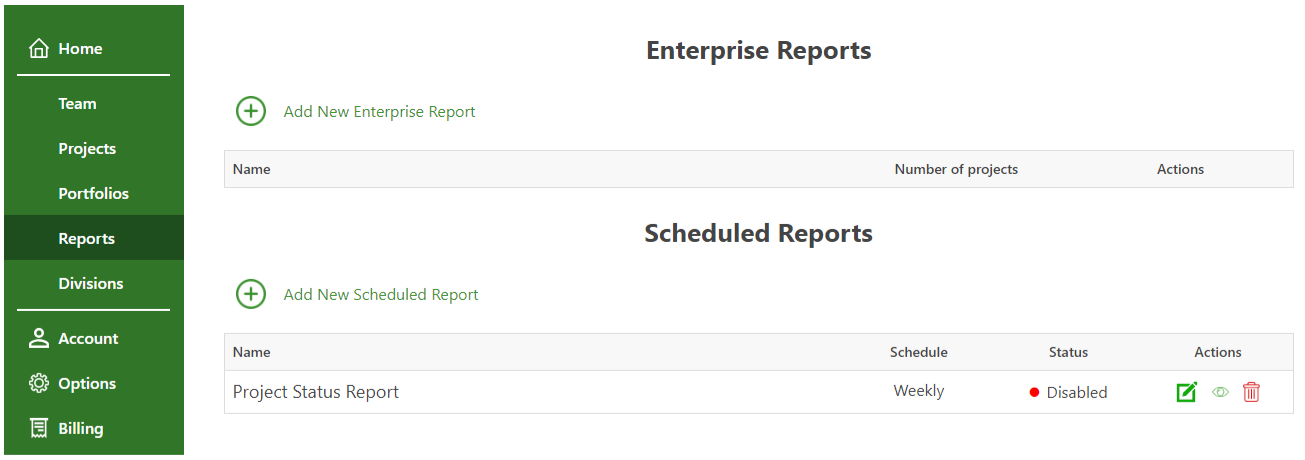
What is a Disabled Scheduled Report?
A Scheduled Report with status Disabled means that the report was created but it won’t be sent to the email addresses added in the “Email Report To” field until you enable it.
Can I Schedule Reports for Password Protected MPP Files?
We are sorry but Password Protected MPP Files are not supported by the Scheduled Reports functionality. If you do add password protected MPP file to scheduled reports, the report will not be sent and Preview will be unavailable!
On what platform is the Scheduled Reports functionality available?
The Scheduled Reports functionality is currently available only on the Windows, Mac and iOS (iPad) platforms.
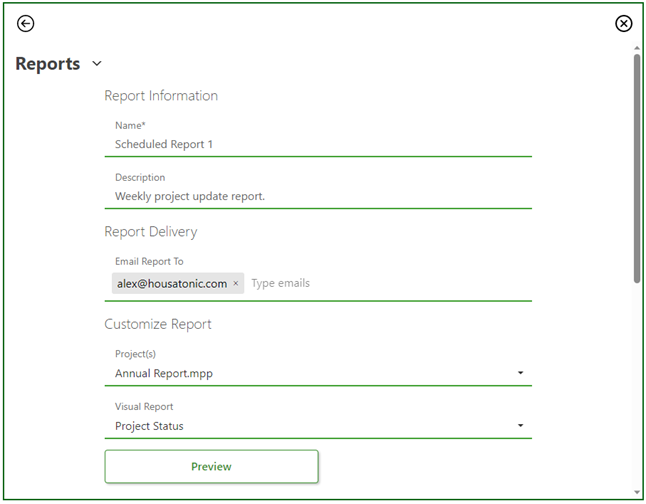
Step by step on how to create a Scheduled report from Online Portal:
- Sign In with your email and password on our Online Portal .

- Go to the Reports tab and click on the Add New Scheduled Report.


3. Fill in all the required fields with the desired information.
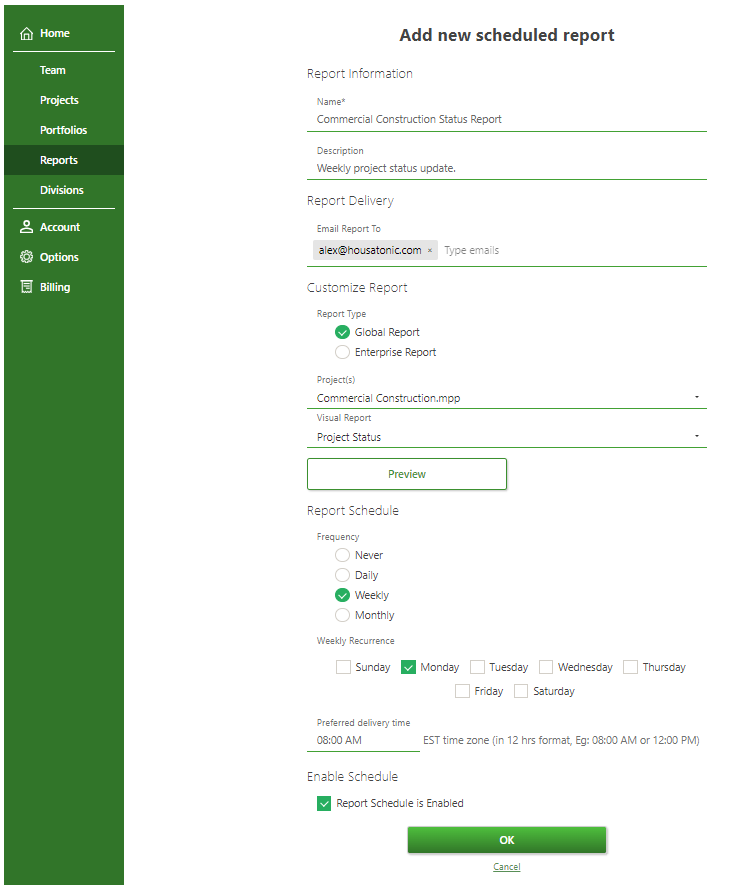
Note that Password Protected MPP files are not supported by Scheduled Reports! If you do add password protected MPP file to scheduled reports, the report will not be sent and Preview will be unavailable!
4. Press OK for the Scheduled Report to be created.
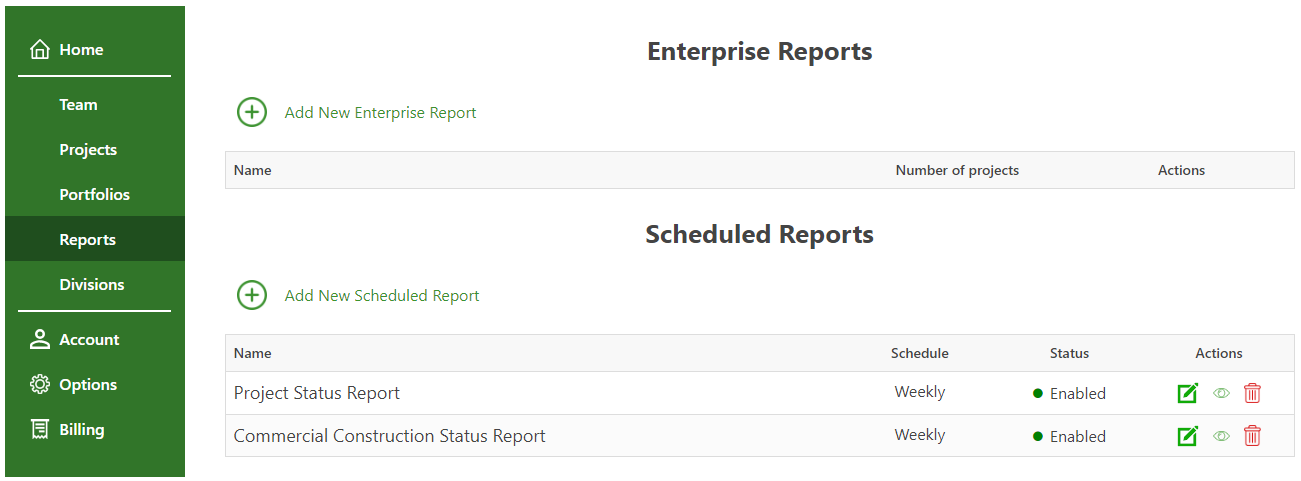
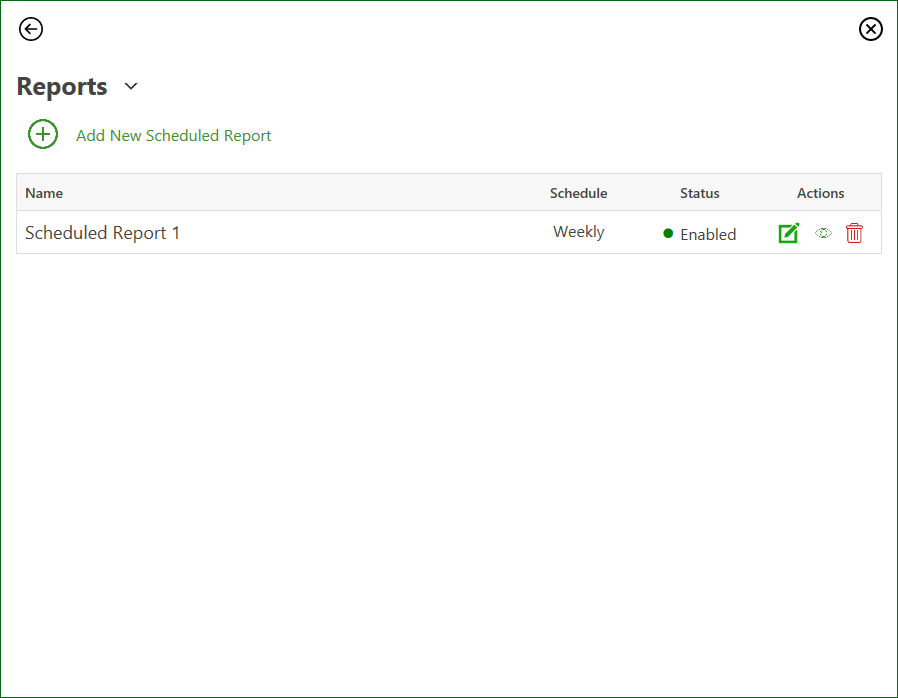
5. After you created your Scheduled Report, it will be displayed in the Reports tab:
Step by step on how to create a Scheduled report directly from the application:
- Go to the menu Report – Scheduled Reports.

2. Click on the Add New Scheduled Report button.
3. Fill in all the required fields with the desired information.
Note that Password Protected MPP files are not supported by Scheduled Reports! If you do add password protected MPP file to scheduled reports, the report will not be sent and Preview will be unavailable!
- Press OK for the Scheduled Report to be created.
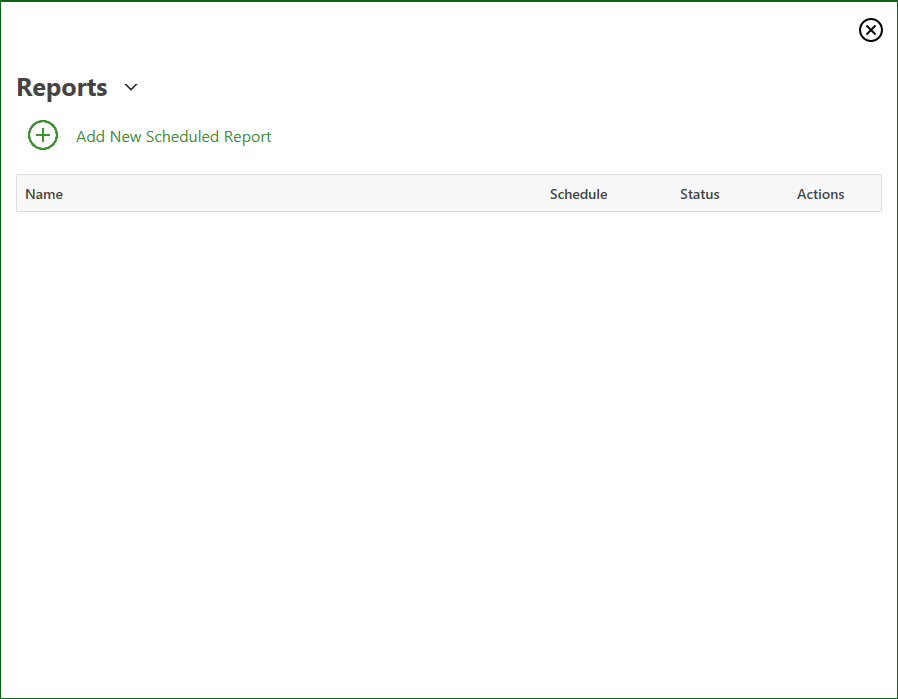
- After you created your Scheduled Report, it will be displayed in the Scheduled Reports dialog.

Step by step on how to edit a Scheduled Report:
- Sign In with your email and password on our Online Portal .
- Go to the Reports tab and click on the Edit Report button for the desired report.

- You can Edit the desired fields: Name, Descriptions, Email Report To, Project(s), Visual Report, Frequency, Recurrence, Enable Schedule.

Note that Password Protected MPP files are not supported by Scheduled Reports! If you do add password protected MPP file to scheduled reports, the report will not be sent and Preview will be unavailable!
4. Click OK for the changes to apply.
Note: You can also edit a Scheduled Report directly in the Project Plan 365 application by going to the menu Report – Scheduled Reports and following the steps described above.
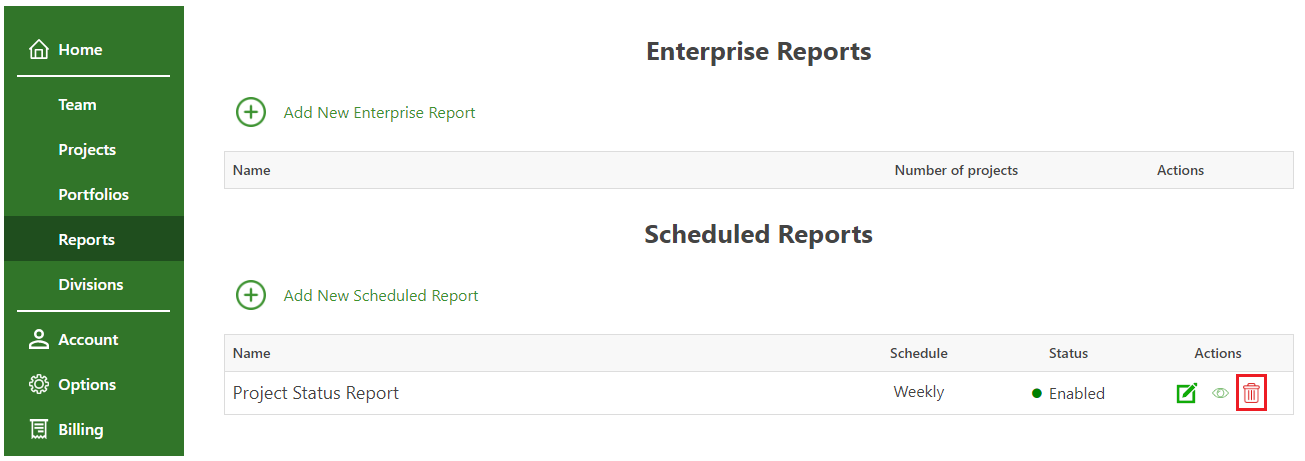
Step by step on how to delete a Scheduled Report:
- Sign In with your email and password on our Online Portal
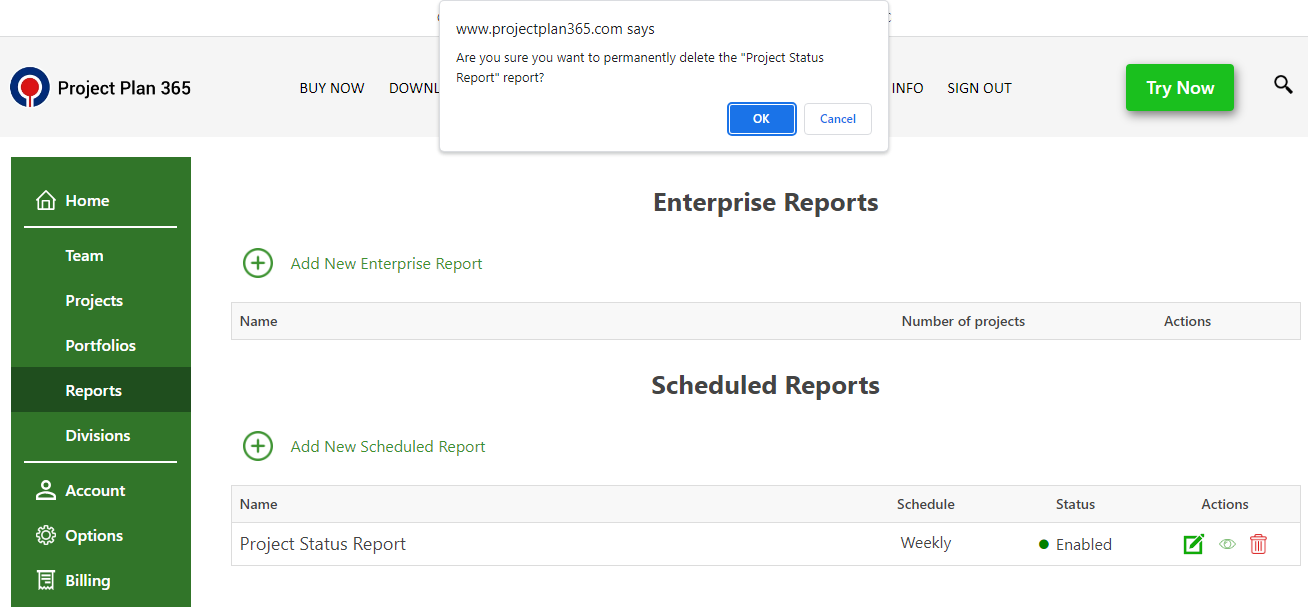
- Go to the Reports tab and click on the Delete button for the desired report.
- A message will appear saying “Are you sure you want to permanently delete the report?”.

- Press OK for the changes to apply.
Note: You can also delete a Scheduled Report directly in the Project Plan 365 application by going to the menu Report – Scheduled Reports and following the steps described above.
Step by step on how to add a Visual Report in a Scheduled Report:
- Sign In with your email and password on our Online Portal
- Go to the Reports tab and click on the Add New Scheduled Report button.
- Fill in all the required fields with the desired information.

- In the Visual Report field, you can select one of the predefined Visual Reports or a custom one that was copied to Global Settings.


5. Click OK for the Scheduled Report to be created.
Note: To learn more about how to copy a custom Visual Report to Global Settings check our Visual Reports Online Help Article.
Note: You can also customize a Scheduled Report directly in the Project Plan 365 application by going to the menu Report – Scheduled Reports and following the steps described above.
Step by step on how to enable/disable a Scheduled report:
- Sign In with your email and password on our Online Portal
- Go to the Reports tab and click on Edit button for the desired report.
- Then, from the Enable Schedule section, uncheck or check the Report Schedule is Enable.

- Press Ok for the changes to apply.

Note: You can also enable/disable a Scheduled Report directly from the Project Plan 365 application by going to the menu Report – Scheduled Reports and following the steps described above.
Step by step on how to set when to receive your Project Status Report:
- Sign In with your email and password on our Online Portal
- Go to the Reports tab and click on Edit button for the desired report or click on the Add New Scheduled Report button to create a new one.

3. Then from the Report Schedule section - Frequency you can choose when you want to receive your Project Status Report email: Never, Daily, Weekly, Monthly.
4. Select the desired option from the Frequency section and press OK for the changes to apply.
Note 1: If you select the Weekly frequency, then you can select also the Weekly Recurrence and set in which day of the week to receive the Project Status Report email.
For example, you can select to receive the Project Status Report email every Monday and Friday.
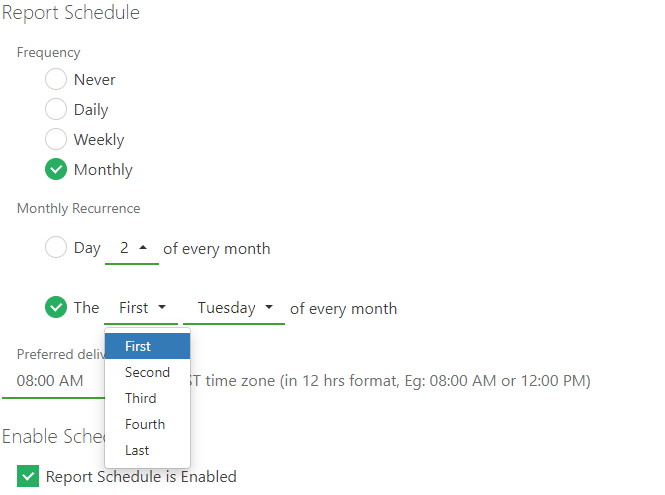
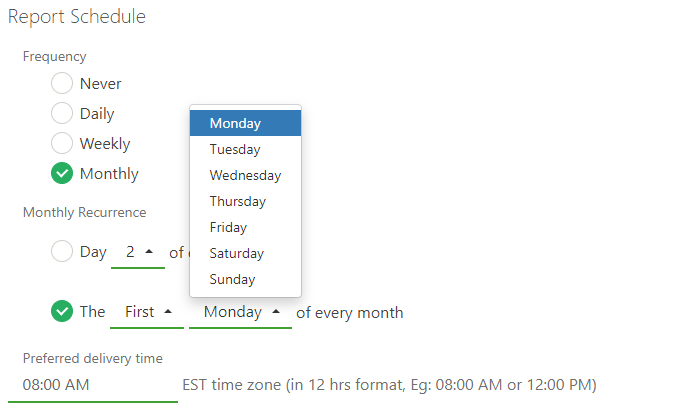
Note 2: If you select the Monthly frequency, then you can select also the Monthly Recurrence. In the Monthly Recurrence section, you can select in which day the report will be sent.
For example, if you want to receive the report on the second day of the month, check the first option and select 2 from the dropdown.
If the report needs to be sent in a certain day of the week, you can choose the second option. Here, you can select the day of the week and its occurrence in the month.
Note: You can also set when to receive your Project Status Report directly in the Project Plan 365 application by going to the menu Report – Scheduled Reports and following the steps described above.