What is a Work Breakdown Structure?

What is a Work Breakdown Structure (WBS)?

A work breakdown structure or WBS is a common term in project management. The concept is used each time a new project is designed — and is best thought out before entering any data into a .MPP file. Yet even though the WBS is an important construct to project managers, creating and using a WBS in the project design phase does not occur with the regularity that you might expect.

Some of this lack of use of the WBS stems from the complicated definition; a 243-page specification published by the United States Department of Defense (MIL-STD-881C) was initially developed back in the 1960s to help NASA and the U.S. military better manage mega-projects, like building rocket systems or getting to the moon. Yet for those outside of the US government, no one wants to adopt a practice that takes 243 pages to describe.

It doesn’t have to be that difficult.

A WBS is really just a visual breakdown of a project into smaller components — think hierarchy – which makes planning for (and creating) the required deliverables easier to accomplish for any project team.

The benefits of designing a project that incorporates a WBS are multifold:

  • The WBS helps define key deliverables and sub-components of deliverables before work is scheduled and started, resulting in a smoother rollout during the project. The scope of your project is captured in the WBS, helping to prevent mission- or scope-creep later.
  • The WBS provides a much-needed collaborative tool that can be reviewed early on with project teams, management and other stakeholders before a plan is locked in.
  • The WBS gives everyone a clear, visual representation of a project, without having to wade through the minutia and tedium of other types of project metrics or documentation.
  • Through use of a numbering schema, the WBS identifies parts of a plan numerically (often called WBS codes), which can be used in many ways during the execution of your project. For example, a repetitive deliverable that is identified by number can be easily resourced, costed or scheduled programmatically from within Project Plan 365 (or many other scheduling tools).

To develop a WBS for your next project, just follow these three golden rules:

First, the 100% Exhaustive & Mutually Exclusive Rule provides that within every level of your WBS, everything you need to deliver is represented within that level. For Level 1 of your hierarchy, for instance, you should find everything that you need to deliver for your project in totality. Within level 2 of that hierarchy, everything you need to deliver for that subcomponent of your project is included (and nothing else). There should be no overlap in scope between the various levels of your WBS. Just the act of creating the WBS exposes deliverables or events that may detrimentally overlap in your plan — and therein lies the beauty of employing a WBS. This figure shows a sample WBS structure set up in a “mind map” format.
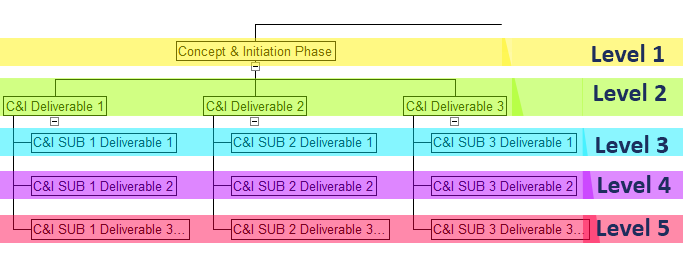
Figure 1. First "branch" of a WBS showing a breakdown as levels within a plan.

Second, the Make a Logical Structure Rule provides that you make a visible representation of your WBS in a hierarchy that makes sense, and is easy to read. In olden times, this was often done in PERT charts. In today’s world of simplification, a much more recognized and modern visualization tool is the ubiquitous mind map, as shown in the figure above.

Note: the numbering schema that goes along with this hierarchy can be automatically generated within Project Plan 365 (see Figure 2 for an example), and WBS codes should be generated this way instead of typing them within the Task Name.
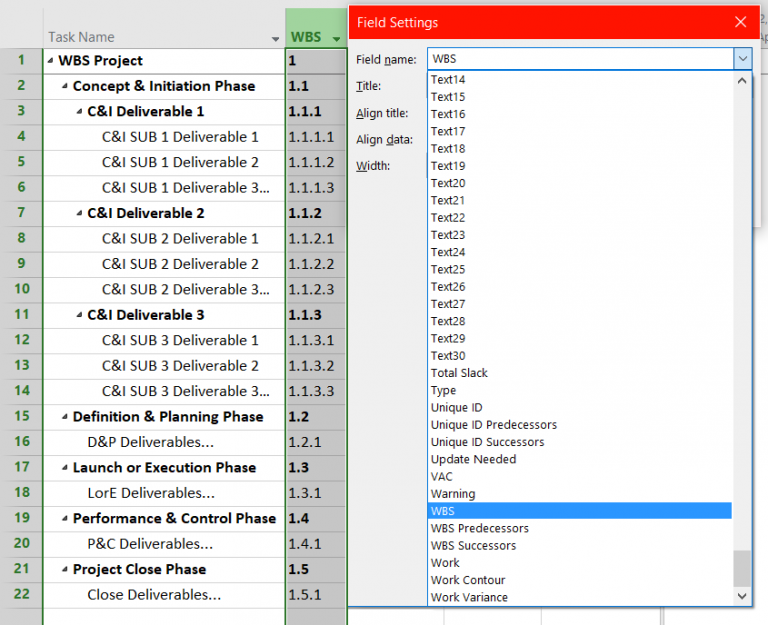
Figure 2. An automatically-numbered schema can be created within the .MPP - just add the WBS column to any view and BOOM - you're done!

Third, Grammar Rules should be followed, but don’t worry, this grammar is easier than you think! Here’s how you do it:

  1. Use descriptive nouns to describe all your deliverables and sub-deliverables
  2. At the lowest levels, use action verbs to describe what’s needed to make each sub-deliverable “happen.” Figure 3 shows WBS grammar rules in action.
  3. Use row #1 to name the project and set the title of the plan.
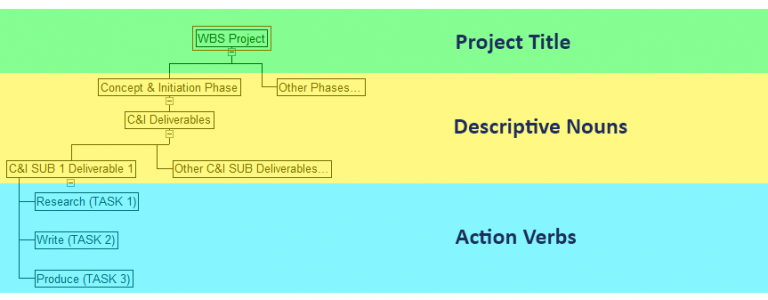
Figure 3. Syntax of a best-practice WBS.

In summary...

By following these three golden rules, your WBS will become an invaluable tool throughout your project planning experience: from the initial design collaboration – to the actual scheduling in Project Plan 365 — you will surely come to depend on having a WBS prepared for every project that you manage.

To give Work Breakdown Structures a try, simply subscribe to Project Plan 365 today!

Mind-Mapping Your Way to Better Project Plans

How to use mind maps to create a WBS...

Mind-mapping (or as it is also known, concept mapping) is a proven method and technology for organizing your thinking, no matter what you are thinking about. Students learn this technique in school these days, so that term papers and research reports are better thought out and organized for their professors. Writers use this technique to better prepare and organize articles for their editors and project managers also benefit from this easy-to-do technique when designing project plans and schedules. Here’s why: 

1. Creating a mind-mapped WBS is a great way to collaborate with others…

Mind maps are easier to jigger in real time than in a project schedule or Excel spreadsheet, and much easier to share within a group of collaborators who are watching on-screen as you jointly break down the work. So when first designing your project, you can present your mind-map in the form of a Work Breakdown Structure, and quickly adjust for changes suggested by your team. For a lengthy example on how this is done, see this YouTube tutorial.

2. Some mind-mapping tools have a one-click export, and some PM apps have a one-click import…

MindJet’s MindManager or Xmind Pro are two mind-mapping applications that are great for creating a project WBS, especially when first designing a new project and when breaking down the work. You can re-arrange an idea for a project by using drag and drop, and with a minimal of clicks, you can map out a WBS in no time flat. When done, it’s usually just a one-click export to your PM app, or a one-click import if using Project Plan 365. There are several other mind-mappers that export to the .mpp file format, and a review of the most common software packages can be found here.

3. You are new to your PM App, or you don't like to (or know how to) manipulate dozens or perhaps thousands of rows of tasks within your PM application, just to make your plan organized…

So you are not distracted by the mechanics of your PM app when designing the schedule, you should use a mind map instead, allowing you to focus on the organization of the project without the distraction of a thousand or more click options staring you in the face. And you can drag and drop much more easily within a mind-mapping app then any PM app. Once you have created the structure of a plan within a mind-mapping tool, you can focus on the actual mechanics of the PM app to do what you need to do.

4. You want to design a project plan using a visual design tool…

Even for old-timey project planners, using a visual tool to design projects can be a most welcome change from starting a project plan from scratch within a PM app - or from a canned template that needs lots of editing before you can even begin.

After all, science says this process is more effective. In other words, it is always better to combine your thinking with something visual, and keep that activity separate from say the analytical task of manipulating a PM application.

Ok, let's build one!

To begin building a plan using a mind mapping tool, you can start with this simple process:

Step 1. Name your project as the central topic of the mind map

All mind mapping tools work just about the same; you start with a central topic and develop a hierarchy of sub-topics. In the case of project work, the central topic is simply the name of the project, while the sub-topics are phases and tasks found in your typical plan. There are rules for the breakdown, so see this article for those.

Step 2. Breakdown your work into topic / subtopic branches in the map’s “tree”

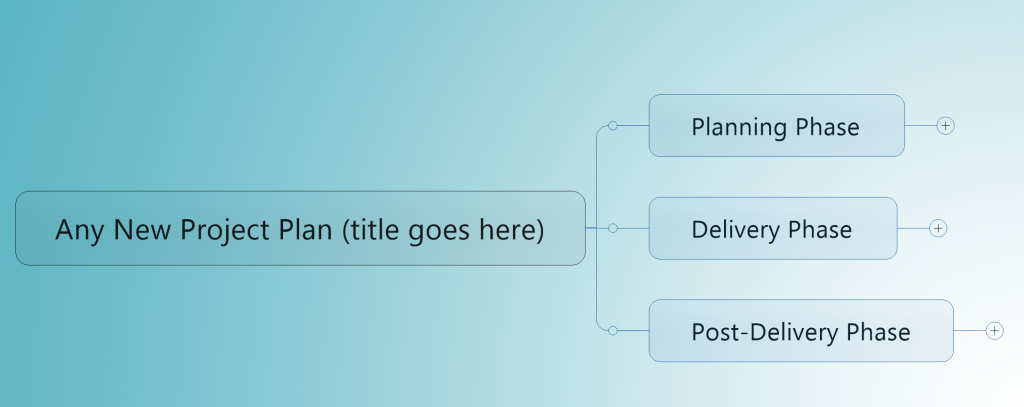
During project work, mind-map topics are treated as tasks, with the largest set of tasks organized in the order they would be implemented. So for example, you might have a project defined by phases titled: “Planning,” “Delivery” and “Post-Delivery”:

Mind Mapping in PP365

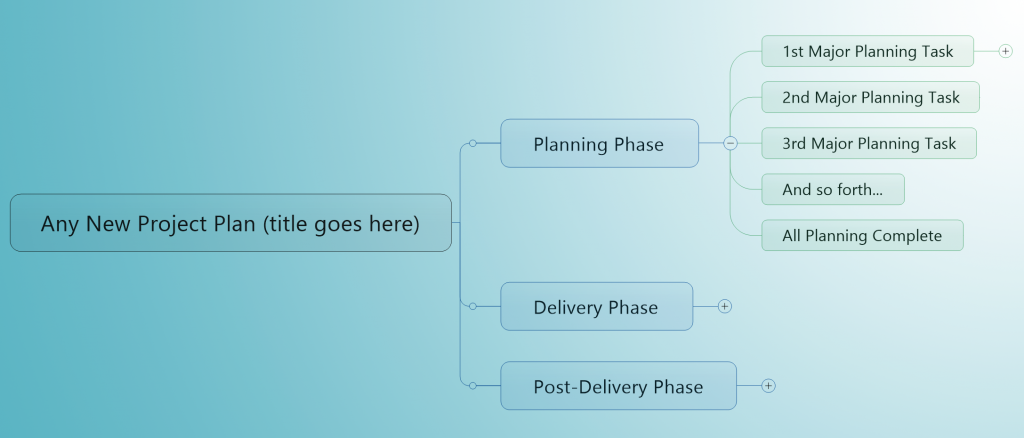
These high-level project phases are no more than three topics attached to the mind map’s central topic. To break down the phases further, subtopics are added to each phase, with each representing another task or group of tasks:

Mind mapping in PP365

Mind-mapping tools all include selective disclosure “twisties” just like PM apps do, so you can selectively work on parts of your WBS without being distracted by all the rest. Using this method, you can break down your project work into as small or as large bits as you need to, and display what you need depending on the context.

Step 3. Hold a collaborative meet-up with partners, stakeholders, and worker-bees

Now the beauty of this approach becomes apparent, as instead of reviewing a printed Gantt chart or live project plan with your collaborating team, you can review a WBS in mind-map format, which is much easier to change on the fly. Folks not familiar with Gantt charts or your PM app’s interface will easily understand your mind map, making for a much more productive review meeting.

During this meet-up, you can confirm the overall design of the plan, and also begin to collect other needed bits of data, such as: estimated costs, proposed resources, approximate durations and all the rest – remembering that the better the design is up front, the more efficient the execution will be later on down the road (goodness in - goodness out).

Step 4. Prepare your reviewed WBS for export or import to your PM application

During the collaborative meeting, you don’t want to define dependencies and constraints between tasks and subtasks (Finish-Start, Start-Finish, Start-Start, Finish-Finish, and actual dates). But after the meeting you do, and it’s best to do all of that inside of your PM application itself. However, it is possible to define all of the above inside of MindJet’s MindManager for example, but that’s not recommended (see list of gotchas below). What is recommend is that you annotate your map before export to your PM app using the app’s “notes” feature. Preserve as much data as possible this way, and you won’t have to type it all over again later.

Other features that can be exported without fear of data corruption are priority designations, marking tasks as a milestone, and resource listings.

Step 5. Export your mind-map into your PM app, and then tailor to suit

Once exported or imported, your mind-map (now WBS) can be further developed within your app, using all the wonderful functions found there. For example, you should now add all the “linking” and task constraints that you need to make your project work in real life:

Tips, gotchas and bugaboos...

While we primarily use MindManager or Xmind as a design tools to front-end Project Plan 365, other mind-mapping tools may also have some difficulties during export or import to your PM app of choice; so here are a few implementation tips:

  • Let your PM app handle all dates and the scheduling. In other words, don’t input dates into a mind-mapped WBS, but instead, do all the scheduling from within your PM application, whether that be Project Plan 365, Microsoft Project or other application.
  • Task Dependency linking is possible within many mind-mapping tools, but it is much easier to do that task within your PM application. Let your PM app do all this heavy lifting, and only use the mind-mapper of choice to visually layout the plan.
  • Other features of your mind-mapping tool - such as adding images, icons and calculations – may not translate into any terms that your PM app can understand. So again, just use your mind-mapping tool to layout your plan and create the WBS during the beginning stages of your project planning.

If purchasing a mind-mapping tool like MindManager or Xmind for the purpose of creating a WBS, get the Windows version, as in most cases only the Windows version has the ability to export a .mpp file. However, if using Project Plan 365 as your PM app, you can import the native files for both MindManager and Xmind - regardless of platform - so no need to worry here.

Closing notes...

Well, as you can see, using a mind map to front-end your next project plan is a more efficient and effective way to prepare the initial work break-down for your next project – and giving it a try is easy enough to do. Just download a 30-day trial of a mind-mapper and follow the steps listed above to begin mind-mapping your way to better project plans and schedules. Then, if you are looking for a great PM app that imports maps in just one click, then download a trial of Project Plan 365 to see how it all works – together and better!