Why can’t I add a team member with editor role?
Only Admin users can add team members with Editor role. Please contact your team administrator for more information.
Why can’t I change the “Admin” flag?
If you cannot set the Admin flag, it means that you do not have administrator rights. Only Admin users can set the Admin flag. Please contact your team administrator for more information.
Why can’t I delete a team member from my organization?
If you cannot delete a team member from your organization, it means that you do not have the rights to perform this operation. Only Admin users can delete team members from organization. Please contact your team administrator for more information.
Why can’t I change my own admin flag?
You cannot change your own Admin flag. Please contact another Admin if you want your Admin flag to be changed.
How do I add time off for a team member?
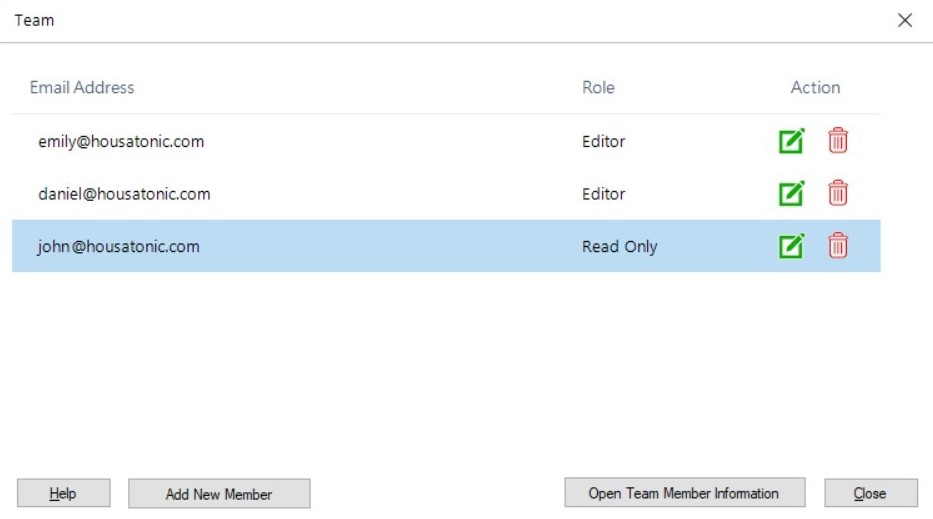
To add Time Off for a team member, go to Team menu – Manage Team, select a team member and click Open Team Member Information. In Team Member Information dialog, in the Time Off section, add the Name, Start Date and Finish date for the Time Off period and click “OK”. Note that you must have Admin rights to perform this operation.
How do I set part time schedule for a team member?
To add set Part Time schedule for a team member, go to Team menu – Manage Team, select a team member and click Open Team Member Information. In Team Member Information dialog, choose Part Time for the Schedule field. Note that you must have Admin rights to perform this operation.
How do I set full time schedule for a team member?
To add set Full Time schedule for a team member, go to Team menu – Manage Team, select a team member and click Open Team Member Information. In Team Member Information dialog, choose Full Time for the Schedule field. Note that you must have Admin rights to perform this operation.
How do I set custom schedule for a team member?
To add set Custom schedule for a team member, go to Team menu – Manage Team, select a team member and click Open Team Member Information. In Team Member Information dialog, choose Custom for the Schedule field. The Set Custom Schedule dialog will be displayed, where you can set the working hours per day. Click OK in both dialogs to save the changes. Note that you must have Admin rights to perform this operation.
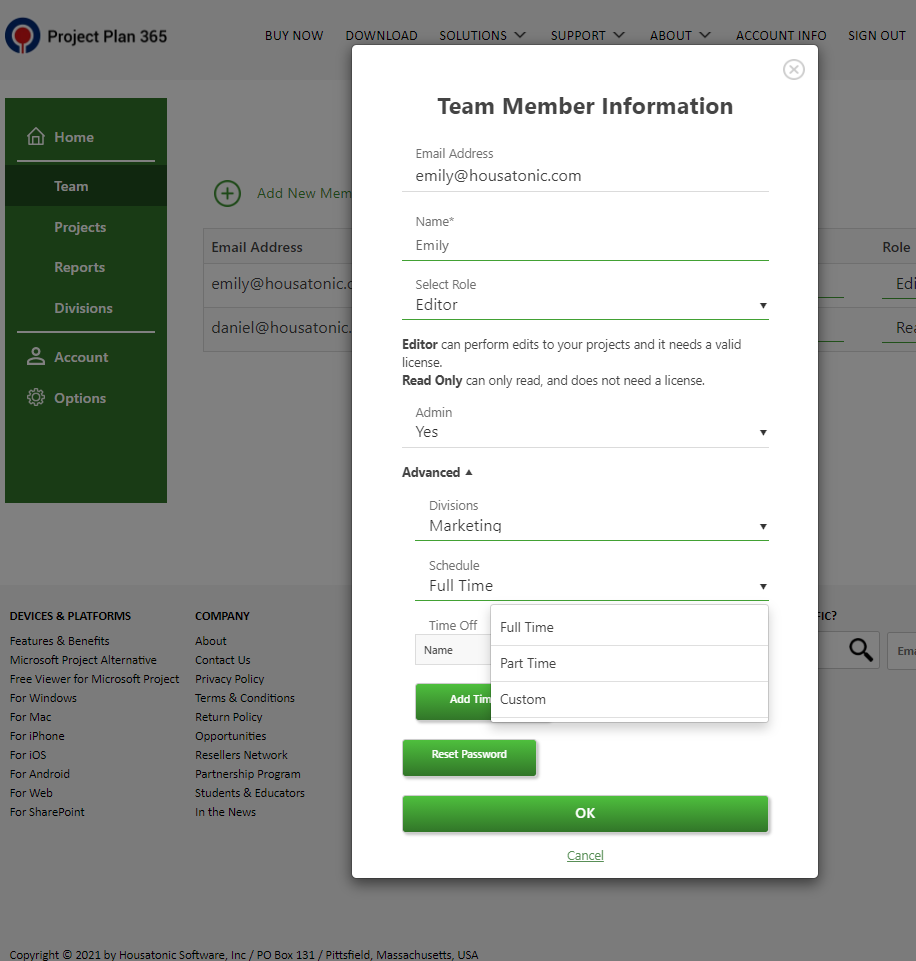
How do I edit a team member’s information?
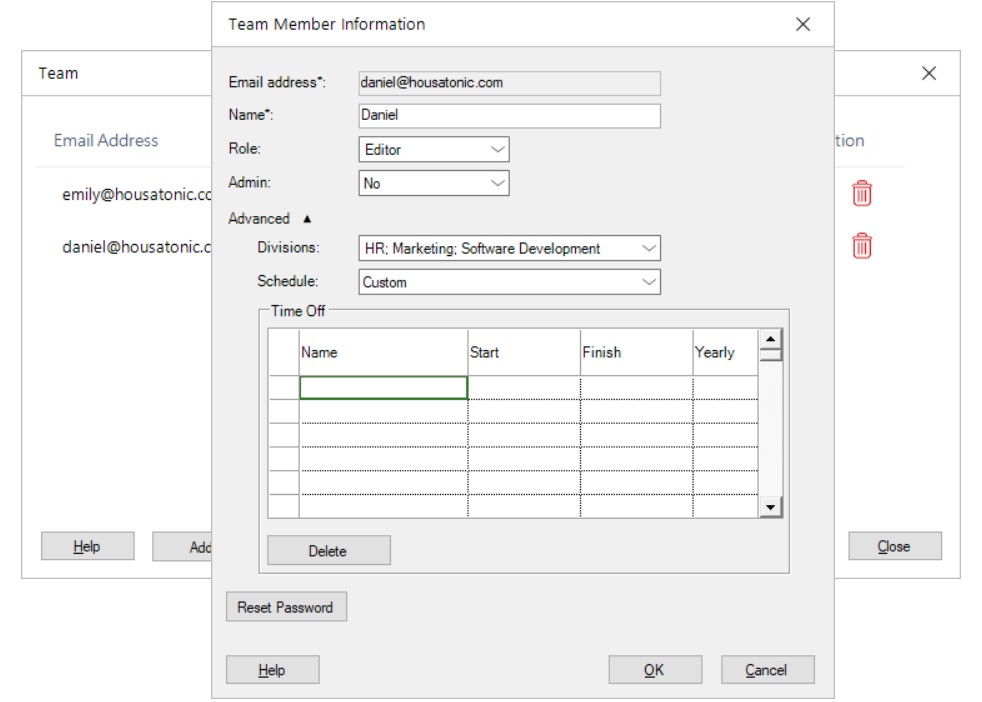
To edit a team member’s information, go to Team menu – Manage Team, select a team member and click Open Team Member Information. In Team Member Information dialog, you can edit the Name, set the Role and Admin rights, assign the team member to Divisions, set the Schedule and add Time Off. Note that you must have Admin rights to perform this operation.
How do I assign divisions to team members?
To assign divisions to a team member, go to Team menu – Manage Team, select a team member and click Open Team Member Information. In Team Member Information dialog, select from Divisions combo box the ones you want the team member to be part of. Note that you must have Admin rights to perform this operation.
How do I set the Admin flag for a team member?
To set the Admin flag for a team member, go to Team menu – Manage Team, select a team member and click Open Team Member Information. In Team Member Information dialog, select Yes for the Admin field. Note that you must have Admin rights to perform this operation.
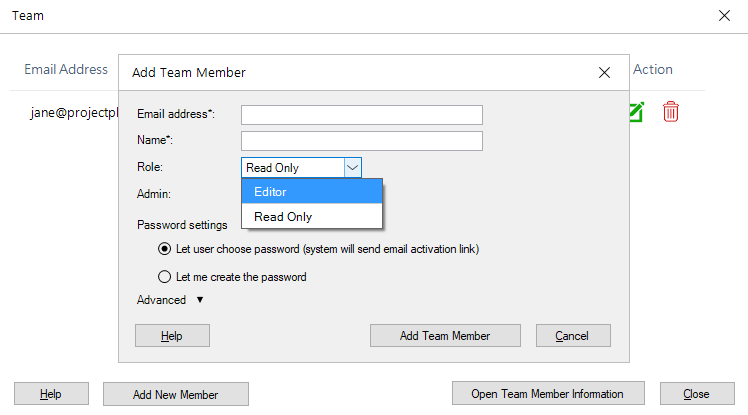
How do I set the password for a team member?
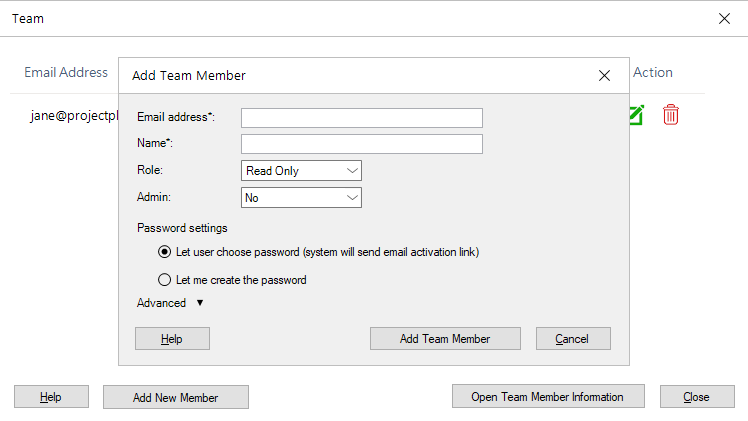
To set the password for a team member go Team menu – Manage Team, then click the Add New Member button in the Team dialog. In the Add Team Member dialog, fill the required fields (i.e. “Email address” and “Name”) and choose the Let me create the password option from the Password Settings section. After that, type a valid password and send the password in email by filling out the recipients list with the team member’s email address.
How do I reset the password for a team member?
In order to reset the password for a team member, go to Team menu – Manage Team, select the team member for whom you want to reset password and click the Open Team Member Information button. In Team Member Information dialog, click the Reset Password button. Afterwards you can reset the password by typing a valid password in the Password field and sending it to you and to the team member by email by filling out the recipients list with the email addresses.
Can I let the new team member choose his own password?
When adding a new team member, you must choose the “Let user choose password” option from Password Settings section in order to let the team member set his own password. The team member will be sent an activation link where he can set his password and activate his account.
Why my new team member did not receive his password in email?
If the team member did not receive the password in email, most likely you did not check the Send password in email option when setting or resetting his password. Or probably you forgot to type the team member’s email in the recipients list. If it is not the case, please submit a ticket at our Support Team.
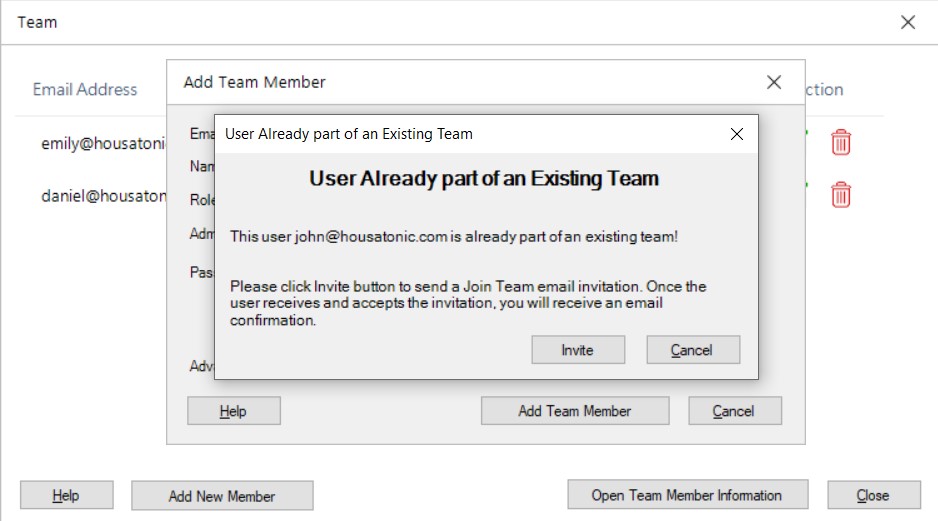
Can I add to my team a team member that is already in another existing team?
To add a team member that is already in another existing team, go to “Team” menu and click the “Add Member” button. Type the email address of the team member you want to add and click anywhere in the dialog. A dialog will appear immediately, and it allows you to invite the team member to your team. Right after you click the “Invite” button, an invitation will be sent to the entered email address. If user accepts the invitation, he will be added to the new Team with a Read Only role.
Do I lose all my projects if I join a new team?
Joining a new team results in losing access to your Drive 365 projects. Please, save them locally before joining the new team.
Why did my role change to Read-Only?
If you recently accepted an invitation to join a new team, you have been added to that team with a Read-Only role. Only Admin users can change the team members role. Please contact your team administrator for more information.
Can I add a time off for a team member if I have a Standard subscription?
Adding a time off and setting a schedule for a team member is available only for Business subscription.
How can I add a team member with read-only role?
In order to add a new team member, follow the steps below:
- Go to our Online Portal page and Sign In with your email and password.
- Click on “Team” tab and then click on the “Add new team member” button and insert the user’s email address, set the name and the role to “Read Only”.
- Click on the “Add new team member” button.
- The invited user will receive an email to join your organization. If the team member doesn’t have an account on our website, in the received email will be a link where the team member can set the password for his account.
I added a team member from Portal but it does not appear in the app.
If the team member added from Portal does not appear in the app, please click the “Refresh team members” button inside the “Resource names” control from the grid in “Gantt Chart” / “Resources Sheet” view or from the “Resources” table in the “Task Information” dialog.
What happens if I added multiple team members with Editor role while in trial?
If you add multiple team members with Editor role while you are in trial your card will be automatically debited for the number of assigned subscriptions only if you don’t cancel Auto-Renewal before your trial expires.
Please know that the subscription period will automatically renew unless you turn it off no later than 48 hours before the end of the current period. To cancel automatic renewal or manage your subscriptions, read the Cancel Subscription online help article.
If you want to reduce the number of assigned subscriptions, please check our Change Quantity Online Help Article.
Can I create another team member role besides the one that already exists?
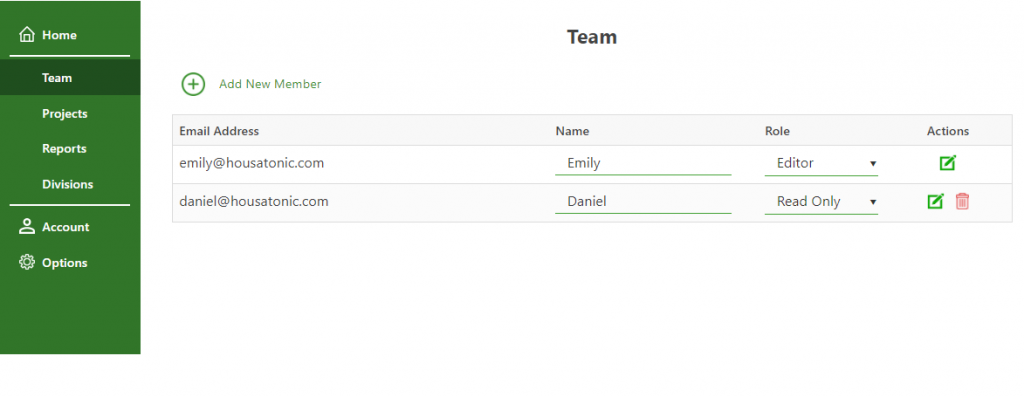
Step by step on how the owner/editor should manage the Team Members from Online Portal:
1. Sign In with your email and password in our Online Portal.

2. Go to Team page.
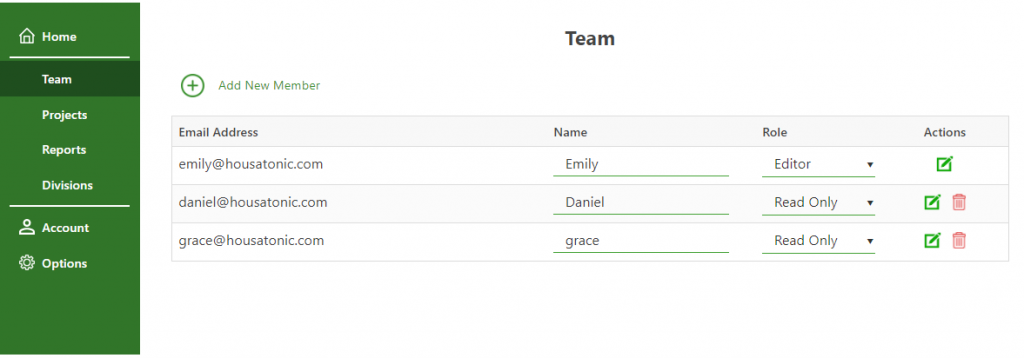
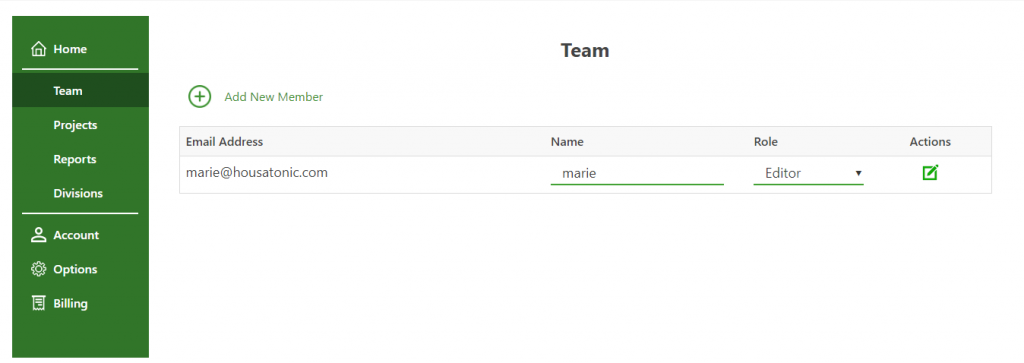
3. In the Team tab you can perform the following operations:
- Delete a team member by clicking Delete icon;
- Edit the team member info (Name, Role, Admin, Divisions, Schedule and Time Off) by clicking Edit icon or you can change the Name and Role directly from the page;
- Add New Member.
4. If there is no available subscription, the following drop down will be shown.
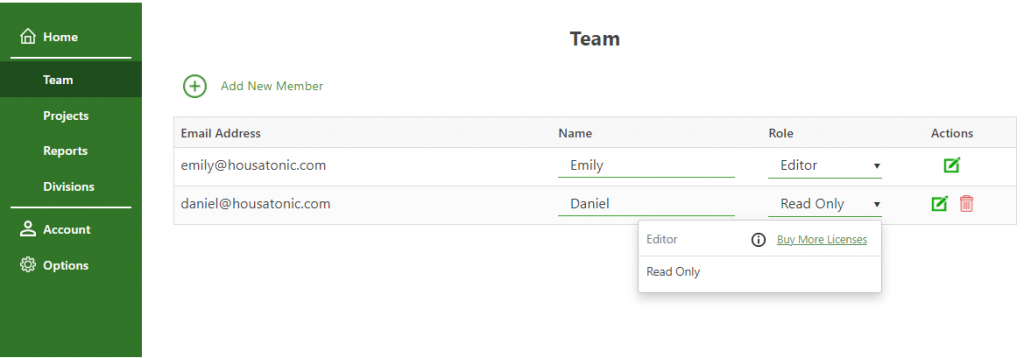
5. You can assign as many Read-Only team members as you want. Only for Editors you will need to purchase a subscription.
Note that the team members can also be managed from inside the application.
1. Click on your email address in the upper right corner.
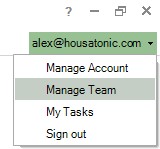
2. Click on the Manage Team button.
3. A dialog appears with all the team members that are in your organization.
4. Any modification performed in this dialog is immediately visible after the dialog is closed.
Note: Another way to manage the Team is to go to the menu Team – Manage Team.

Step by step on how the owner/admin should manage the Team Members information directly from app:
- Sign in inside the application.

- Go to Team menu – Manage Team.
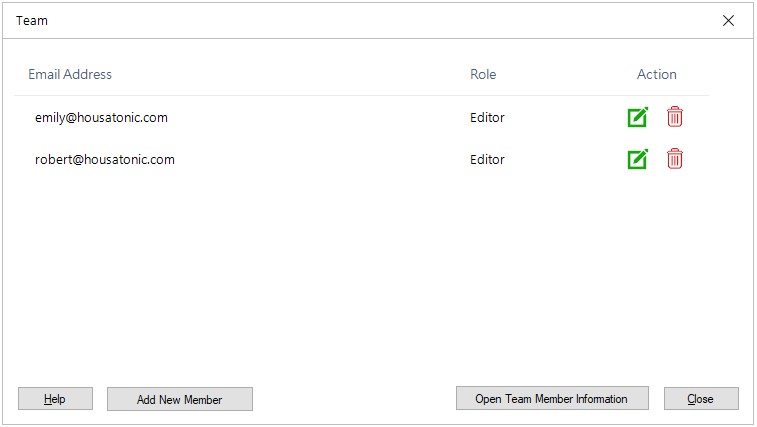
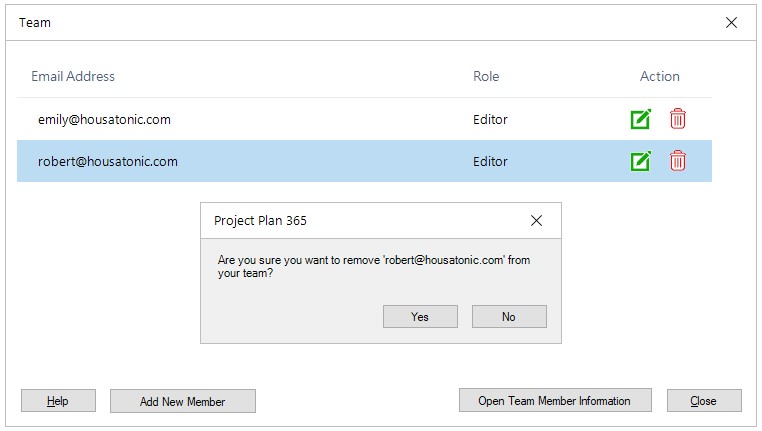
- In Team dialog you can perform the following operations:
- Delete a team member by clicking Delete icon;
- Edit the team member info (Name, Role, Admin, Divisions, Schedule and Time Off) by clicking Edit icon or Open Team Member Information.
- Add New Member.
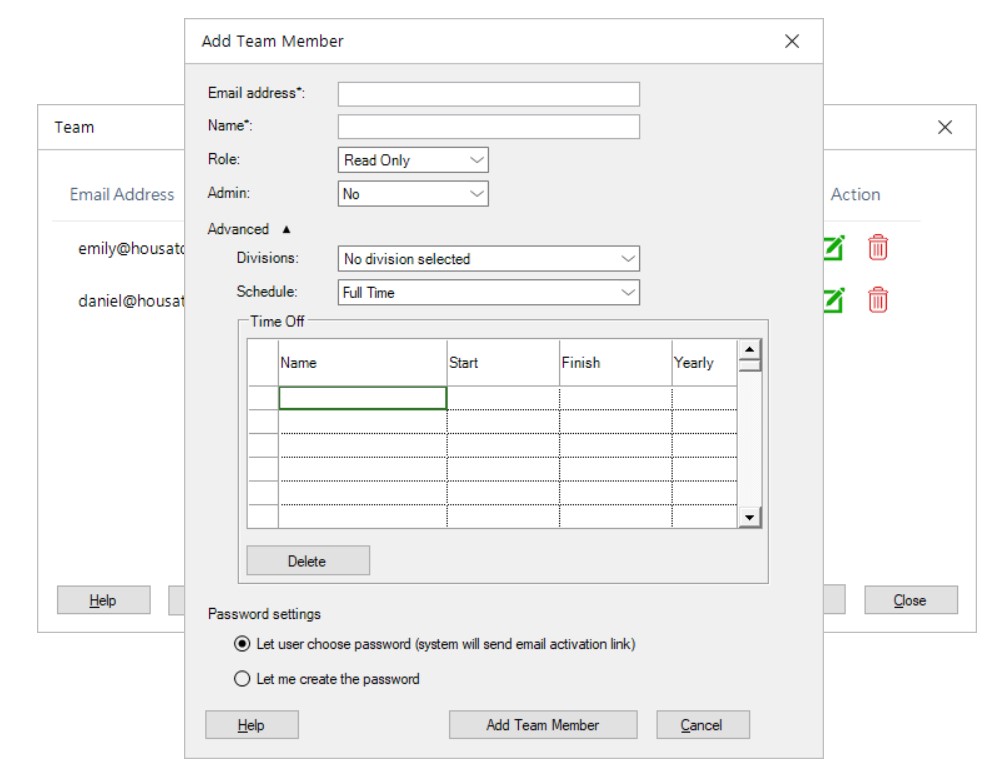
- After performing any of the following operations, click Close button.
Step by step on how to add team members from Organization into your project plans:
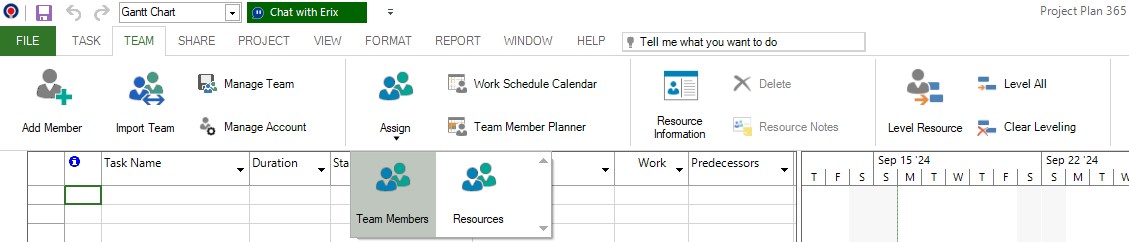
1. Select a task from Gantt Chart view.
2. Go to menu Team - Assign - Team Member.
3. The Assign Team Members to This Task dialog will be opened.
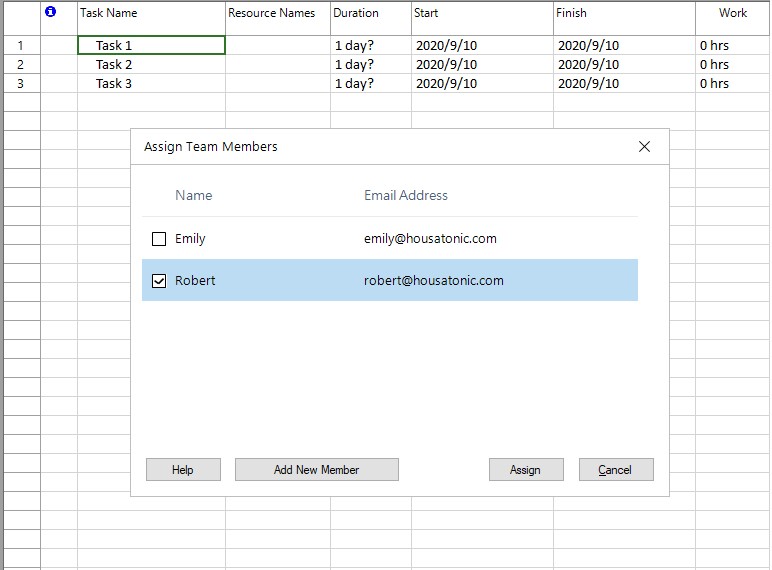
4. Select the team members that you want to assign to the task and click on the Assign button.
5. Once you click Assign, all the selected Team Members are added as Work Resources into the current project.

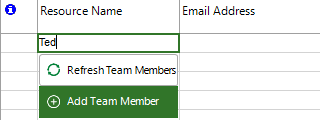
Step by step on how to add team members into your project using the Resource Name column in Gantt Chart view:
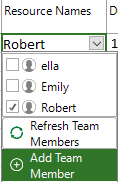
1. You can add Team Members by adding them from the Gantt Chart view.
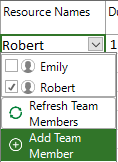
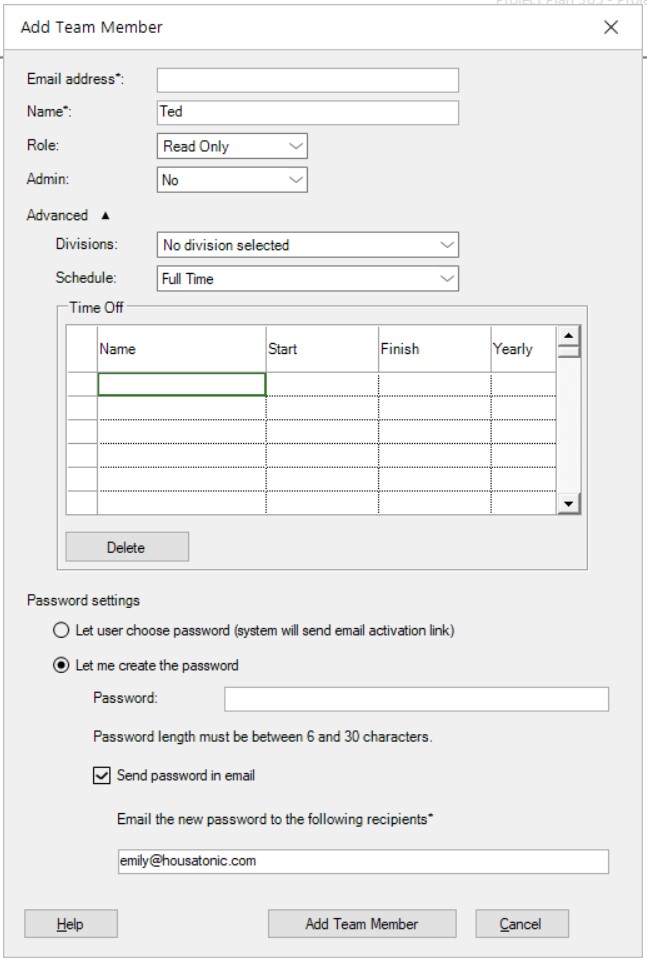
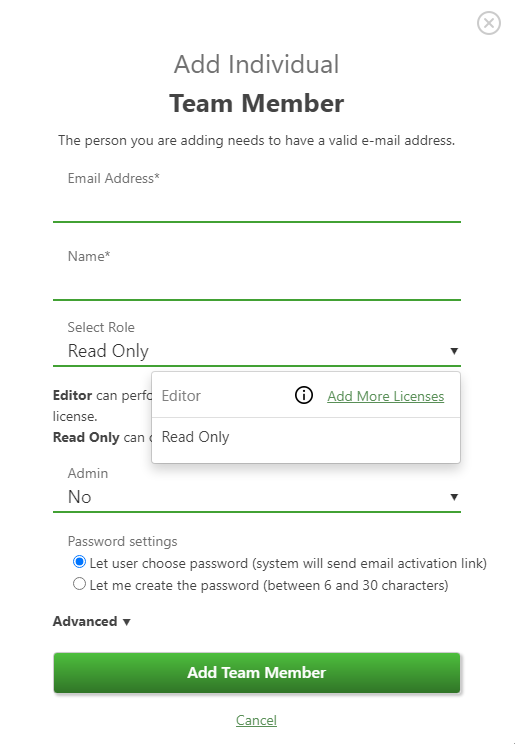
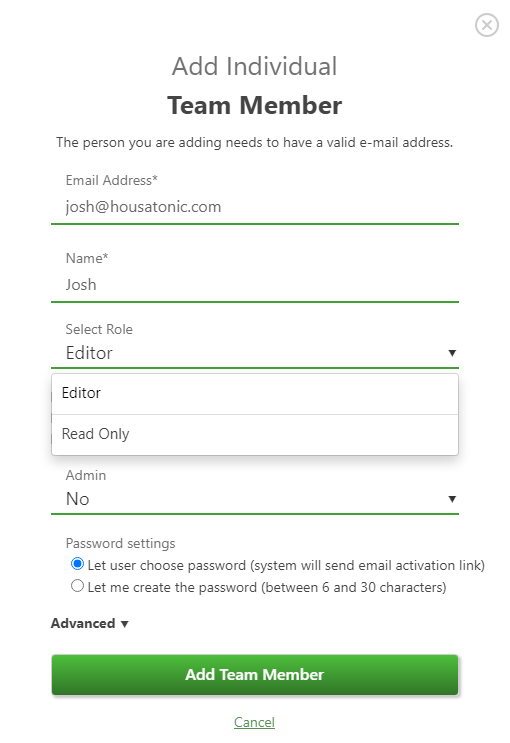
2. When you open the Resource Names drop-down menu, you will get a list of all resources in your project and the Team Members (marked with an icon). Note that all the Team Members are visible in this list (added or not). Selecting any Team Member in this list will add it to the current project (only once). If you want to add a new Team Member, click the Add Team Member button and the following dialog will be opened:
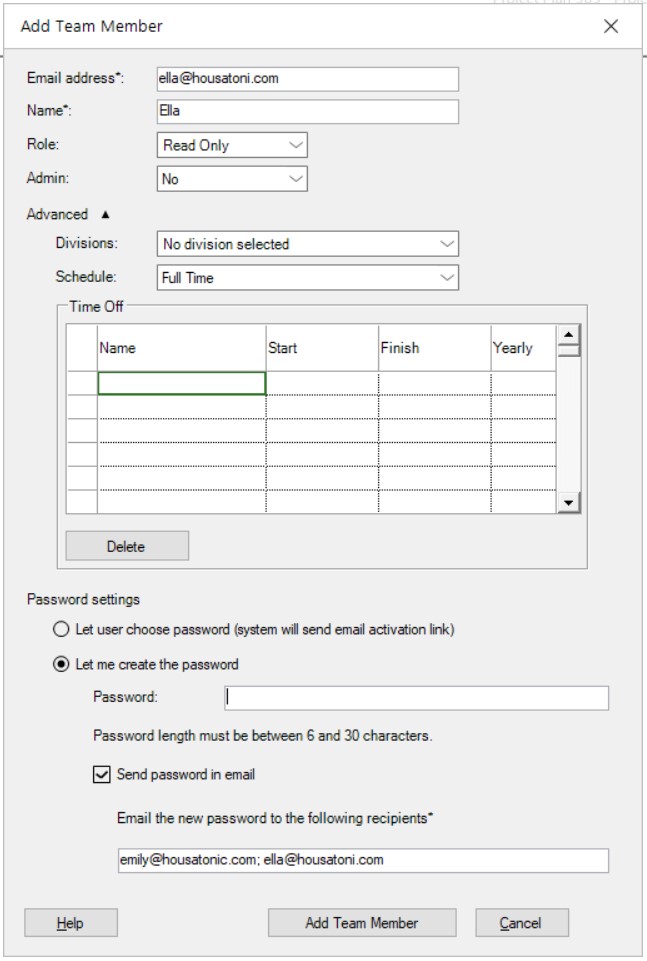
3. Enter the Email address, Name, select the Role, Admin, Divisions, Schedule and Time Off.
4. After clicking on the Add Team Member button, Ella will be added as a Team Member.
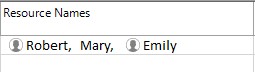
Note that Added Team Members that are assigned to tasks are shown in the Resource Names with a distinct icon in front of their name.
Step by step on how to add team members into your project using the Resource Sheet view:
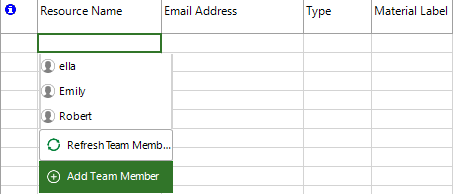
1. You can add Team Members by adding them from Resource Sheet view.
2. The Resource Name editing control provides a list of non-added Team Members and the Add Team Member button. If there are no Team Members to suggest, the button alone is displayed.
3. As you type in the input box, the suggestions list is automatically refreshed so it matches the input.
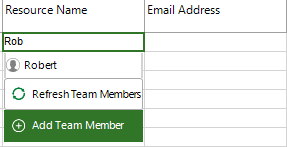
4. If you type in a resource name that does not correspond to any existing team member (that is available for adding), you can click the Add Team Member button and proceed to add it to the organization.
5. The Name field in the dialog is automatically filled with the resource name. Same is available for existing project resources – you open the Resource Name editing control for an existing resource, click on the Add Team Member button and the information is automatically filled in the dialog.
Step by step on how to import team members from your plan into your team Organization:
1. Go to menu Team – Import Team.

2. A dialog will appear that will contain all the Work Resources in the current project that are not already Team Members.
3. Once you enter a valid email address for the resources that you want to import, they will become Team Members.
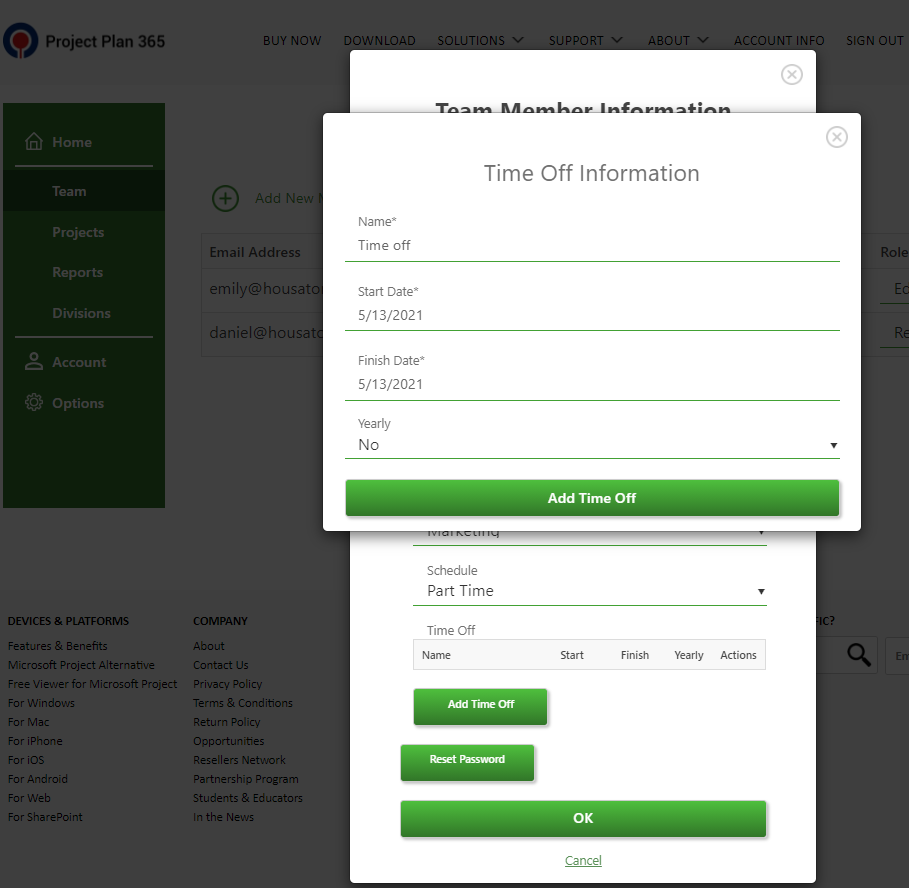
Step by step on how to set Time Off for a team member:
- Go to Team menu – Manage Team;
- Select a team member and click Open Team Member Information.
- In Team Member Information dialog, in the Time Off section, add the Name, Start Date and Finish date for the Time Off period.
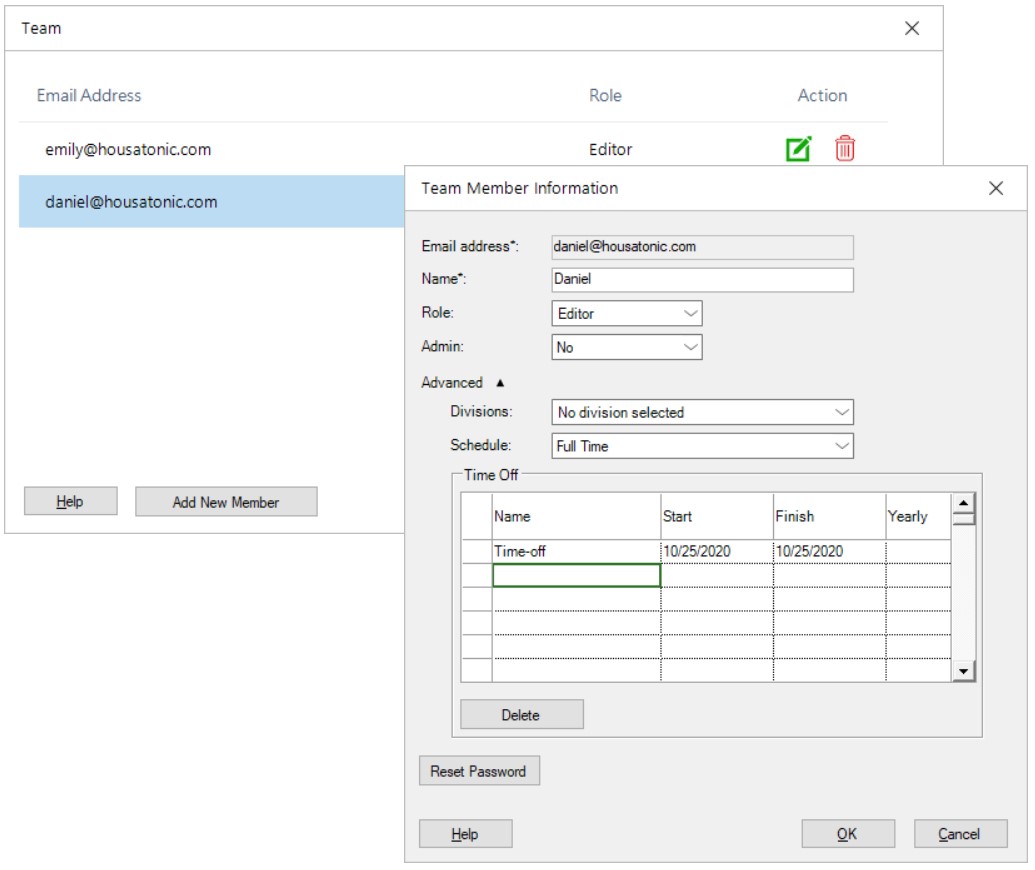
- Click OK to save the changes.
Note: You can also set Time Off for a team member from the Portal by going to the Team tab and clicking the Edit icon for the team member. Click the Advanced arrow. Then, in the Time Off section, add the Name, Start Date and Finish date for the Time Off period and click OK.
Step by step on how to set the Schedule for a team member:
1. Go to Team menu – Manage Team;
2. Select a team member and click Open Team Member Information.
3. In Team Member Information dialog, you can choose the Schedule type for the team member: Full Time, Part Time or Custom.
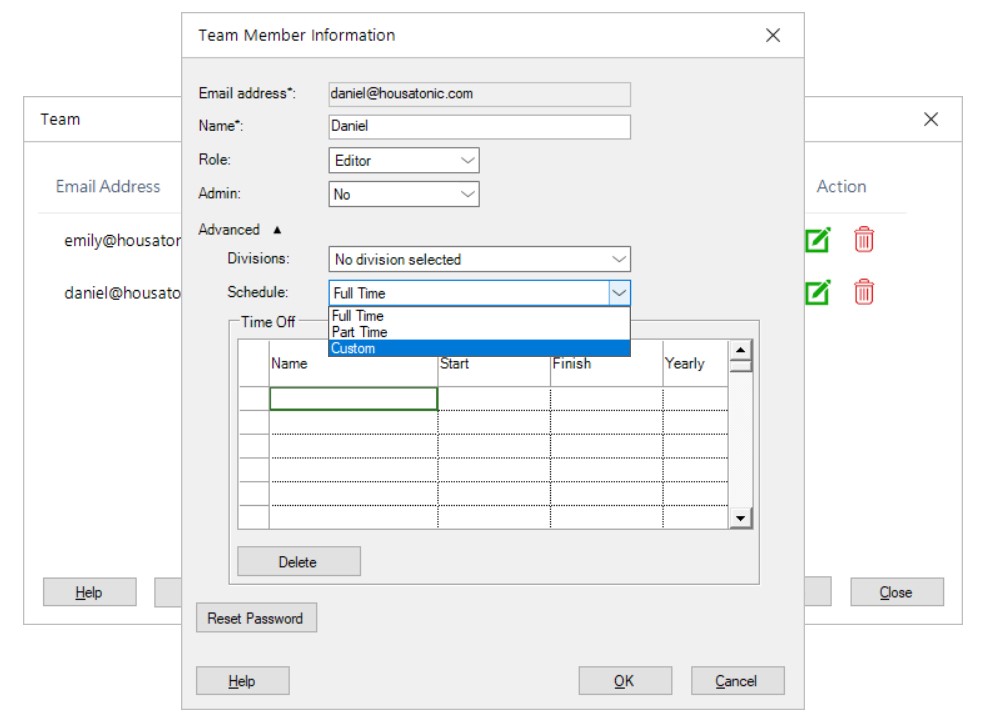
4. If you choose Custom option, the Set Custom Schedule will be displayed where you can set the team member’s working hours per day.
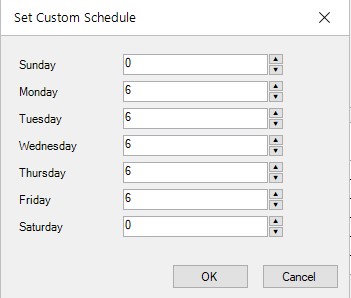
5. Click OK to save the changes.
Note: You can also set Schedule for a team member from the Portal by going to Team tab and clicking the Edit icon for the team member. Click the Advanced arrow. Then, for the Schedule field, choose the right schedule for your team member.
Step by step on how to set a password for a team member:
Note: Only Admins can set passwords for team members.
- Go to Team menu – Manage Team;
- Click the Add New Member button.
- In Add Team Member dialog, fill out the required fields (i.e. “Email address” and “Name”).
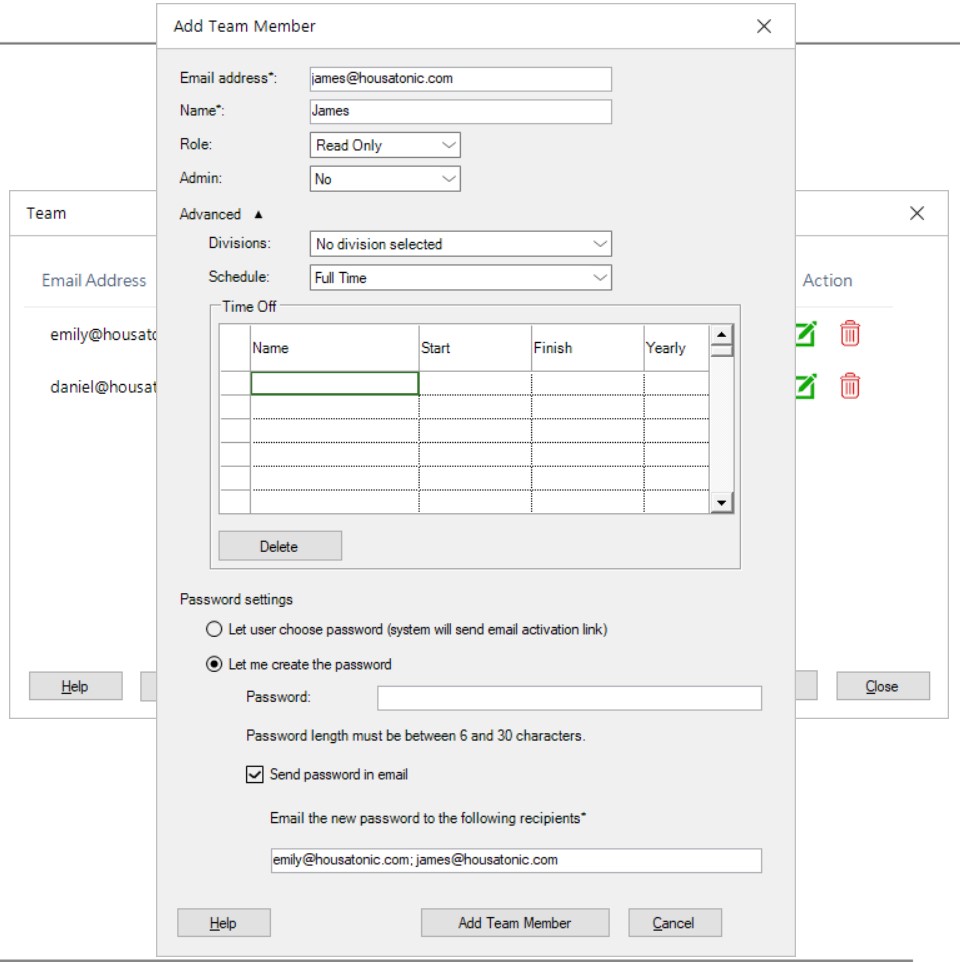
- “Let me create the password” option is selected by default. Type a valid password for the new team member’s account.
Note: If you want to let the user create his own password, choose the “Let user choose password” option and click the Add Team Member button, skipping the next steps. The team member will be sent an email with the activation link. For more information, read the Set Password article.
- “Send password in mail” is also checked by default. By checking this, you will be sending the password to all recipients from the list. Note that recipients list is autocompleted with your and team member’s email addresses. You can always add more email addresses separated by semicolon.
- After managing the password settings, click the Add Team Member button.
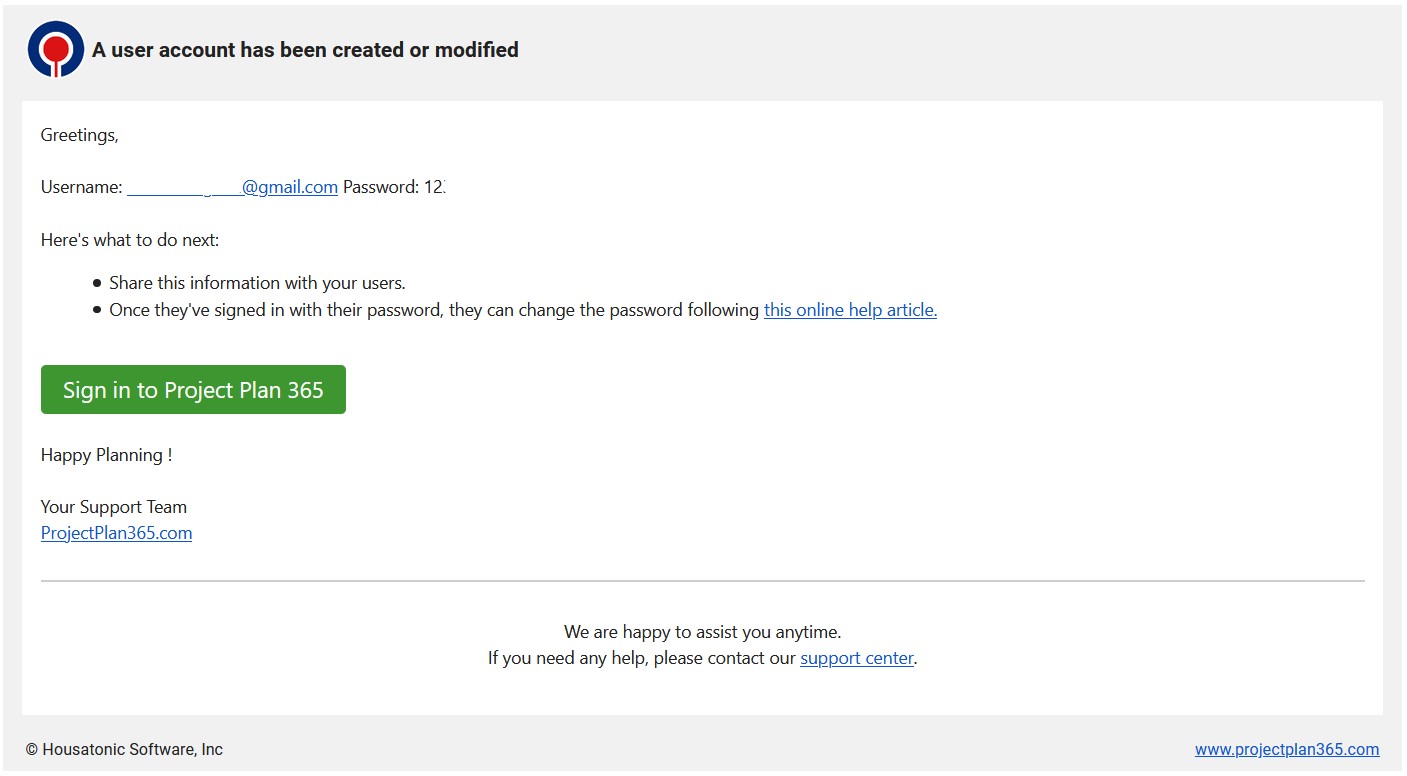
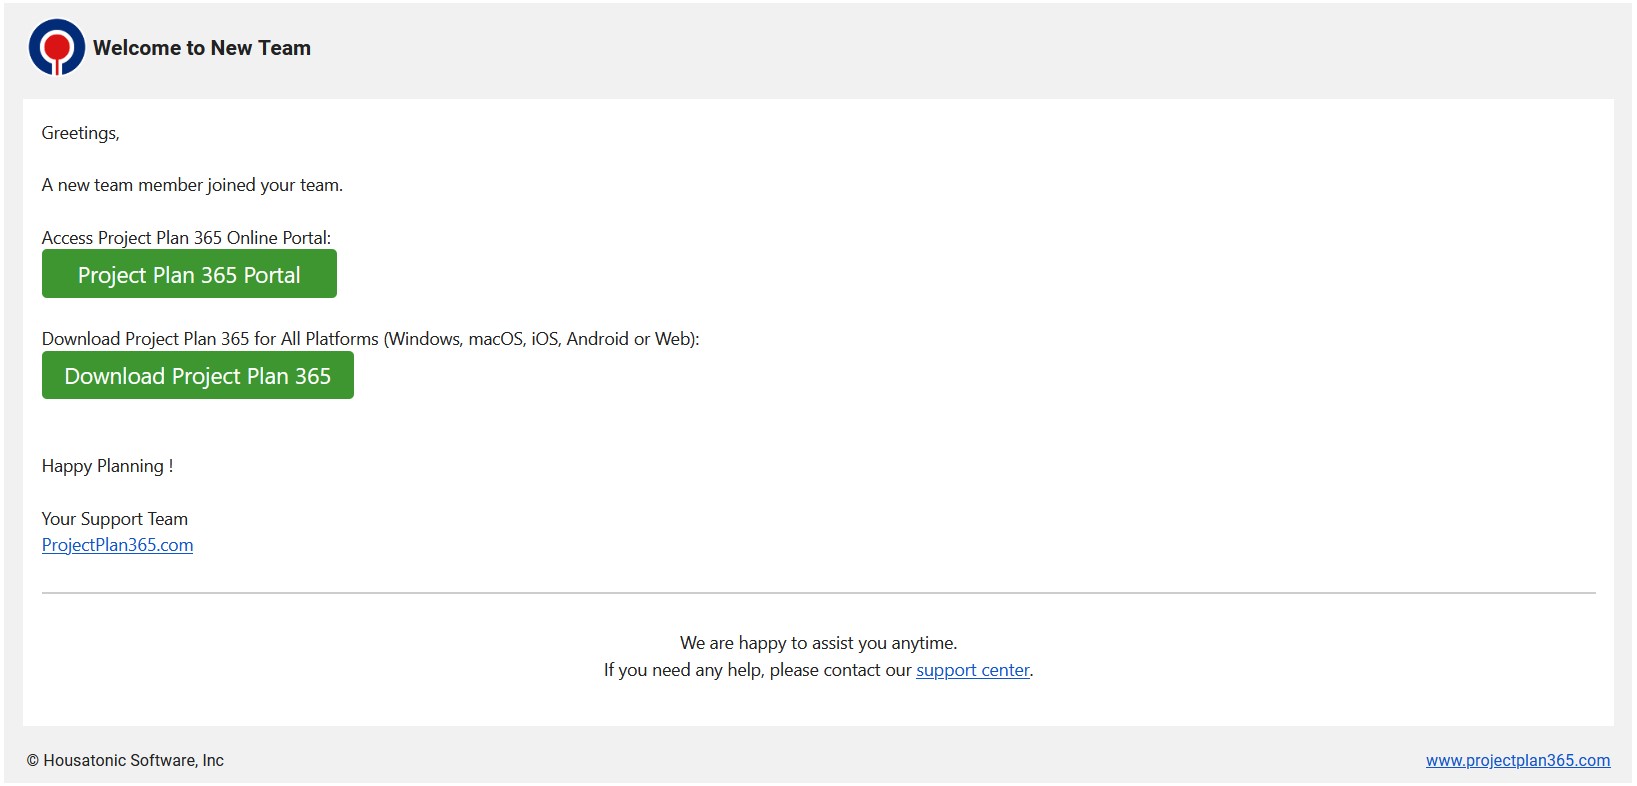
- All people from the recipients list will receive an email like the one below.
Step by step on how to reset password for a team member:
Note: Only Admins can reset passwords for team members.
- Go to Team menu – Manage Team;
- Select the team member for whom you want to reset password and click the Open Team Member Information button.
- In Team Member Information dialog, click the Reset Password button.
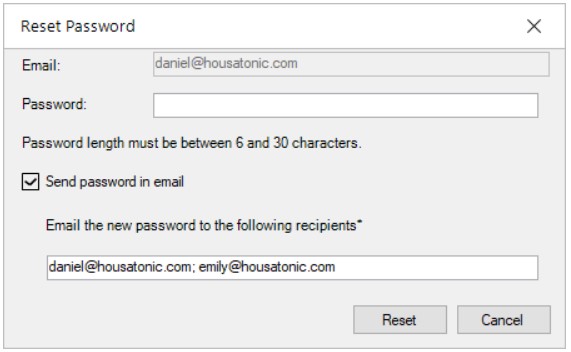
- Type a valid password for the selected team member.
- “Send password in mail” is checked by default. By checking this, you will be sending the password to all recipients from the list. Note that recipients list is autocompleted with your and team member’s email addresses. You can always add more email addresses separated by semicolon.
- After filling out the necessary fields, click the Reset button.
- All people from the recipients list will receive an email like the one below.
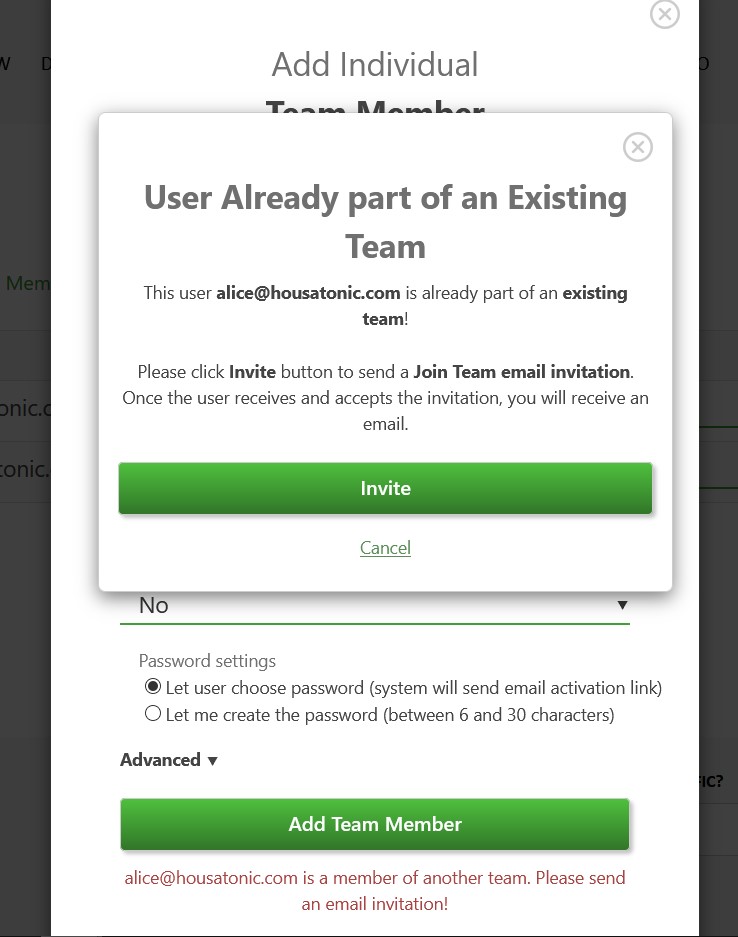
Step by step on how to add a team member that is already in another existing team from the Project Plan 365 app:
- Go to Team menu – Add Member;

- Fill out the Email address field with the one of the team members that is already in another existing team.
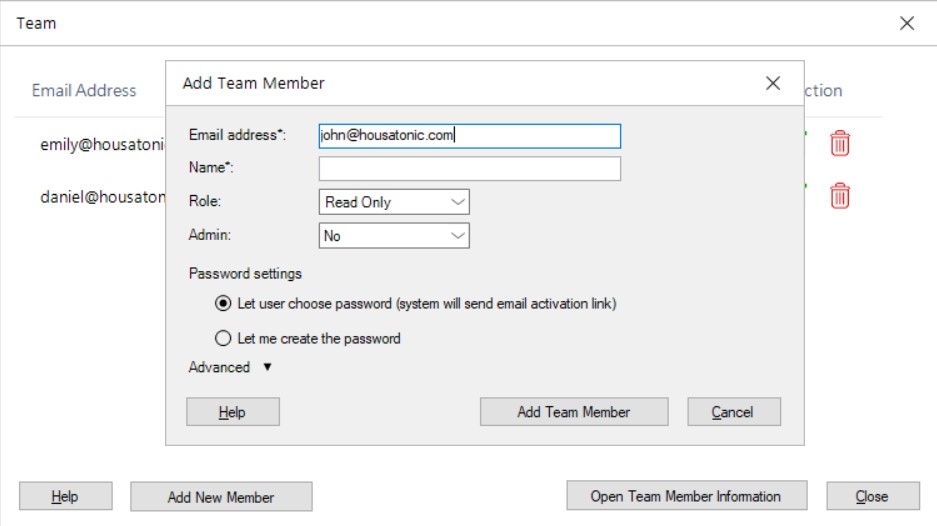
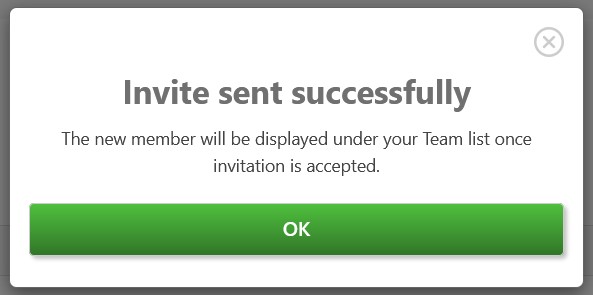
- Right after the Email address input, the following dialog will appear:
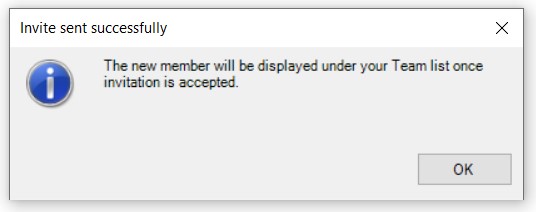
- After clicking the Invite button, the following dialog will appear:
- An invitation email will be sent to the team member.
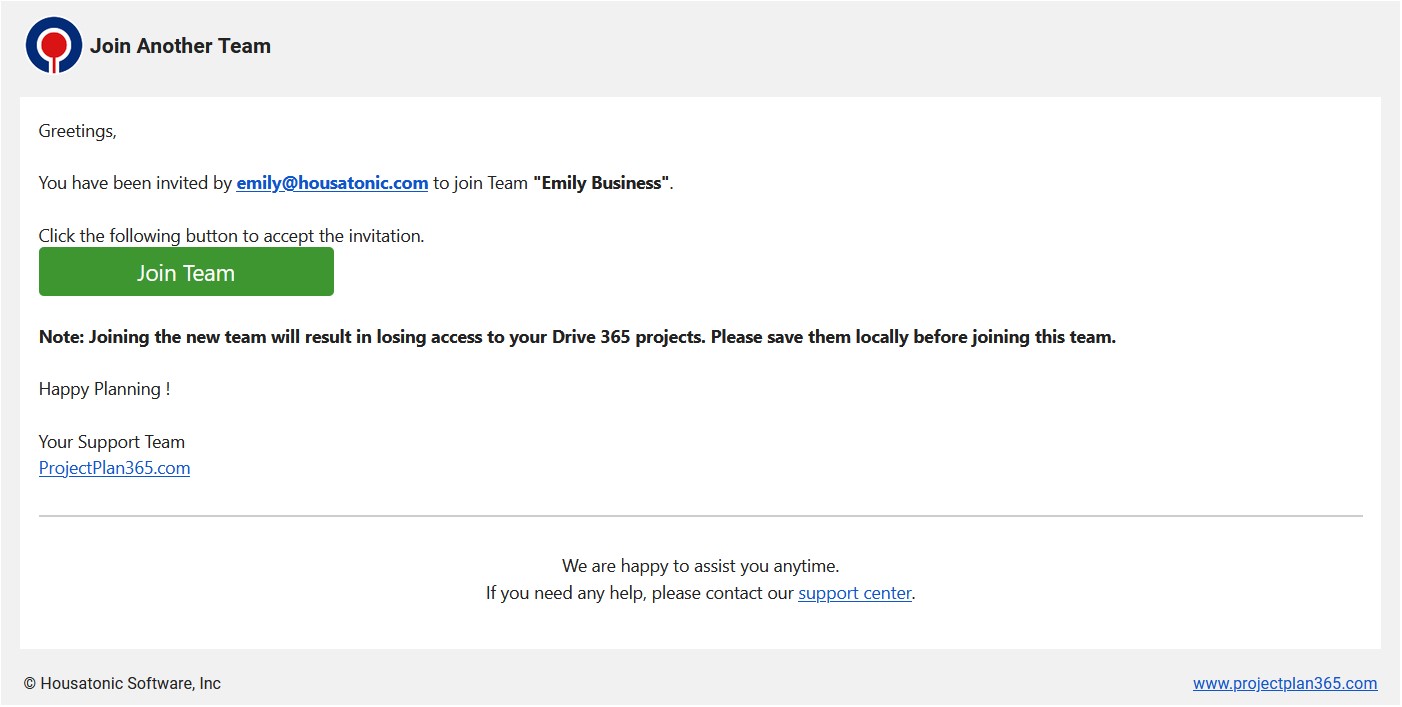
- After the team member accepts the invitation (i.e. clicks the Join Team button), he will be redirected to the sign in page.
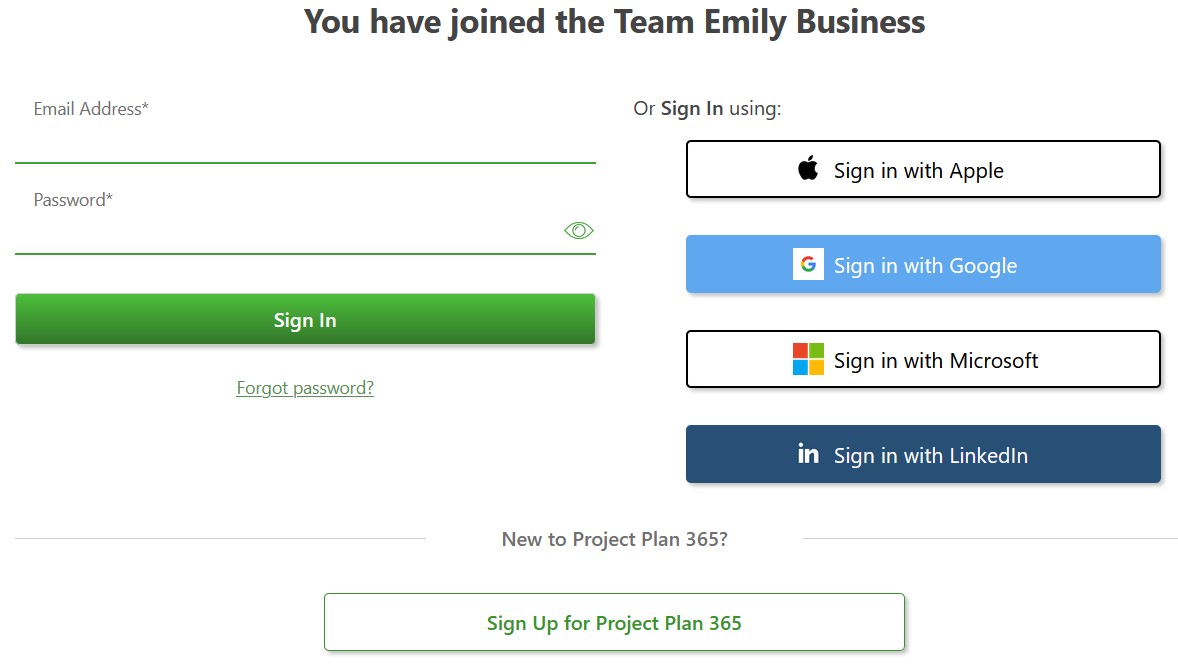
- Then, he will be added to the Team with the Read Only role and Admin field set to false.
- Both the new team member and the team member that invited him will receive the “Welcome to New Team” email.
Step by step on how to add a team member that is already in another existing team from the Project Plan 365 Portal:
- Go to Portal – Team tab and click the Add New Member button:
- Fill out the Email address field with one of the team members that is already in another existing team. Right after you enter the Email address, the following dialog will appear:
- After clicking the Invite button, the following dialog will appear:
- An invitation email will be sent to the team member.
- After the team member accepts the invitation (i.e. clicks the Join Team button), he will be redirected to the sign in page.
- Then, he will be added to the Team with the Read Only role and Admin field set to false.
- Both the new team member and the team member that invited him will receive the “Welcome to New Team” email.

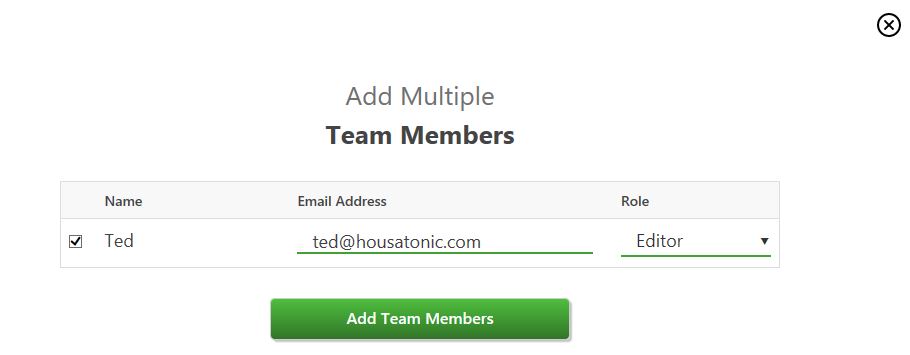
Step by step on how to add editor team members while in trial from the Project Plan 365 app:
- Go to Team menu – Add Member;
2. Open the Role dropdown list and click on the Add More Licenses button.
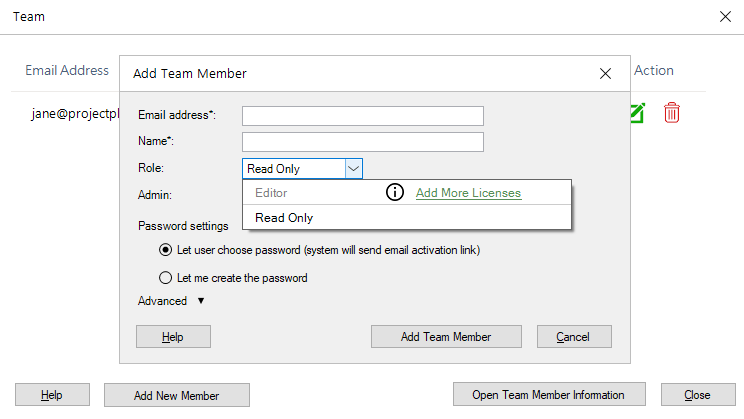
3. In the Add Project Plan 365 Subscriptions dialog select the quantity of how many subscriptions you want to add then make sure the billing information is correct and click on the Add x Subscriptions button.
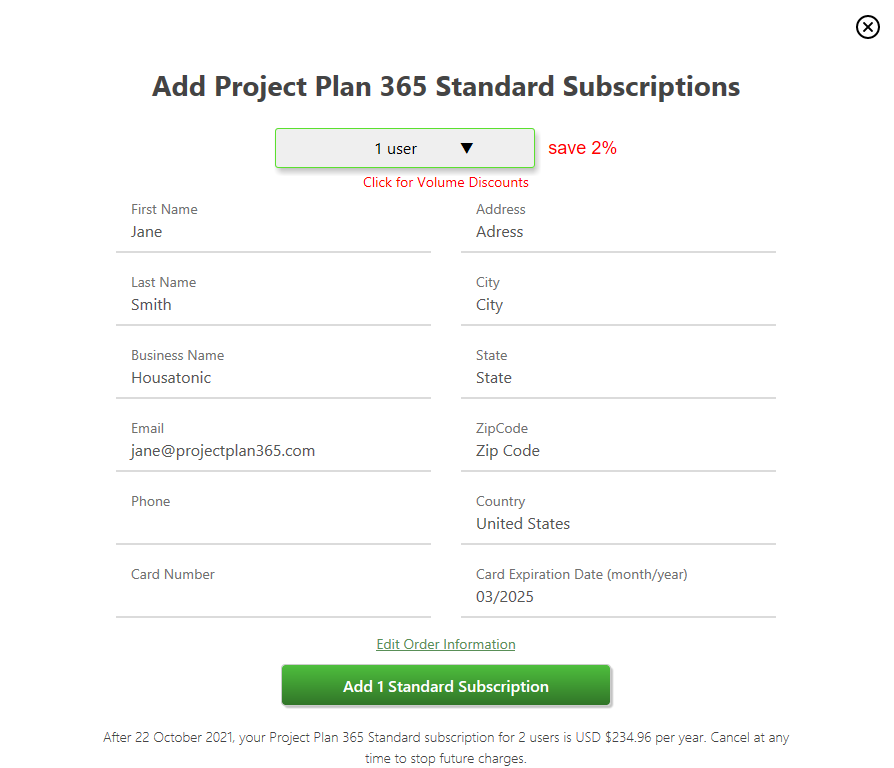
4. Now you can select the Editor Role from the Role dropdown list.
- Fill out all the required information and click on the Add Team Member button.
Step by step on how to add editor team members while in trial from the Project Plan 365 Portal:
- Go to Portal – Team tab and click the Add New Member button.

- Open the Role dropdown list and click on the Add More Licenses button.

- In the Add Project Plan 365 Subscriptions page select the quantity of how many subscriptions you want to add then make sure the billing information is correct and click on the Add x Subscriptions button.

- Go to Team tab and click again on the Add New Team Member button.
- Fill out all the required information, select the Editor role from the Role dropdown list and click on the Add Team Member button.

Note: If you want to reduce the number of Trial Subscriptions please check the Change Quantity Article.
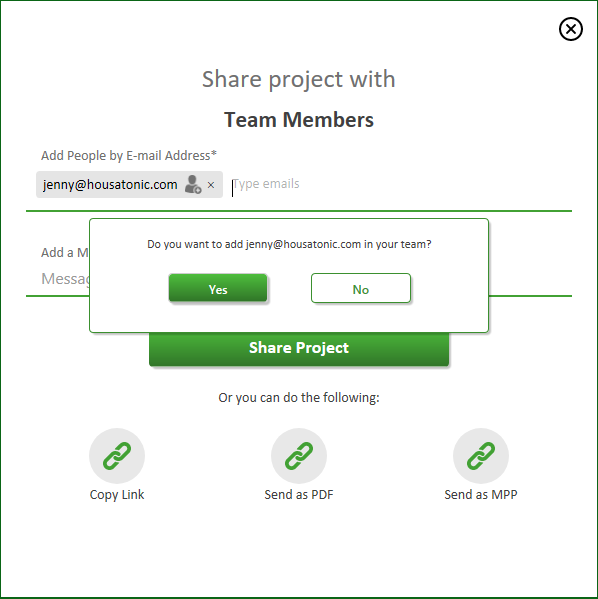
Step by step on how to add a team member when sharing a .MPP file:
- Go to the File menu – Share – Share or to the Share menu – Share;
- Type the email of a new team member in the “Add People by E-mail Address” field;
- When adding the email address a pop-up dialog will appear asking if you want to add the resource as a team member into your organization.

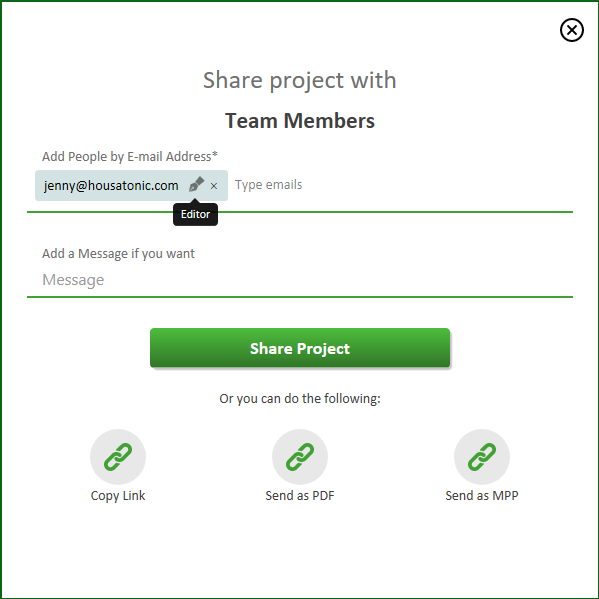
- Click Yes and fill in the desired information in the Add New Member dialog then click Add New Member button to add the user to your team.

- After clicking on the “Add New Team Member” button, the role of the team member will be updated in the Share project dialog;