Simple Calendaring in Project Plan 356

Simple Calendaring in Project Plan 356

When scheduling a project in either Microsoft Project or Project Plan 365, you can change the calendar for your project, i.e. the days your work is ongoing – or not! In fact, you can tailor calendars in many ways, for example, you can have unique calendars for people (resources), for tasks and for the project as a whole. Having all these custom calendaring options is great, but can be a bit complex and confusing to set up (see here). 

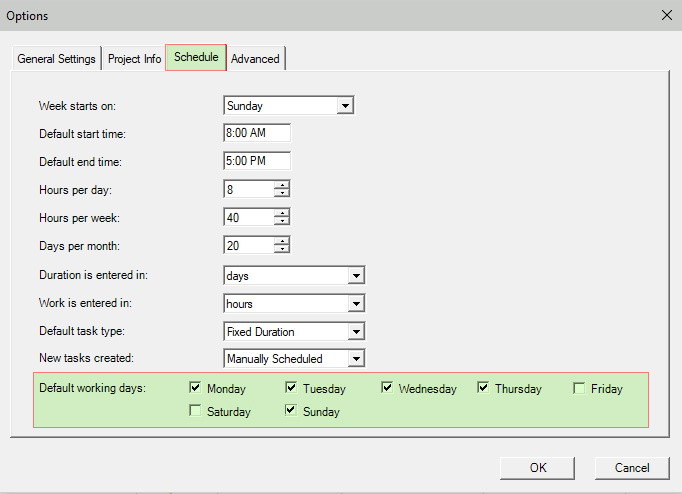
What if all you need to do is change the days of the week everyone is working, for example if your project locale is somewhere Friday & Saturday is considered weekend time off (or, if you are lucky enough to just work 4 days a week instead of 5)? In these simple cases, the latest version of Project Plan 365 provides a much easier way to change your project calendar.

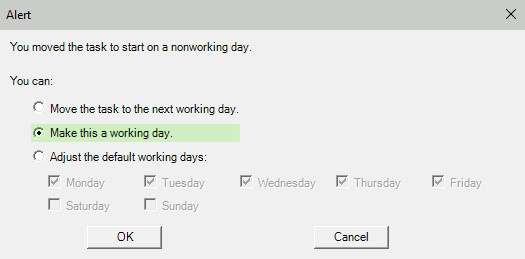
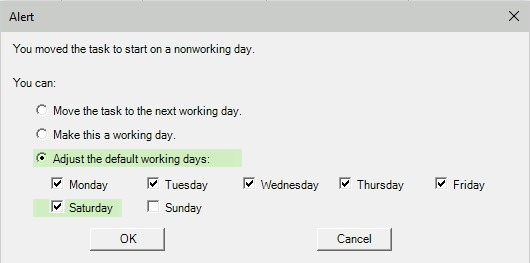
And what if you just want to extend the default work week (M-F) by one day, perhaps to finish up some work left over from Friday, using Saturday to get that done. Here too, Project Plan 365 provides a quick way to change the project calendar to reflect that one extra day of work.

Case 1 – Changing the Default Work Week

In the case where all want to do is adjust the work days within a week, for example, to indicate your project is being rolled out Sunday through Thursday, instead of the usual Monday through Friday, then just follow these steps:

1 ) Open Project Plan 365 and go to the File menu to select Options:

2 ) In the Options dialog, go to the Schedule tab and check or uncheck the desired-working days from the Default working days group:

A default work week, for example, used in most Muslim-oriented countries.

In the example above, we’ve changed the default work week, and have also updated the default project calendar all in one go.

3 ) Click OK. 

Case 2 – Changing a Single Day

In the case where all want to do is extend or limit your work by a single specific day, for example to finish up some work left over from Friday - on Saturday, then just follow these simple steps:

1 ) Within your plan, open the date-picker from anywhere within in the Start/Finish column and click on any non-working day that you wish to change (in this case, Sat):

2 ) When clicking a non-working day (or a working day for that matter), an Alert message appears, from which you have these three options:

If you selected a non-working day (in this example, Saturday the 7th) and then hit the Make this a working day radio button, clicking OK makes that Saturday a working day.

3 ) Here you can also Adjust the default working days (just as we did in Case 1 above), i.e. if you decide you are working all Saturdays from here on out, you can just select the Saturday checkbox to make that so:

TIP: You can also use this alert to MOVE a task to the next working day (by selecting any task and hitting the radio button named the same).

4 ) Click OK, and you’re done.

Summing Up...

For these common cases of calendaring adjustments, you can simply use Options / Schedule to change the default work week, or just click on a Start/Finish date (from any view) to make changes to a particular day. This technique greatly simplifies tailoring your work days to the days you are actually working - or not!

Note: Of course, you can always do all of this the “hard” way (by using the Change Working Time dialog), but the two cases described here do not need such heavy lifting, and this simple method allows Project Plan 365 users to make the most common calendar adjustments in the shortest amount of time. (Sorry Microsoft Project users, this feature is not available to you.)

To start calendaring the easy way, subscribe to Project Plan 365 right away!