What is a Work Breakdown Structure?

What is a Work Breakdown Structure (WBS)?

A work breakdown structure or WBS is a common term in project management. The concept is used each time a new project is designed — and is best thought out before entering any data into a .MPP file. Yet even though the WBS is an important construct to project managers, creating and using a WBS in the project design phase does not occur with the regularity that you might expect.

Some of this lack of use of the WBS stems from the complicated definition; a 243-page specification published by the United States Department of Defense (MIL-STD-881C) was initially developed back in the 1960s to help NASA and the U.S. military better manage mega-projects, like building rocket systems or getting to the moon. Yet for those outside of the US government, no one wants to adopt a practice that takes 243 pages to describe.

It doesn’t have to be that difficult.

A WBS is really just a visual breakdown of a project into smaller components — think hierarchy – which makes planning for (and creating) the required deliverables easier to accomplish for any project team.

The benefits of designing a project that incorporates a WBS are multifold:

  • The WBS helps define key deliverables and sub-components of deliverables before work is scheduled and started, resulting in a smoother rollout during the project. The scope of your project is captured in the WBS, helping to prevent mission- or scope-creep later.
  • The WBS provides a much-needed collaborative tool that can be reviewed early on with project teams, management and other stakeholders before a plan is locked in.
  • The WBS gives everyone a clear, visual representation of a project, without having to wade through the minutia and tedium of other types of project metrics or documentation.
  • Through use of a numbering schema, the WBS identifies parts of a plan numerically (often called WBS codes), which can be used in many ways during the execution of your project. For example, a repetitive deliverable that is identified by number can be easily resourced, costed or scheduled programmatically from within Project Plan 365 (or many other scheduling tools).

To develop a WBS for your next project, just follow these three golden rules:

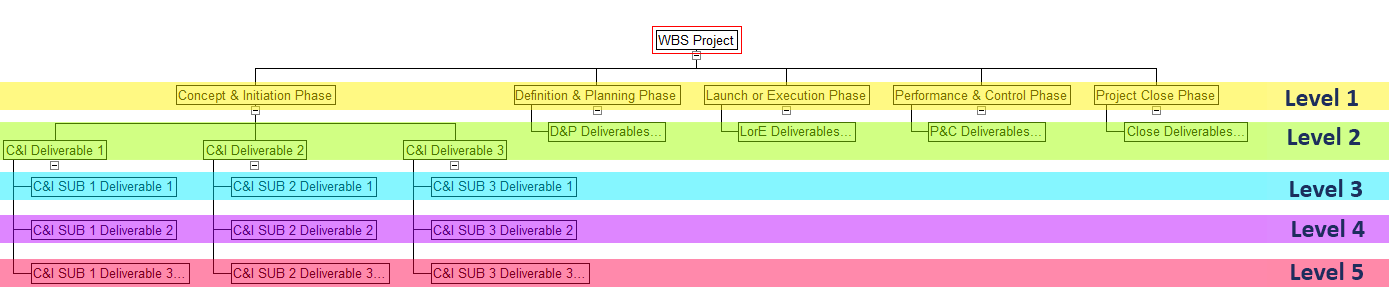
First, the 100% Exhaustive & Mutually Exclusive Rule provides that within every level of your WBS, everything you need to deliver is represented within that level. For Level 1 of your hierarchy, for instance, you should find everything that you need to deliver for your project in totality. Within level 2 of that hierarchy, everything you need to deliver for that subcomponent of your project is included (and nothing else). There should be no overlap in scope between the various levels of your WBS. Just the act of creating the WBS exposes deliverables or events that may detrimentally overlap in your plan — and therein lies the beauty of employing a WBS. This figure shows a sample WBS structure set up in a “mind map” format.

Figure 1. First "branch" of a WBS showing a breakdown as levels within a plan.

Second, the Make a Logical Structure Rule provides that you make a visible representation of your WBS in a hierarchy that makes sense, and is easy to read. In olden times, this was often done in PERT charts. In today’s world of simplification, a much more recognized and modern visualization tool is the ubiquitous mind map, as shown in the figure above.

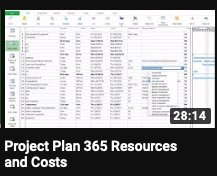
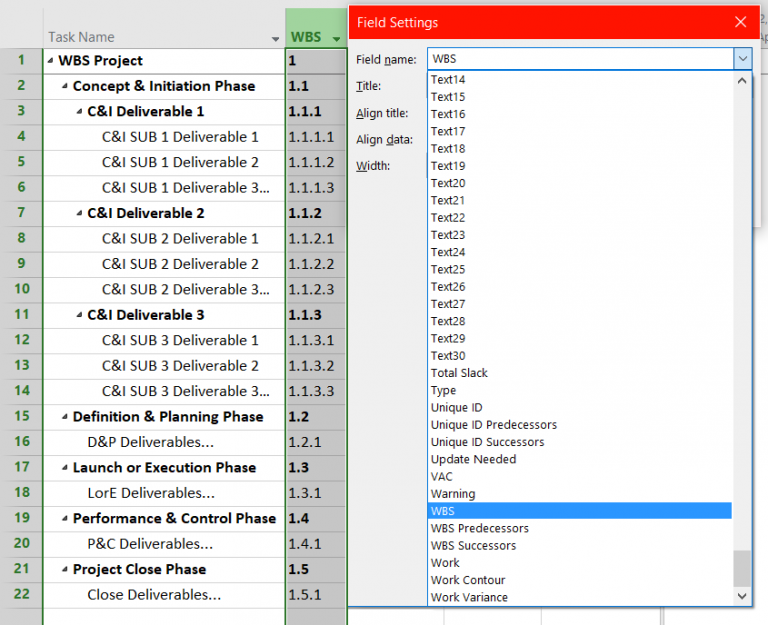
Note: the numbering schema that goes along with this hierarchy can be automatically generated within Project Plan 365 (see Figure 2 for an example), and WBS codes should be generated this way instead of typing them within the Task Name.

Figure 2. An automatically-numbered schema can be created within the .MPP - just add the WBS column to any view and BOOM - you're done!

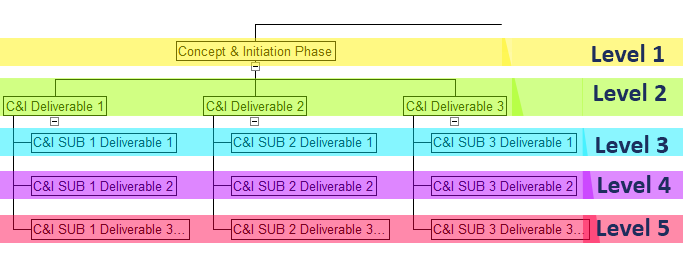
Third, Grammar Rules should be followed, but don’t worry, this grammar is easier than you think! Here’s how you do it:

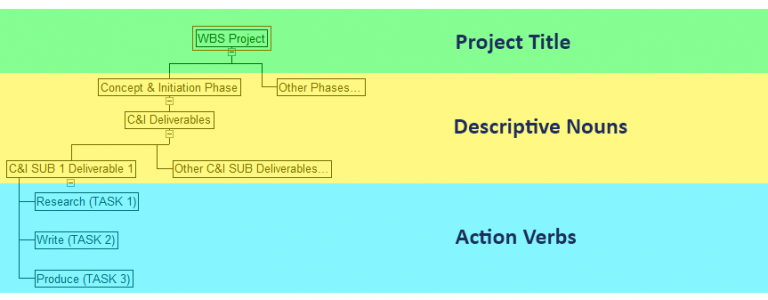
  1. Use descriptive nouns to describe all your deliverables and sub-deliverables
  2. At the lowest levels, use action verbs to describe what’s needed to make each sub-deliverable “happen.” Figure 3 shows WBS grammar rules in action.
  3. Use row #1 to name the project and set the title of the plan.
Figure 3. Syntax of a best-practice WBS.

In summary...

By following these three golden rules, your WBS will become an invaluable tool throughout your project planning experience: from the initial design collaboration – to the actual scheduling in Project Plan 365 — you will surely come to depend on having a WBS prepared for every project that you manage.

To give Work Breakdown Structures a try, simply subscribe to Project Plan 365 today!

Cloud Basics for PMs

Cloud Basics for Project Managers

Over the past decade or so, the concept of ‘cloud’ has become synonymous with a place where we store all things work-related (such as documents and data). In many cases, a ‘cloud’ represents the place where we work (i.e. within a digital workspace like SharePoint or Project Plan 365).

For project managers, we often speak in fluffy terms that reflect this new atmospheric characteristic of the modern workplace: “…just put that in cloud” is common geek-speak for putting any bit of communication or data in a place where everyone else can get to it.

However, how many of us really understand this amorphous reference to a metaphor taken straight out of metrology?

While developing a new file-storage option rolled out in Project Plan 365 (a popular look-alike to Microsoft Project), we gained insight into the common understanding (and misunderstanding) of what the ‘cloud’ means to everyday project managers. Sorin Fiscu (CEO of Housatonic Software) explains: "While my team was analyzing user trends for tens of thousands of project managers, only a tiny fraction of the user-base was implementing a cloud storage system."

He wondered why, so this article explores why individual PMs and organizational PMOs have not embraced the cloud as wholeheartedly as other professionals, such as programmers, engineers, marketers, etc. who are all working in legitimate cloud-computing environments.

Demystifying the Cloud Concept

Before discussing why or why not the cloud should be used during your daily work regimen, let’s explore what the ‘cloud’ really is…

Eric Griffith (Feature Editor @ PC Magazine), extolls that the ‘cloud’ is nothing more than a buzzword and is not really new – especially if you were born after the invention of the internet. Eric explains that the ‘cloud’ is the internet, for all intent and purposes. He also points out that the cloud is not an upgrade to your hard drive, and is not about attaching a NAS (network-storage device) to your company LAN (local area network) and calling it a cloudy day.

Instead, Eric enthusiastically explains that the cloud is really a paradigm shift in computing (call that cloud computing), and that this shift fundamentally changes the way we approached all of our work within a computing environment. Well, obviously he was right, as 2016 was the year that Microsoft introduced Planner and made OneDrive for Business a key component within the Office 365 suite. In essence, these and other additions to Office 365 (like Project Online) signify a shift away from terrestrial computing as we know it – away from using Microsoft-Project standalones like Project Server and SharePoint to something seemingly more ethereal and out of our control…something somewhere up in the clouds.

But, ethereal the real ‘cloud’ is not...

As the Office 365 concept portrays, we are not just saving bits of information or knowledge to the collective. We are actually using software that does not exist on earth as we know it, such as on our computing devices in the form of apps and programs. Instead, we are now in the realm of Software-as-a-Service (SaaS), which means you no longer “own” computer programs, but rent them instead. In many cases, you never install anything on your computing device, but just log into the service using whatever web browser you have at hand.

SaaS leads us further upwards in a trajectory to the cloud, where even our computing infrastructure is now found there. That’s called PaaS, or Platform as a Service, where your entire IT department is soon to be extinct, with applications and infrastructure (all those black boxes with blinking lights) being moved out of your company basement and into someone else’s worry basket. In the case of a PaaS, internet service vendors (ISVs) perform the duties your old IT gal or guy did back in the day (when you had hardware and software in-house). Figure 1 explains:

Figure 1. PaaS explained

Organizations that currently deploy Microsoft Servers in-house (SQL, SharePoint, and the Project Web part), are considering (or being pushed) into moving all of that out of the organization’s IT basement and into the cloud using the Microsoft Azure offering (which is essentially the setup shown in Figure 1 above). This takes your entire company’s IT setup and moves it offsite and upwards into a stratosphere owned solely by Microsoft, but rented to you and your company on a per-seat basis.

Why PMs should use the Cloud (and why we don’t)

Getting back down to earth for a moment, you may be wondering why in the world you or your organization would depart on such an adventure, considering the other million things that your organization has on its plate. The old adage of “if it ain’t broke, why fix it” comes to mind. Outside of the fact that most projects fail (or partially fail) in the world today, here are a few reasons why SaaS and PaaS should be considered as a computing environment for project management (and PMO) work. SaaS plus PaaS equals:

  • Better and easier collaboration between planners, partners, and stakeholders
  • Faster “time to market” for new projects planned collectively in the cloud
  • No up-front investments for hardware or software
  • Minimized operational costs, especially if you are now paying big bucks for an IT department
  • Enhanced productivity, as planners and partners work together at the speed of electrons
  • Access to project data anywhere, anytime using whatever device or platform at hand
  • Secure and customized access to data by project workers, partners, management, and even the public
  • Centralized project management activities, with no more disparate project managers working in isolation

So, what’s not to like, a good planner will ask. The major inhibitor (in our opinion), is that this is a huge change in the way that we have used computers in the past to plan out our projects. And as some planners rightly equate, change means re-work, more expense, and in general, more headache.

But, change is what we are good at, no?

Another inhibitor for smaller PMOs and organizations with just a handful of planners is that all of the above may seem overkill when trying to meet the bottom line and come out with more green than red at the end of the year. Many dozens of dollars per person per year may seem like a lot when all is said and done. Training people on new software, and setting up access for all to experience the wonders of cloud computing, may also be prohibitive in the middle of a busy schedule.

Another concern heard most is security and privacy. PM may ask, if my data is in the cloud, can’t it be hacked easier than if on my company’s local network? Well, one has to just look at the Equifax breach, the Sony breach, or any other security or privacy breach over the last few years. Do you really feel safer with your project data on the ground, rather than, say in a Microsoft-controlled cloud?

With some of your concerns heard, let’s harken back to the fact that most all projects endeavored either fail or partially fail in the world today. Perhaps there is one big reason to switch to a total cloud computing environment – to succeed!

Project Plan 365's secure cloud: Drive 365

To help subscribers of the Project Plan 365 Business (PMO) or Enterprise (EPM) plans succeed, we have included access to a secure, private cloud for all of your project data, and that's called Drive 365. This is a much simpler way to implement cloud computing (as show in Figure 1 above).  With Drive 365, the entire concept is condensed; part of our service to you is to store your critical project plans (those that relate to your project portfolio) safely and securely. 

In this way, not only are portfolio statistics generated automatically, but you don't have to worry about where any of your critical files are, or if they are safe from prying eyes or not. And you don't need to understand anything else.

In summary...

During this blurb on cloud computing, we have discovered that “let’s put it in the cloud” means much more than just storing your MS project file on OneDrive or Dropbox. We also see now that there are a few different tiers within modern cloud-computing: there is one tier where you or your organization use SaaS offerings to collaborate on project planning, and then there is the more extreme tier where most of your IT department is displaced by PaaS. In this case, all those servers and mysterious doo hickeys once housed in your IT basement are now gone, leaving you with more party space when it comes time to celebrate your project success. And if you need an instant cloud environment, all that's needed is a subscription plan to Project Plan 365.

To give PM cloud computing a try, simply try us out free for 30 days! 

Tracking Costs & Budgeting Projects

Tracking Costs & Budgeting Projects using Project Plan 365

During the formulation and implementation of your team’s project schedule, your team has most likely discussed the budget, and might have asked the following: how much money are we going to spend? How is the money to be spent? What happens when new costs arise…how are those added in? How much have we spent to date? More or less, how much are we off from our initial budget projections?

These questions and more are all questions that Project Plan 365 (or Microsoft Project, for that matter) will answer for you, provided that costs are entered into the application. This simple exercise of entering costs into your project plan will help you ensure the fiscal health of your projects. After all, no one wants a project to come in overbudget, or worst, cancelled midstream due to a lack of funding.

First, let’s understand costs from a budgeting (and software) perspective…

Many schedulers don’t have the ability to track costs (for example, with Wrike and many other popular PM services), or have a separate app or spreadsheet for that, or don’t see the need or simply don’t know how. In PM parlance, that’s a big boo boo; but one that can be easily corrected by following this golden PM rule: always connect the cost of the resource used for any bit of work, with the task itself. Even if your organization has an entire department that handles the finances (and perhaps has their own software to do just that), you should still enter in the costs of resources within Project Plan 365, and also refine these costs over time as they change. This ensures that your project plan is a one-stop shop for both scheduling and financial data – you get the complete project picture!  

Before applying that golden PM rule however, we need to understand how costs are handled within the software. First, think of people as having an associated cost (salaries, consultant fees, vendor charges, etc.). Also, think of materials as having costs associated with each, for example, the price of a palette of bricks, a stack of windows, computers, a desk or a chair. In addition, think of services that can incur costs over the life of a project, such as utility bills or travel expenses.

In Project Plan 365, costs are categorized into three types:

Work: people, equipment or facilities costs, in terms of rates per hour or cost per use. Select this resource type for people / equipment / facilities that are assigned to a task, but are not consumed during the task.

Material: material costs, in terms of a standard rate or a cost per use. Select this resource type to track consumable resources, such as bricks or food stuffs – for things that are used up during the project.

Cost: everything else, in terms of a single one-time charge. Select this resource type to track budgetary items such as travel costs or phone bills that are not dependent on the amount of work done, or on the duration of a task.

Within any schedule of work, Project Plan 365 automatically calculates the total cost of your project based on your input of resource costs, and the software also flags any variances from your initial budget, as your project progresses over time. In other words, the software calculates how much you planned to spend, are spending now, and how much you’ve overspent or underspent at any given time, or on any task.

It's up to you (as project manager), to determine what costs to track within your project plan, and how. For example, is employee travel tracked or not, or do you want utility bills to be added to the cost of the project? In other words, the granularity of cost tracking is determined by you, the PM; with the level of granularity determining how accurate your cost projections can be (down to the penny, or in much larger round numbers).

Note: If you just want to use the fixed cost column to track costs (i.e. you don’t plan on renting equipment or buying materials by piece,  then you don’t need to add the material resources in the resource sheet as described in the following tutorial. For more on this method, see "Using the Fixed Cost Field..." immediately following the tutorial.

Tutorial: Entering each type of cost (Work, Material & Cost) into the Resource Sheet

If you want to follow along using Project Plan 365, go to the Backstage and select New / New PMO to open up a copy of the template used in this tutorial.

Now that we understand costs from a software perspective, let’s add a few of each type to a project plan, either your own or one of ours. 

All resources should be entered into the Project Plan 365 (or Microsoft Project) Resource Sheet. This resource-related spreadsheet has default columns displayed for entering in the Resource Name, Type, Material Label, Initials, Group, Max Units, Standard and Overtime rates, Cost per use rate, Accrual rate, Base Calendar, and a column for a Code of some sort.

Fortunately, you don’t need to fill each column with data, just the ones needed to calculate costs (for example, for this tutorial we have hidden those we don’t need). You can also add additional columns (such as Email), but let’s leave column manipulation for another tutorial…

In this tutorial, we will cost some resources and begin to budget a project plan, understanding that the financial picture only becomes clear after we apply costed resources to specific tasks within the plan.

Entering costs for resource type WORK

1.

Navigate to the Resource Sheet view and type a name for a resource into a cell under the Resource Name column. After you hit enter, you will see that some of the columns self-populate to a default value, and that the next column has the default Type of Work:

2.

Now you have to determine if you want the resource to be costed by the hour (with or without overtime, based on the calendar), or on a cost-per-use-basis (for example, you are employing someone with a one-time charge per task performed):

Entering costs for resource type MATERIAL

3.

After entering the Resource Name, change the Type to Material and enter the Cost / Use for the material.

4.

Now to complete the Resource Sheet, you would enter in all the Work and Material type resources as required by the task list (see Gantt View, and tasks that require resources).

Entering costs for resource type COSTS

5.

For costs associated with budgetary items such as utility bills or travel expenses (items that do not depend on the work or duration of tasks), you need to enter the name of those costs here; but you won’t be able to enter in the actual cost, just a descriptive name. (See step 6).

6.

To enter in Cost/Use values, you need to flip over to a task list view (such as the Gantt View), to assign this type of cost to the work being done. For example, select the task where the cost incurs, and then use the Task Information popup to enter in the cost of the resource(s) selected. 

In the example below, the cost of a “Conference Space rental” is being applied to a day when the training is planned to take place:

7.

Now, to enter the actual cost of this resource, navigate to Task Information / Resources tab and enter the cost there: 

Do this for all planned expenses not dependent on work or task durations (Cost) – AND - also assign all other resource types (Work and Material) to tasks in the plan, where appropriate.

Using the Fixed Cost Field...

An alternative way of calculating costs is by using the Fixed Cost field (in conjunction with the Cost, Baseline Cost, and Actual Cost fields). To enter fixed costs while looking at your Gantt chart, just flip over to the Project ribbon and select Table / Cost:

Now simply enter any fixed cost amounts into the plan at the appropriate place. Note: never enter costs - or anything else - into a Summary Task field, as those fields are automatically calculated: 

It is a best-practice to use the Notes tab (Task Info pane) to annotate what the fixed cost is about. Once entered, these fixed costs are added to your mix of resource and other costs as represented in the Resource Sheet.

Putting it all together and using your new cost plan

9

Setting a Baseline and Tracking Costs...

Now that you have entered in all the costs that you want to track in your plan, a “baseline” or record of your initial thinking must be captured. Doing so allows you to later look back, and see what you had planned to spend, vs. what you actually spent. (Someone will always ask.) To set a baseline, navigate to Set Baseline on the Project ribbon, and select For Entire Project. Once a baseline is set, you can begin tracking costs as they occur, in terms of baseline costs, actual costs, and remaining costs. In addition, as your project progresses, you can produce budget reports in a variety of formats and for a variety of purposes… no need to use Excel!

Costing at Project Start
Costing at Project End

Sample Budget Report

To get reports on your cost plan, navigate to the Report ribbon and select any of the reporting options found there, for example Costs / Budget Report:

Additional reports can be generated from the Report ribbon that are sure to help you with any financial analysis of your project. For more information on costing and reporting, see our online help, training and videos:

See our complete library of training materials for beginning-to-end lessons on doing all that matters to a PM.

Summing up...

To sum up, we’ve entered in all three types of costs: Work, Material & Cost for every resource in a project plan, and then assigned those costed resources to appropriate tasks in the plan. We also explored using the Fixed Cost field for costing items outside of the Resource Sheet. You can apply this fiscal strategy to new plans being created (for example, to calculate cost projections) or while plans are in progress, i.e. to add additional costs not planned. This wealth of cost data also comes in handy after projects are completed, as you can see from the data how much you overspent (or underspent), and where! 

This strategy of always costing your plans within Project Plan 365 (or Microsoft Project, for that matter), gives managers and project teams real-time cost data that can be used when making financial decisions during project rollout.

For more information on making your project plans viable, see our website. To try out Project Plan 365 for free, download the 30-day trial; and if you are interested in better software for your Project Management Office (PMO), don’t forget to check out our Business (PMO) subscription plan.

Getting to Microsoft Project – on a Mac!

Getting to Microsoft Project - on a Mac!

If you are a project manager using Apple devices, then you know that a PC-bias still exists in the software industry, especially when it comes to anything Microsoft Project. But in 2019, we have options. 

While most all software manufactures provide versions of their apps and services that work on both Macs and PCs, Microsoft does not have a macOS version of Project, making your team project work awkward, indeed. To restore harmony in this fractured computer-verse (Mac vs. PC, Apple vs. Google, iOS vs. Android, Siri vs. Alexa, etc.), there are a number of ways for you and your project team to get to Microsoft Project plans:

  1. The long road, where you use an app to create a “virtual” second computer onboard the hard drive of your MacBook, iMac or MacPro (called a virtual machine), and then you install Microsoft Project within a virtual Windows.
  2. The winding road, where you meander from Safari to the Project Online website (through an Office 365 subscription), or you are directed to some other project website running SharePoint with a Project Server, and that’s where you do all of your project work - from within a web browser.
  3. The short cut 

This article discusses the long and winding road (and reveals the shortcut) in terms of pros and cons, as well as providing estimated “travel” costs for your journey…

1) The Long Road: Virtualizing your Mac to run Microsoft Windows + MS Project

What may sound like a quick jog (just run windows on your Mac) this is actually the road less traveled, and for good reason. This slog involves subscribing to one of many providers of a virtualization layer (Parallels Desktop, VMware, etc.) used before you install any flavor of Microsoft Windows that you may have on hand - and finally, once that’s all up and running, then can you install Microsoft Project and get to your work on an Apple device.

1) The Long Road: Virtualizing your Mac to run Microsoft Windows + MS Project

PROS

  • In addition to running Microsoft Project, you can install and run any Windows app that you want.
  • If something goes wrong with Windows or Project (as things sometimes do), you can just “blow away” that virtual machine and use your automatically created backup copy.

CONS

  • Requires one more subscription to a software service (for example, Parallels or VMWare).
  • Adds another layer to your Mac that needs a bit of worrying about (in addition to everything else that worries you).
  • Creates files so large (after all, there’s an entire computer stuffed inside) you may have to upgrade your Mac’s internal hard drive to something gigabytes bigger.

2) The Winding Road: Using Project Online and all the rest to get there....

There are many reasons that you might want to take the meandering path of using your Mac’s web browser to access Microsoft Project data, but simplicity would not be one of them. If all you want to do is to open, edit or create new Microsoft Project files, then don’t install SharePoint Server or any other servers just to do that – that would be silly and overly complex in this age of cloud computing and software-as-a-service (SaaS). Just jump to #3 for a much shorter path.

winding road

PROS

  • This setup may be essential to your large enterprise (in other words, you have no choice but to follow this path).

CONS

  • If you work anywhere that the internet doesn’t, you are out of luck.
  • If you are a small-to-mid sized business, the expense of it all may bust your bottom line.
  • If you are the Project Manager for your team without dedicated IT support, this could be trouble.

    (It’s easier to raise children then to manage all of these systems.)

3) The Shortest Distance Between Two Points: Project Plan 365

If all you want to do is to collaborate with other folks sharing or creating Microsoft project data, then just download the free 30-day trial of either Project Plan 365 for Mac or Project Plan 365 for iOS. This gives you the flexibility to work on any Microsoft Project-created data file, regardless of your hardware or internet connection. Both apps allow you to do exactly the same thing: open, edit or create any Microsoft Project file (.MPP) with no conversions or imports from other odd formats, like .XML or .XLSX - or any other type of file where things can go wrong and mess with your precious project data. This is by far the “shortest distance between two points” for any Project Manager wanting to work on a Mac.

Current users of Microsoft Project will instinctively know how to use Project Plan 365, as the interface is virtually the same – no learning curve here to slow you down.

In addition, by subscribing to the Business (PMO) plan, project managers (especially those working in small-to-medium sized businesses) can augment their Microsoft Project experience as well, by using such Project Plan 365 features as real-time collaboration, portfolio and resource management and more. In short, a Project Management Office (PMO) can be set up on the cheap and within a few hours after your team subscribes to this plan.

PROS

  • The simplest solution for the stated problem.
  • The cheapest solution for the stated problem.
  • Adds even more to the experience of being a Microsoft Project user, and gives your team more capabilities as you roll out your projects.

CONS

  • None to speak of 🙂 

The Bottom Line...

The bottom line depends on how far you are willing to go, just to get to a Microsoft Project file, or to collaborate with your team who are all using the same set of Microsoft Project data. Must your team use Project Online / SharePoint / Project Server because your management team has made that edict? Well, we feel for you… perhaps a new Microsoft laptop is in your future, leaving your shiny new Mac in the dust. But if not, taking the shortcut (#3 above) is going to save you time and money: 

Road Taken...

1. The long road:

2. The winding road:

3. The shortcut:

Cost per user, per year (in USD)

Approximately $1000

Mega-bucks in Enterprise dollars!

$200

Which solves the problem? #1 yes, #2 not really and #3, sure thing! 

In addition to user cost savings per year, other intangibles are gained, such as the convenience of working on your project plans (or having someone else updating your plan) no matter where in the world you or anyone on your team is working (say on the plains of the Sudan, the beaches of Fiji or atop Mt. Everest) – you will always have a way to edit your Microsoft Project plans on your favorite Apple device.

Project Plan 365 also allows you to take Microsoft Project files and go well beyond what you can do within the Microsoft app; for example, with Project Plan 365 you can build a PMO on the cheap, manage and report on your entire portfolio of projects, and store your files in a private and secure cloud - without having to purchase expensive software servers or buy any more new hardware. 

Turbo-charging Your PM Tools for Construction

Turbo-charging Your PM Tools for Better Construction Productivity

According to Mckinsey Research, the number one laggard in global productivity for the past several decades has been the Construction Industry, which even falls well below the total economic average for just about everything. This dismal state of affairs comes on the eve of what is expected to be an infrastructure boon spanning the next few decades. One has to wonder: isn’t this the perfect time to revolutionize and retool? Yet a recent Economist report as well as a McKinsey Research study shows an industrial-size reluctance to make the move.

This reluctance to digitize and revolutionize the industry by turbo-charging industry software tools and methodologies is clearly holding us back and limiting our growth. Study after study tells us this. However, a shift in spending is starting to occur; this from the same study:

Clearly, the industry is starting to move towards productivity tools fit for the modern age. Are you? But what exactly are we moving towards, in terms of tools? What software innovations actually improve productivity? These are all valid questions to ask...

How Does a Good PM Tool Improve Productivity?

Unlike general business tools, project management software deals specifically with what, say, a construction manager would be most concerned with: costs / scope / schedule and of course quality with a little risk management thrown in. Tools like Microsoft Excel and many new “project management” websites cannot help us much in this regard, at least not without a lot of effort and expense.

However, tools like Microsoft Project and Oracle Primavera do just that; they help you balance costs over schedule over scope with ease and precision, which is just what you want to do in order to improve your productivity. These two heavy hitters have been around for decades, but they come with a high price tag and constrictions for the average construction manager. For example, with these two “top-tier” products, the project manager is constricted to working behind a desk, instead of on the job site where they might want to be. In addition, tools such as these can run into the dark side of margins and might not be affordable for small-to-midsize businesses. So better project-management software would have these important attributes:

  • Be able to juggle project costs, scope and schedule with ease.

  • Have built-in or automated methods for the construction industry.

  • Be portable enough to work on the job-site, and sharable across team members

  • Be relatively inexpensive, as not to negatively influence the bottom line.

The_triad_constraints
Project Planning Construction Projects
"Our survey revealed that more than 44 percent of respondents have adopted some type of digital technology, and planned adoption within the next three years is expected to reach 70 percent.”
McKinsey Research, 2018
Study
“The trade as a whole is reluctant to spend money on the sorts of technologies, from project-management software to mass production, that have revolutionized so many other industries”
The Economist, 2017
Report
“The construction sector has much to do…infuse digital technology, new materials, and advanced automation. Construction lags significantly behind other sectors in its use of digital tools and is slow to adopt new materials, methods, and technology”
McKinsey Research, 2018
Study

Introducing Project Plan 365: A Turbo Tool Built for Construction

Project Plan 365 is a project management tool that helps the construction manager do what they need to do; all without the heavy price tag of say a Microsoft Project installation. Project Plan 365 allows you juggle project costs, scope and schedules like a pro, and even allows you to take your plan out to the field - so you can collaborate & coordinate with your on-site teams.

With a Project Plan 365 schedule, you can clearly see factors causing delays or balance resources in real-time while communicating any changes to others that need to know. Even if you are already working with Microsoft Project files, you can open those in Project Plan 365 with no data conversion needed – just pop open the file and go, even if all you have on hand is a simple smartphone or tablet.

Project Planning Construction Projects Screen Capture
Sample Construction Project within Project Plan 365 for Mac

How Project Plan 365 Benefits the Construction Manager…

  • Project Plan 365 connects the head office with teams working on-site; in essence allowing team collaboration no matter where managers or workers are located.

  • Allows everyone to view the schedule in whatever format suits them: Gantt charts, calendars, data sheets, etc.

  • Project Plan 365 is driven by real numbers, making updating in real-time possible; never work from an old plan again!

  • Project Plan 365 is the most cost-effective tool in the industry, yet is compatible with the most expensive (Microsoft Project 2016 and Primavera P6).

How to Start Your Next Construction Project Plan…

  1. Download and install the Project Plan 365 trial for whatever platform or device that you prefer.

  2. a) Start a new plan, or b) open an existing plan (in MPP format) or c) use the built-in starter template called Commercial Construction

  3. Edit your plan and save to any convenient cloud location like Dropbox, OneDrive SharePoint, etc.

  4. For more help, see the Project Plan 365 support library or check out this case study video for the Construction Industry. Also available is the popular Quick Start video.

templates